- 重要な情報
- はじめに
- Datadog
- Datadog サイト
- DevSecOps
- AWS Lambda のサーバーレス
- エージェント
- インテグレーション
- コンテナ
- ダッシュボード
- アラート設定
- ログ管理
- トレーシング
- プロファイラー
- タグ
- API
- Service Catalog
- Session Replay
- Continuous Testing
- Synthetic モニタリング
- Incident Management
- Database Monitoring
- Cloud Security Management
- Cloud SIEM
- Application Security Management
- Workflow Automation
- CI Visibility
- Test Visibility
- Intelligent Test Runner
- Code Analysis
- Learning Center
- Support
- 用語集
- Standard Attributes
- ガイド
- インテグレーション
- エージェント
- OpenTelemetry
- 開発者
- 認可
- DogStatsD
- カスタムチェック
- インテグレーション
- Create an Agent-based Integration
- Create an API Integration
- Create a Log Pipeline
- Integration Assets Reference
- Build a Marketplace Offering
- Create a Tile
- Create an Integration Dashboard
- Create a Recommended Monitor
- Create a Cloud SIEM Detection Rule
- OAuth for Integrations
- Install Agent Integration Developer Tool
- サービスのチェック
- IDE インテグレーション
- コミュニティ
- ガイド
- API
- モバイルアプリケーション
- CoScreen
- Cloudcraft
- アプリ内
- Service Management
- インフラストラクチャー
- アプリケーションパフォーマンス
- APM
- Continuous Profiler
- データベース モニタリング
- Data Streams Monitoring
- Data Jobs Monitoring
- Digital Experience
- Software Delivery
- CI Visibility (CI/CDの可視化)
- CD Visibility
- Test Visibility
- Intelligent Test Runner
- Code Analysis
- Quality Gates
- DORA Metrics
- セキュリティ
- セキュリティの概要
- Cloud SIEM
- クラウド セキュリティ マネジメント
- Application Security Management
- AI Observability
- ログ管理
- Observability Pipelines(観測データの制御)
- ログ管理
- 管理
ワークフローの構築
選択した Datadog サイト () では Workflow Automation はサポートされていません。
You can create workflows or edit existing workflows from the Workflow Automation page. The page lists information about existing workflows, such as the workflow’s owner, the trigger type, the dates that each workflow was last modified and executed, and whether the workflow is published or not.
- Hover over a workflow for the options to delete, clone, or edit the permissions for the workflow.
- 自分が作成したワークフローだけを表示したい場合は、My workflows をトグルします。
ブループリントからワークフローを構築
- Click the Blueprints tab.
- 必要に応じて、検索バーを使用して、名前、カテゴリー、インテグレーションでブループリントのリストを絞り込むことができます。
- 使用したいブループリントを探し、クリックします。ワークフローキャンバスが表示されます。
- Create From Blueprint をクリックします。ワークフローキャンバスが更新され、新しく作成されたワークフローが表示されます。
- Enter a new name and description for the workflow.
- Optionally, select or enter tags you’d like to apply to the workflow. For more information on Datadog tags, see Getting Started with Tags.
- Optionally, select any related services to apply to the workflow.
- Optionally, select teams to associate with the workflow. If a team doesn’t exist, you can enter a name to create it.
- Click Save to apply your changes.
- 更新が必要なワークフローステップには、感嘆符が表示されます。修正したい各ワークフローステップをクリックし、Configure タブの空白フィールドを埋めます。
- ワークフローの修正が完了したら、Run をクリックしてワークフローをテストします。
- ワークフローを公開する準備ができたら、Publish をクリックします。公開されたワークフローは、ワークフローの実行に基づいてコストが発生します。詳細は、Datadog の料金ページを参照してください。
Create a workflow with AI
何から始めたらよいかわからない場合は、AI でワークフローを自動生成することができます。ワークフローを生成するには
- Workflow Automation ページから、New Workflow をクリックします。
- Click Build with Bits AI.
- ワークフローの詳細を入力します。使用するインテグレーションとアクションを指定します。
- 上向き矢印 (↑) をクリックしてアプリを作成します。
カスタムワークフローの作成
To create a workflow, click New workflow on the Workflow Automation page.
To configure your workflow:
- In the workflow configuration panel, enter a Name for your workflow.
- Optionally, select or enter tags you’d like to apply to the workflow. For more information on Datadog tags, see Getting Started with Tags.
- Optionally, select any related services to apply to the workflow.
- Optionally, select teams to associate with the workflow. If a team doesn’t exist, you can enter a name to create it.
- ワークフローで入力または出力パラメーターを使用する場合は、それらを入力してください。
- Click Save to apply your changes.
If you’re not sure about your workflow configuration, you can return to the panel later by clicking anywhere on the workflow canvas.
ワークフロービルダーでワークフローを構築する
- If your workflow requires a trigger, click Add Trigger. For more information, see Trigger a Workflow.
- Click Add Step to start adding steps to your workflow.
- 検索バーを使ってアクションを検索するか、インテグレーションとその関連アクションをブラウズして、探しているアクションを見つけます。アクションをクリックすると、ワークフローキャンバスのステップに追加されます。
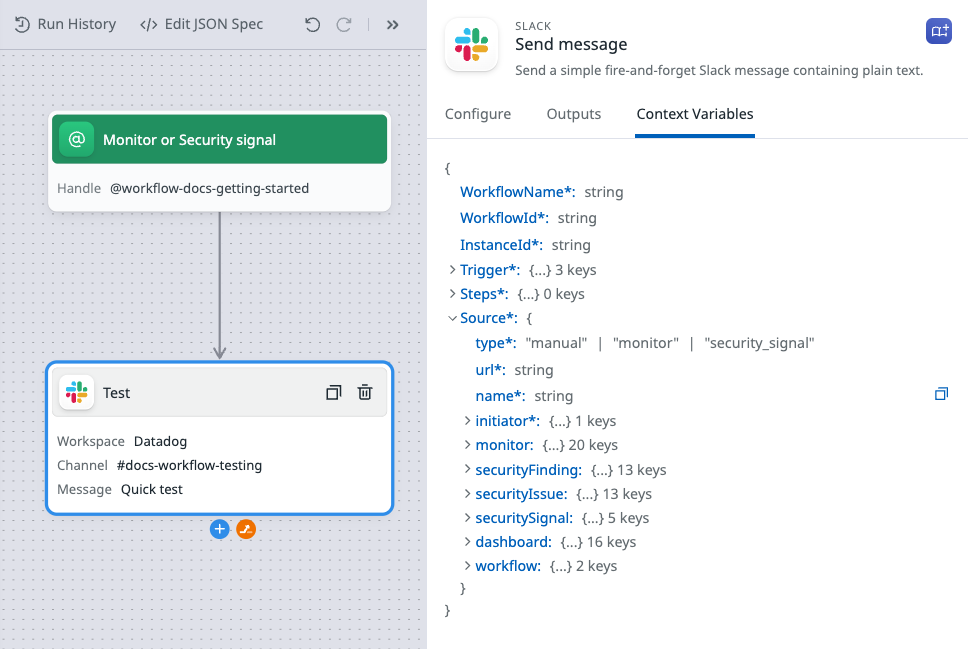
- ワークフローキャンバスでステップをクリックすると、そのステップを構成したり、出力やコンテキスト変数を表示したりすることができます。出力やコンテキスト変数の詳細については、コンテキスト変数を参照してください。
- After you’ve configured the step, click either the AI icon or the plus icon (+) to add another step, or save the workflow if you’re done.
- ワークフローを公開する準備ができたら、Publish をクリックします。公開されたワークフローは、ワークフローの実行に基づいてコストが発生します。詳細は、Datadog の料金ページを参照してください。
ワークフロー上のステップをクリックすることで、いつでも編集することができます。ワークフロー上のステップをクリックしてドラッグすると、ステップを並べ替えることができます。
Test a step
To ensure a step functions as desired without having to run the entire workflow, you can test the step independently.
To test a workflow step:
- Click Test in the step Inputs section.
- Optionally, adjust the step configuration. If your step uses output variables from a previous step, enter some hardcoded test data for the step to use.
- Click Test to test the action.
- When you’re finished testing the step, click Use in configuration to use your new configuration in the workflow, or close the screen to return to the workflow without saving your test configuration.
Testing is not available for branching and logic actions. To test a JavaScript function or expression action that uses output variables from a previous step, comment out the variables in your code and replace them with test data. For more information, see Testing expressions and functions.
ワークフローの公開
スケジュールされたワークフローおよびトリガーされたワークフローは、公開するまで自動的にトリガーされません。ワークフローを公開するには、ワークフローのページから Publish をクリックします。
公開されたワークフローは、ワークフローの実行に基づいてコストが発生します。詳細は、Datadog の料金ページを参照してください。
コンテキスト変数
有用なワークフローを作成するためには、あるステップから別のステップにデータを渡したり、ワークフローのトリガーソースからのデータで動作するステップを構成することが必要になることがあります。このようなデータ補間は、コンテキスト変数で行うことができます。
- ワークフロー変数は、現在のワークフローに関する情報を提供します。
WorkflowName: ワークフローの名前。WorkflowId: ワークフローの ID。InstanceId: ワークフローの実行インスタンスの ID。
- 一部のステップにはステップ出力変数が組み込まれており、そのステップからワークフロー内の後続のステップにデータを渡すことができるようになっています。
- トリガー変数は、トリガーとなるイベントによってワークフローに渡されます。
- ソースオブジェクト変数は、トリガーとなるイベントによってワークフローに渡されます。
各ステップの Context Variables タブには、そのステップで利用可能なすべてのコンテキスト変数のマップが表示されます。
二重中括弧 ({{) で囲んで、ステップ内のコンテキスト変数にアクセスします。コンテキスト変数内のフィールドにアクセスするには、ハンドルバー式構文を使います。
ステップ出力変数
ステップによっては、ワークフロー内の後続のステップで利用可能な出力を作成するものもあります。構文 Steps.<step_name>.<variable> を使ってステップ変数にアクセスします。例えば、GitHub のプルリクエストステータスステップ (Get_pull_request_status) からプルリクエストステータス変数 (state) を取得するには、次のコンテキスト変数を使用します。
{{ Steps.Get_pull_request_status.state }}
探している変数がわからない場合、Datadog は入力中に既存のステップの出力を提案します。また、Context Variables タブで利用可能な変数のリストを参照することもできます。
入力パラメーター
Input parameters are immutable key-value pairs that you can use to pass data into a workflow. You can use input parameters in workflows that:
- ダッシュボードなどから手動でトリガーされる。
- モニターやセキュリティシグナル通知ルールなどのメンショントリガーを使用する。
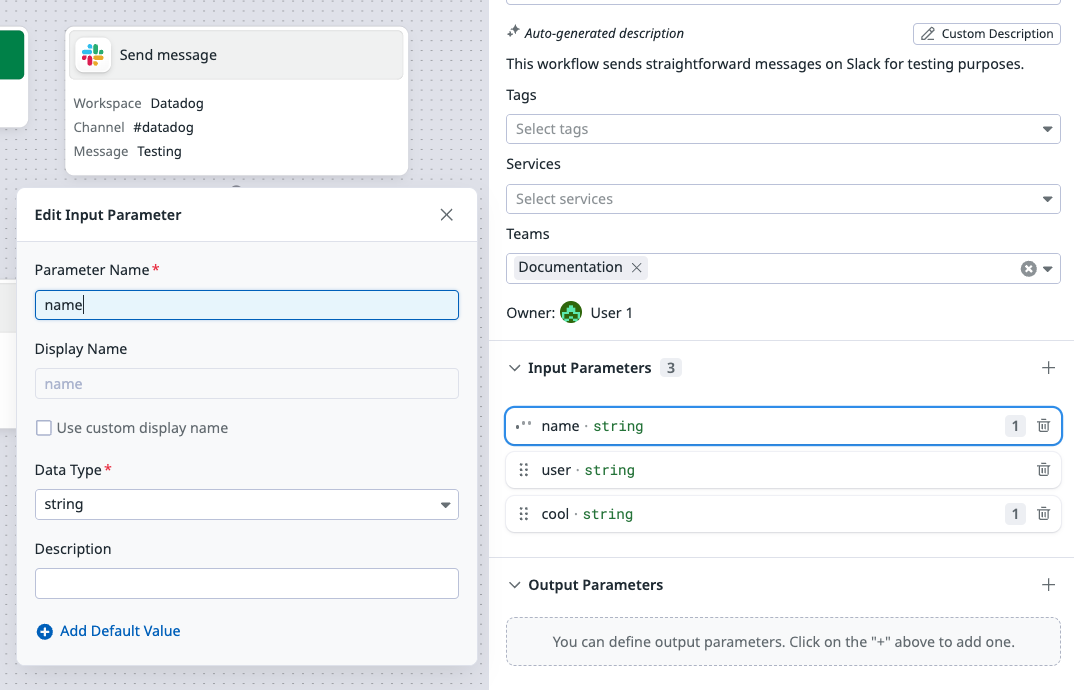
入力パラメーターを追加するには
- ワークフローキャンバスをクリックします。
- Input Parameters の横にある + アイコンをクリックします。
- パラメーターのパラメーター名、データタイプ、説明を追加します。表示名はパラメーター名から自動的に生成されます。カスタマイズする場合は、Use custom display name ボックスをチェックします。表示名はパラメーターの読みやすい名前であり、パラメーター名はワークフローのステップでパラメーターを参照するために使用されます。
- オプションで、パラメーターのデフォルト値を追加します。デフォルト値を追加した場合、パラメーターは実行時にオプションとなります。
ステップ内の入力パラメーターを参照するには、{{ Trigger.<parameter name>}} という構文を使用します。例えば、user という名前の入力パラメーターを参照するには、{{Trigger.user}} を使用します。
Input Parameters セクションには、既存のすべての入力パラメーターの名前とカウンターが表示されます。カウンターにカーソルを合わせると、そのパラメーターを使用しているステップを確認できます。
暗黙の入力パラメーター (ワークフロー内に存在しないパラメーター) を追加するには、ワークフローのステップに {{ Trigger.<parameter name> }} 構文を使用して入力します。次にワークフローを保存すると、パラメーターを明示的パラメーターに変換するためのダイアログが表示されます。ワークフローのトリガーについて詳しくは、ワークフローのトリガーを参照してください。
既存の入力パラメーターを探している場合は、{{ Trigger. と入力して、候補として表示されるかどうかを確認します。また、Context Variables タブで利用可能なパラメーターの一覧を確認することもできます。
ソースオブジェクト変数
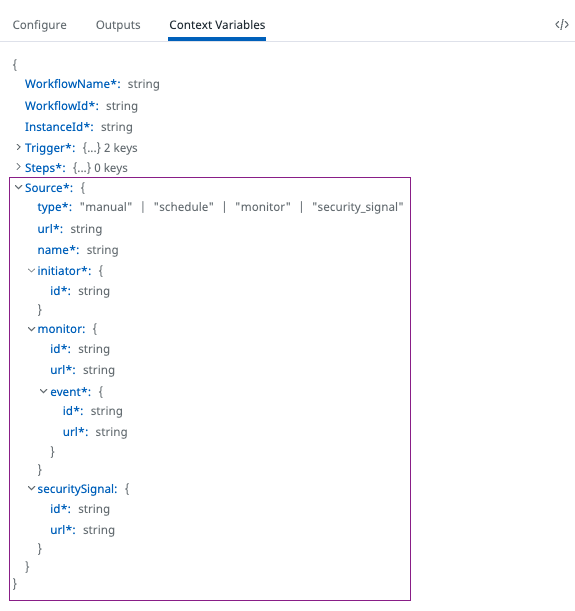
ソースオブジェクト変数は、トリガーイベントのプロパティで、実行時に解決されます。ワークフローで利用可能な変数は、ワークフローインスタンスを開始したトリガーのタイプに依存します。例えば、ワークフローインスタンスがモニターによってトリガーされた場合、モニター ID 変数は {{Source.monitor.id}} を使って利用することができます。もし、ワークフローがセキュリティシグナル検出または通知ルールによってトリガーされた場合、シグナル ID は {{Source.securitySignal.id}} を使用して利用可能です。
ソースオブジェクトのすべての変数が Context Variables タブに表示されます。
Workflow notifications
You can configure your workflow to send you a notification on success or failure. The following integrations are supported:
- Slack
- Microsoft Teams
- PagerDuty
To add a notification:
- In the workflow configuration panel, scroll down to the Notifications section.
- To add a notification if the workflow succeeds:
- Click the plus (
+) icon next to Notify on success. - Select the integration that you want to use for notifications.
- Complete the required fields for the specified integration.
- Save をクリックしてワークフローを保存します。
- Click the plus (
- To add a notification if the workflow fails:
- Click the plus (
+) icon next to Notify on failure. - Select the integration that you want to use for notifications.
- Complete the required fields for the specified integration.
- Save をクリックしてワークフローを保存します。
- Click the plus (
Error handling
You can specify the number of times you want your workflow to retry a failed step, and at what interval, before moving on to an optional error path. If no error path is present, the workflow terminates after all retries are exhausted.
Retries
To configure retries for a step:
- ワークフローキャンバスのステップをクリックします。
- In the Retries section, adjust the Interval and Max retries values.
- ワークフローを保存して、変更を適用します。
Add an error path
You can add an error path for the workflow to follow if it encounters an error.
To add an error path:
- Hover over the step where you’d like to add an error path.
- Click and drag the Error path icon to place a new error path on the canvas.
- Select a workflow step to add to the error path.
- After configuring your step, you can add more steps to an error path and even merge your error path back into the main workflow path.
- When you’re done configuring your error path steps, click Save to apply your changes.
Wait until condition
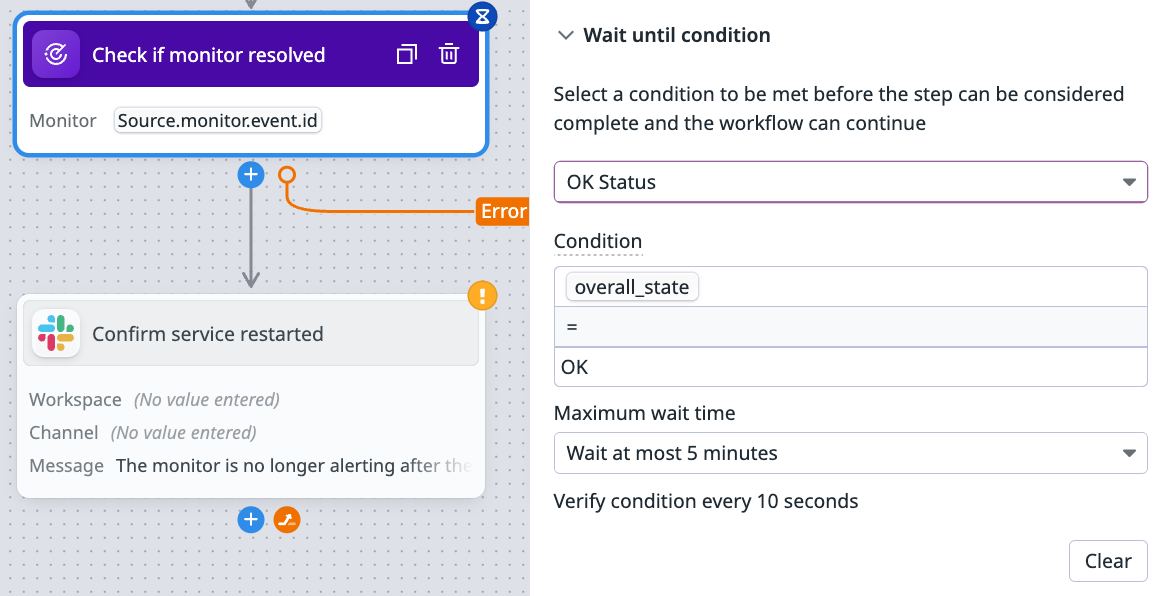
Some actions allow you to add a condition that must be met before a workflow can mark a step as complete and continue.
To add a condition:
- ワークフローキャンバスのステップをクリックします。
- In the Wait until condition section, use the dropdown to select a preconfigured condition, or select Configure custom wait condition and build your own conditional.
- The list of available preconfigured conditions depends on the action.
- Conditional statement variables can be either a String, a Number, a Boolean, or a step output variable.
- Only the current step’s output variables can be used in a custom conditional statement.
- Enter a maximum wait time for the workflow. If the condition is not met in time, the step fails.
JSON でワークフローを編集する
ワークフローのページで Edit JSON Spec をクリックすると、JSON でワークフローを編集することができます。また、JSON エディターでは、以下のことが可能です。
- Format JSON: JSON を美しくします。
- Export JSON: ワークフローをダウンロードします。
参考資料
お役に立つドキュメント、リンクや記事:
Do you have questions or feedback? Join the #workflows channel on the Datadog Community Slack.


