- Essentials
- Getting Started
- Datadog
- Datadog Site
- DevSecOps
- Serverless for AWS Lambda
- Agent
- Integrations
- Containers
- Dashboards
- Monitors
- Logs
- APM Tracing
- Profiler
- Tags
- API
- Service Catalog
- Session Replay
- Continuous Testing
- Synthetic Monitoring
- Incident Management
- Database Monitoring
- Cloud Security Management
- Cloud SIEM
- Application Security Management
- Workflow Automation
- CI Visibility
- Test Visibility
- Test Impact Analysis
- Code Analysis
- Learning Center
- Support
- Glossary
- Standard Attributes
- Guides
- Agent
- Integrations
- OpenTelemetry
- Developers
- Authorization
- DogStatsD
- Custom Checks
- Integrations
- Create an Agent-based Integration
- Create an API Integration
- Create a Log Pipeline
- Integration Assets Reference
- Build a Marketplace Offering
- Create a Tile
- Create an Integration Dashboard
- Create a Recommended Monitor
- Create a Cloud SIEM Detection Rule
- OAuth for Integrations
- Install Agent Integration Developer Tool
- Service Checks
- IDE Plugins
- Community
- Guides
- Administrator's Guide
- API
- Datadog Mobile App
- CoScreen
- Cloudcraft
- In The App
- Dashboards
- Notebooks
- DDSQL Editor
- Sheets
- Monitors and Alerting
- Infrastructure
- Metrics
- Watchdog
- Bits AI
- Service Catalog
- API Catalog
- Error Tracking
- Service Management
- Infrastructure
- Application Performance
- APM
- Continuous Profiler
- Database Monitoring
- Data Streams Monitoring
- Data Jobs Monitoring
- Digital Experience
- Real User Monitoring
- Product Analytics
- Synthetic Testing and Monitoring
- Continuous Testing
- Software Delivery
- CI Visibility
- CD Visibility
- Test Optimization
- Code Analysis
- Quality Gates
- DORA Metrics
- Security
- Security Overview
- Cloud SIEM
- Cloud Security Management
- Application Security Management
- AI Observability
- Log Management
- Observability Pipelines
- Log Management
- Administration
Enable SSO with Okta
Enabling Single Sign-On (SSO) with Okta as your identity provider allows you to simplify authentication and login access to Cloudcraft.
This article helps you set up SSO if your identity provider is Okta. For other identity providers, see the following articles:
For general information on using SSO with Cloudcraft, check out Enable SSO in Your Account.
Setting Up SAML/SSO
Only the account owner can configure the SAML SSO feature. If the account owner is unable to configure SSO, contact the Cloudcraft support team to enable this feature.
- In Cloudcraft, navigate to User > Security & SSO.
- The details you need to create a new application with Okta can be found in the Cloudcraft service provider details section.
- Log in to Okta as an administrator.
- Click Application.
- Click Add Application, then click Create New App.
- Select SAML 2.0 as the sign on method and click Create.
- Enter Cloudcraft as the name of the application and leave the remaining values as-is.
- Click Next.
If you prefer to use an app logo, you can use this logo which adheres to Okta's size restrictions.
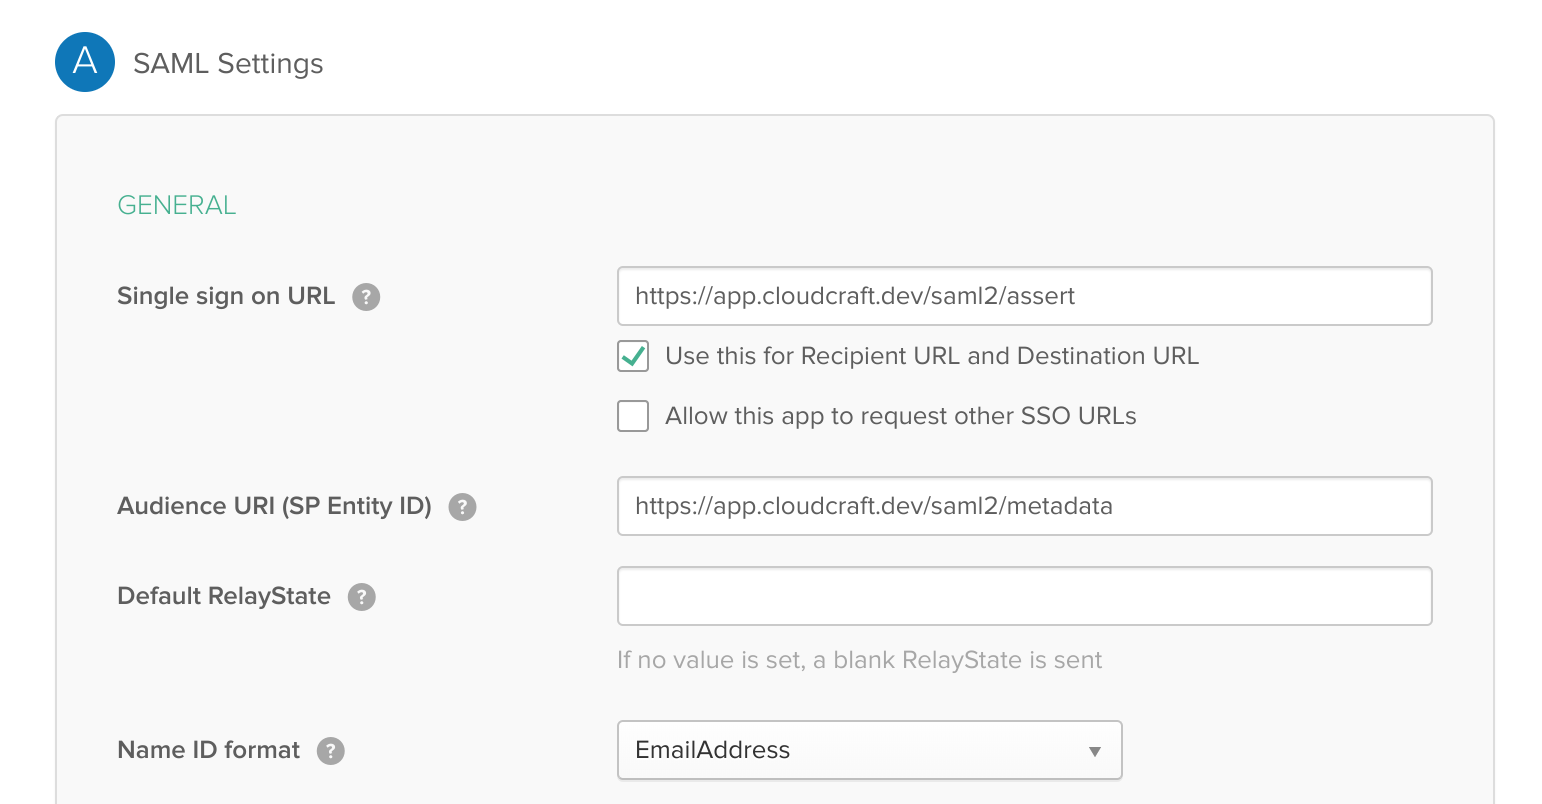
- Next, configure the SAML integration using the details provided by Cloudcraft. The fields are mapped as follows, with the first one being the label in Okta, and the second one being the label at Cloudcraft.
- Single sign on URL: Assertion Consumer Service URL
- Audience URI: Service Provider Entity ID
- On the Name ID format dropdown, select EmailAddress.
- Proceed to the next screen and select I’m an Okta customer adding an internal app to answer the question “Are you a customer or partner?”.
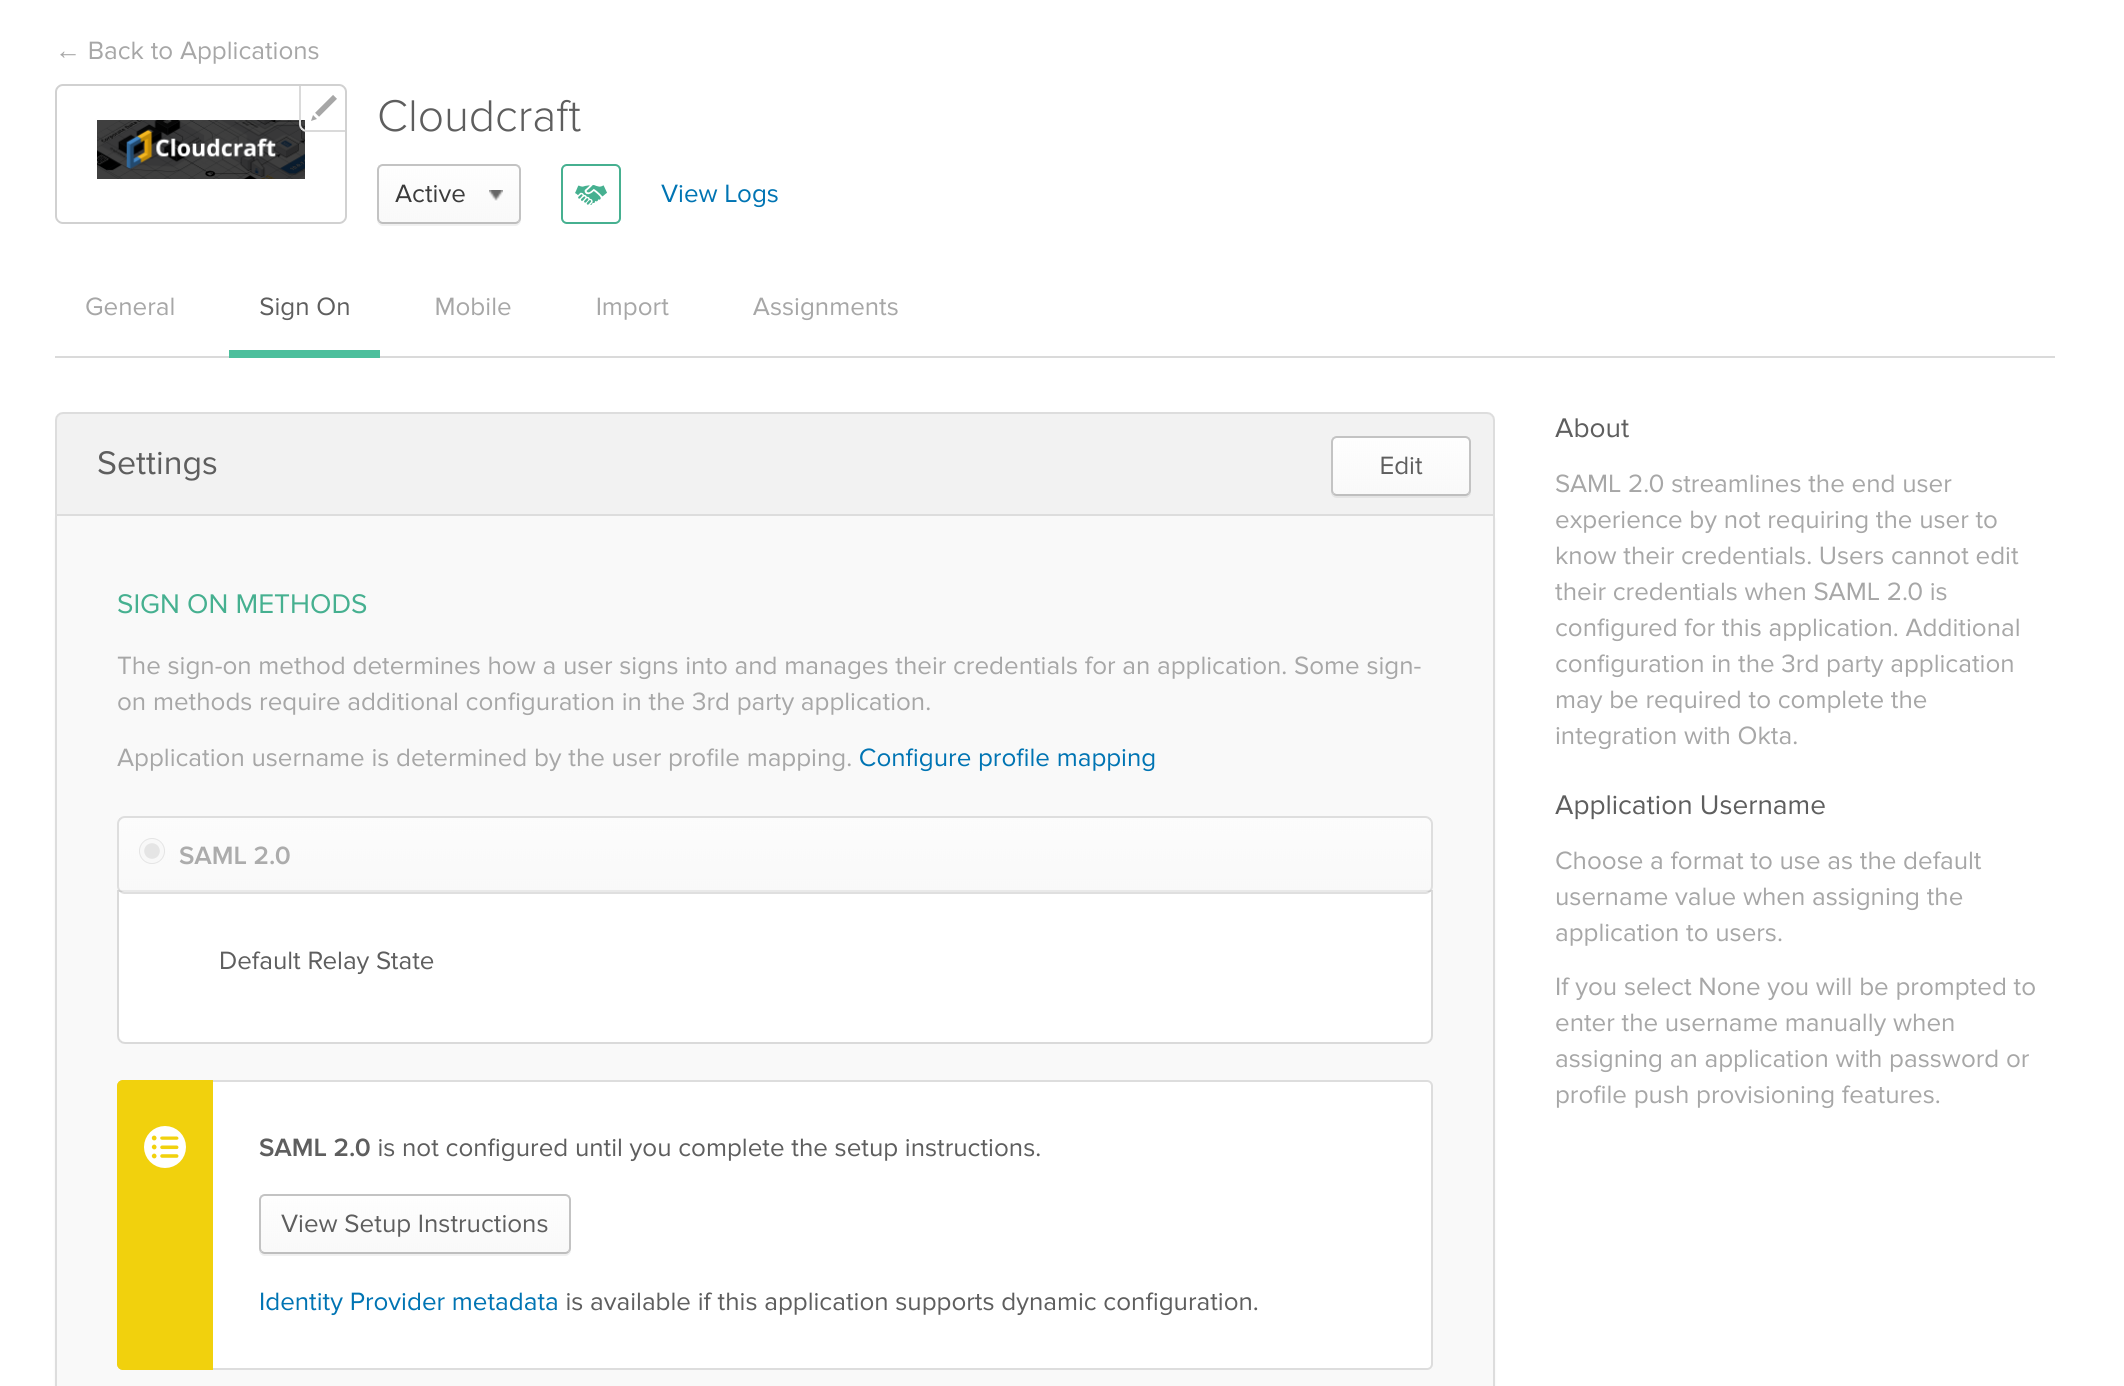
- Click Finish. Now that the application is set up in Okta, you can assign your users to it and once you’re done, navigate to the Sign On tab.
- Under the View Setup Instructions button, click the blue link to download the file required for upload to Cloudcraft.
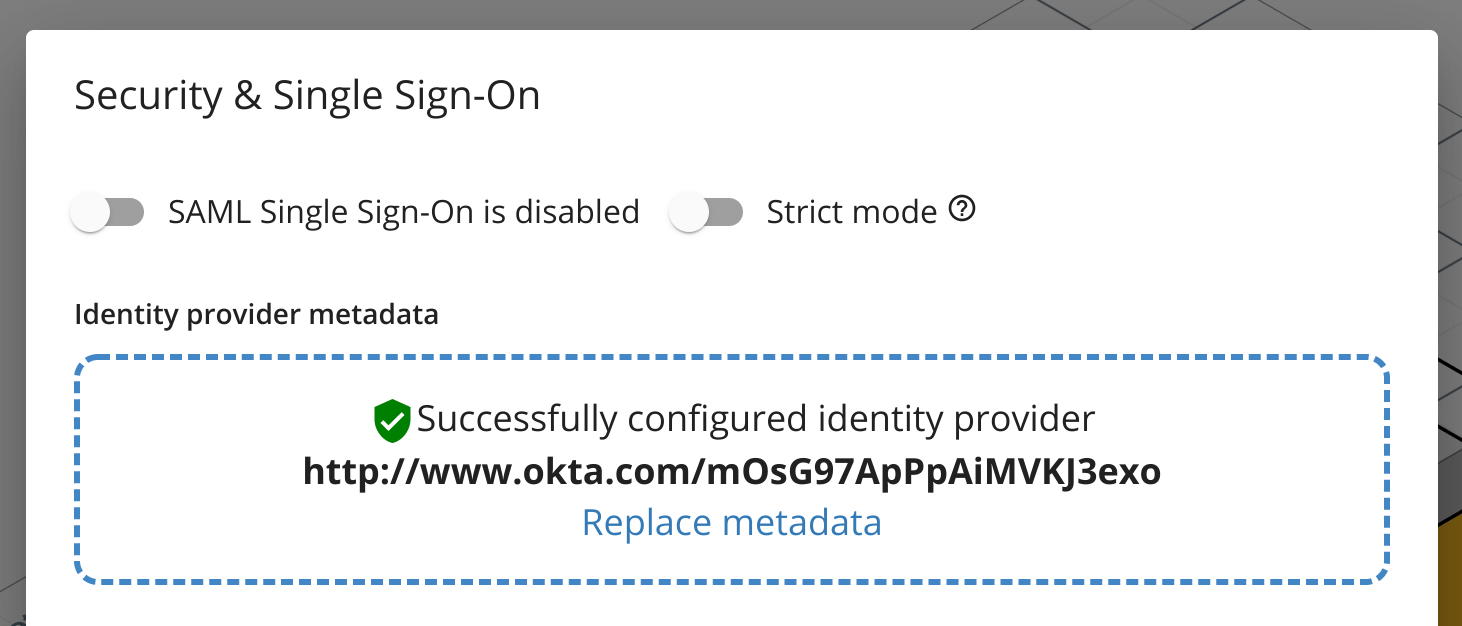
- Navigate back to Cloudcraft and upload your config file.
- Toggle the SAML Single Sign-On is enabled option.
- If you prefer to have your users access Cloudcraft only via your identity provider, enable the Strict mode option.


