- Essentials
- Getting Started
- Datadog
- Datadog Site
- DevSecOps
- Serverless for AWS Lambda
- Agent
- Integrations
- Containers
- Dashboards
- Monitors
- Logs
- APM Tracing
- Profiler
- Tags
- API
- Service Catalog
- Session Replay
- Continuous Testing
- Synthetic Monitoring
- Incident Management
- Database Monitoring
- Cloud Security Management
- Cloud SIEM
- Application Security Management
- Workflow Automation
- CI Visibility
- Test Visibility
- Test Impact Analysis
- Code Analysis
- Learning Center
- Support
- Glossary
- Standard Attributes
- Guides
- Agent
- Integrations
- OpenTelemetry
- Developers
- Authorization
- DogStatsD
- Custom Checks
- Integrations
- Create an Agent-based Integration
- Create an API Integration
- Create a Log Pipeline
- Integration Assets Reference
- Build a Marketplace Offering
- Create a Tile
- Create an Integration Dashboard
- Create a Recommended Monitor
- Create a Cloud SIEM Detection Rule
- OAuth for Integrations
- Install Agent Integration Developer Tool
- Service Checks
- IDE Plugins
- Community
- Guides
- Administrator's Guide
- API
- Datadog Mobile App
- CoScreen
- Cloudcraft
- In The App
- Dashboards
- Notebooks
- DDSQL Editor
- Sheets
- Monitors and Alerting
- Infrastructure
- Metrics
- Watchdog
- Bits AI
- Service Catalog
- API Catalog
- Error Tracking
- Service Management
- Infrastructure
- Application Performance
- APM
- Continuous Profiler
- Database Monitoring
- Data Streams Monitoring
- Data Jobs Monitoring
- Digital Experience
- Real User Monitoring
- Product Analytics
- Synthetic Testing and Monitoring
- Continuous Testing
- Software Delivery
- CI Visibility
- CD Visibility
- Test Optimization
- Code Analysis
- Quality Gates
- DORA Metrics
- Security
- Security Overview
- Cloud SIEM
- Cloud Security Management
- Application Security Management
- AI Observability
- Log Management
- Observability Pipelines
- Log Management
- Administration
IP Allowlist
Get Started with IP Allowlist
The IP allowlist feature is available for customers on an enterprise plan only. Request access by contacting support.
Request AccessOverview
The IP allowlist controls which networks can be used to access your data in Datadog. By limiting allowed networks, you can protect your resources from data exfiltration and insider threats.
When the IP allowlist is enabled, only IP addresses or CIDR ranges in the allowlist can access the Datadog API and UI.
Blocked and allowed resources
If a user’s IP is not contained in the IP allowlist, they are effectively blocked from accessing and using:
- Datadog’s web UI
- Datadog’s public API, including both documented and unpublished endpoints
- Datadog’s mobile apps (iOS, Android)
- Third-party integrations and applications that access Datadog through OAuth
The IP allowlist feature does not block access to the following:
- Data ingest endpoints to which the Agent sends data, such as metrics, traces, and logs
- The validate API key endpoint, which the Agent uses before submitting data
- Agent flare submission
- Public dashboards
Applications and integrations that submit telemetry from the Agent (metrics, traces, and logs), and those that use an API key provided by the user, are not impacted by the IP allowlist. Datadog recommends utilizing the Audit Trail to monitor for IP addresses from third party applications and integrations.
To allow mobile app clients to connect to Datadog when the IP allowlist feature is enabled, Datadog recommends that the mobile devices connect to an allowed network range via VPN.
Functionality
Only users with the Org Management permission can configure the IP allowlist.
With the IP allowlist API or UI, you can:
- Check the status of the IP allowlist. Whether the IP allowlist is on or off determines whether your organization is restricting requests by IP address allowlist membership.
- Turn the IP allowlist on and off.
- Show the IP addresses (as CIDR ranges) that are covered by your IP allowlist.
- Add IP addresses (IPv4 or IPv6) or CIDR ranges to the IP allowlist with an optional note.
- Edit the note for an IP address already in the IP allowlist.
- Delete a single entry from the IP allowlist.
- Replace the whole IP allowlist with new entries (only available through the API).
Lockout prevention
When you enable or modify the IP allowlist, the system enforces constraints to make sure you can still access your data:
- At least one entry in the IP allowlist contains your current IP
- The allowlist contains at least one entry
Managing the IP allowlist in the UI
Note: The IP allowlist page only appears in the UI if your Datadog organization has the feature turned on.
To find the IP allowlist UI:
- Navigate to Organization Settings from your account menu.
- Under Security, select IP Allowlist.
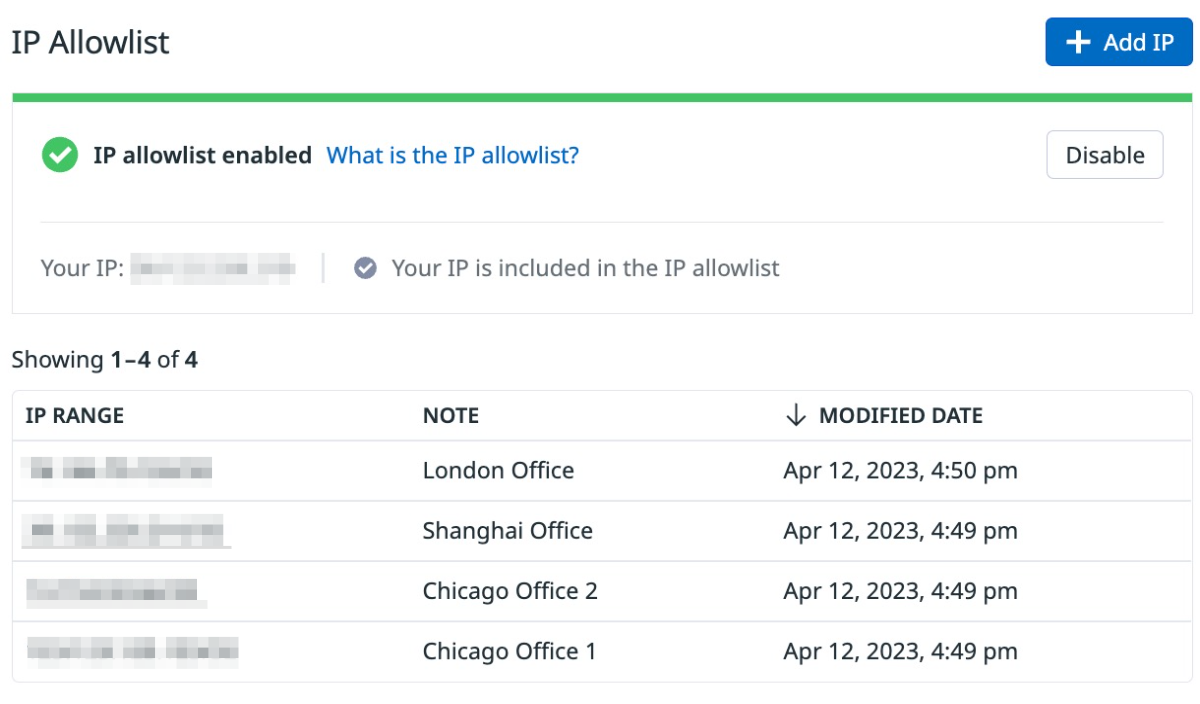
The IP allowlist table lists the CIDR ranges contained in the IP allowlist.
Enable and disable the IP allowlist
A banner at the top of the page shows the enabled or disabled status of the IP allowlist. It also shows your IP and whether that IP is in the allowlist.
To toggle the IP allowlist status, click the Enable or Disable button.
Add IP addresses or CIDR ranges
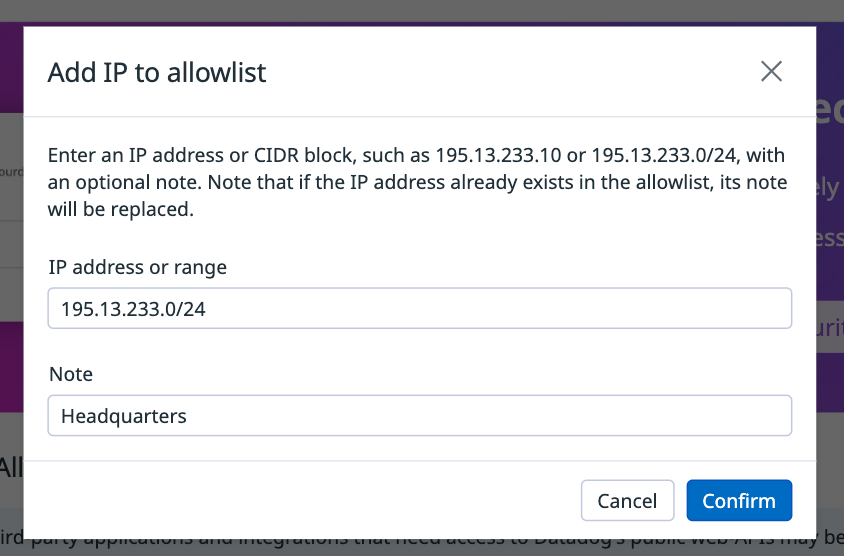
- Click the Add IP button at the top right of the page.
- Enter a valid IP address or CIDR range.
- Optionally, add a note, for example, to remind yourself why you are allowing access to certain addresses.
- Click Confirm.
Edit IP addresses or CIDR ranges
- In the IP allowlist table, hover over the row you wish to edit.
- Click the pencil (Edit) icon.
- Change the descriptive Note text.
- Click Confirm.
Delete IP addresses or CIDR ranges
- In the IP allowlist table, hover over the row you wish to delete.
- Click the trash can (Delete) icon and confirm you want to delete it.
Managing the IP allowlist programmatically
To manage the IP allowlist through the API, see the IP Allowlist API documentation.
See the ip_allowlist resource to manage the IP allowlist in Terraform.


