- Esenciales
- Empezando
- Datadog
- Sitio web de Datadog
- DevSecOps
- Serverless para Lambda AWS
- Agent
- Integraciones
- Contenedores
- Dashboards
- Monitores
- Logs
- Rastreo de APM
- Generador de perfiles
- Etiquetas (tags)
- API
- Catálogo de servicios
- Session Replay
- Continuous Testing
- Monitorización Synthetic
- Gestión de incidencias
- Monitorización de bases de datos
- Cloud Security Management
- Cloud SIEM
- Application Security Management
- Workflow Automation
- CI Visibility
- Test Visibility
- Intelligent Test Runner
- Análisis de código
- Centro de aprendizaje
- Compatibilidad
- Glosario
- Atributos estándar
- Guías
- Agent
- Uso básico del Agent
- Arquitectura
- IoT
- Plataformas compatibles
- Recopilación de logs
- Configuración
- Configuración remota
- Automatización de flotas
- Actualizar el Agent
- Solucionar problemas
- Detección de nombres de host en contenedores
- Modo de depuración
- Flare del Agent
- Estado del check del Agent
- Problemas de NTP
- Problemas de permisos
- Problemas de integraciones
- Problemas del sitio
- Problemas de Autodiscovery
- Problemas de contenedores de Windows
- Configuración del tiempo de ejecución del Agent
- Consumo elevado de memoria o CPU
- Guías
- Seguridad de datos
- Integraciones
- OpenTelemetry
- Desarrolladores
- Autorización
- DogStatsD
- Checks personalizados
- Integraciones
- Crear una integración basada en el Agent
- Crear una integración API
- Crear un pipeline de logs
- Referencia de activos de integración
- Crear una oferta de mercado
- Crear un cuadro
- Crear un dashboard de integración
- Crear un monitor recomendado
- Crear una regla de detección Cloud SIEM
- OAuth para integraciones
- Instalar la herramienta de desarrollo de integraciones del Agente
- Checks de servicio
- Complementos de IDE
- Comunidad
- Guías
- API
- Aplicación móvil de Datadog
- CoScreen
- Cloudcraft
- En la aplicación
- Dashboards
- Notebooks
- Editor DDSQL
- Hojas
- Monitores y alertas
- Infraestructura
- Métricas
- Watchdog
- Bits AI
- Catálogo de servicios
- Catálogo de APIs
- Error Tracking
- Gestión de servicios
- Objetivos de nivel de servicio (SLOs)
- Gestión de incidentes
- De guardia
- Gestión de eventos
- Gestión de casos
- Workflow Automation
- App Builder
- Infraestructura
- Universal Service Monitoring
- Contenedores
- Serverless
- Monitorización de red
- Coste de la nube
- Rendimiento de las aplicaciones
- APM
- Términos y conceptos de APM
- Instrumentación de aplicación
- Recopilación de métricas de APM
- Configuración de pipelines de trazas
- Correlacionar trazas (traces) y otros datos de telemetría
- Trace Explorer
- Observabilidad del servicio
- Instrumentación dinámica
- Error Tracking
- Seguridad de los datos
- Guías
- Solucionar problemas
- Continuous Profiler
- Database Monitoring
- Gastos generales de integración del Agent
- Arquitecturas de configuración
- Configuración de Postgres
- Configuración de MySQL
- Configuración de SQL Server
- Configuración de Oracle
- Configuración de MongoDB
- Conexión de DBM y trazas
- Datos recopilados
- Explorar hosts de bases de datos
- Explorar métricas de consultas
- Explorar ejemplos de consulta
- Solucionar problemas
- Guías
- Data Streams Monitoring
- Data Jobs Monitoring
- Experiencia digital
- Real User Monitoring
- Monitorización del navegador
- Configuración
- Configuración avanzada
- Datos recopilados
- Monitorización del rendimiento de páginas
- Monitorización de signos vitales de rendimiento
- Monitorización del rendimiento de recursos
- Recopilación de errores del navegador
- Rastrear las acciones de los usuarios
- Señales de frustración
- Error Tracking
- Solucionar problemas
- Monitorización de móviles y TV
- Plataforma
- Session Replay
- Exploración de datos de RUM
- Feature Flag Tracking
- Error Tracking
- Guías
- Seguridad de los datos
- Monitorización del navegador
- Análisis de productos
- Pruebas y monitorización de Synthetics
- Continuous Testing
- Entrega de software
- CI Visibility
- CD Visibility
- Test Visibility
- Configuración
- Tests en contenedores
- Búsqueda y gestión
- Explorador
- Monitores
- Flujos de trabajo de desarrolladores
- Cobertura de código
- Instrumentar tests de navegador con RUM
- Instrumentar tests de Swift con RUM
- Detección temprana de defectos
- Reintentos automáticos de tests
- Correlacionar logs y tests
- Guías
- Solucionar problemas
- Intelligent Test Runner
- Code Analysis
- Quality Gates
- Métricas de DORA
- Seguridad
- Información general de seguridad
- Cloud SIEM
- Cloud Security Management
- Application Security Management
- Observabilidad de la IA
- Log Management
- Observability Pipelines
- Gestión de logs
- Administración
- Gestión de cuentas
- Seguridad de los datos
- Sensitive Data Scanner
- Ayuda
Add Custom Metadata with Reference Tables
This page is not yet available in Spanish. We are working on its translation.
If you have any questions or feedback about our current translation project, feel free to reach out to us!
If you have any questions or feedback about our current translation project, feel free to reach out to us!
Overview
Reference Tables allow you to combine metadata with information already in Datadog. You can define new entities like customer details, service names and information, or IP addresses by uploading a CSV file containing a table of information. The entities are represented by a primary key in a Reference Table and the associated metadata.
Validation rules
Reference Table names and column headers are validated using the following naming conventions and automatically updated or normalized, if necessary.
| Rule | Normalization |
|---|---|
| Names and headers can not be duplicated. | Duplicated names are enumerated. For example, if fileid is used twice as a name, the first instance becomes fileid1 and the second instance becomes fileid2. If a name or header is enumerated and it exceeds the 56 characters, it is rejected and needs to be renamed. |
| Names and headers cannot contain uppercase letters. | Names with uppercase letters are converted to lowercase. This conversion may result in duplicate names, which are then enumerated. For example, Fileid and FileID both become fileid and are enumerated to fileid1 and fileid2 respectively. |
| Names and headers cannot contain spaces. | Spaces other than leading and trailing spaces are replaced with underscore _ characters. Leading and trailing spaces are removed. For example, customer names is replaced with customer_names. |
| Names and headers must start with a lowercase letter. | Uppercase characters are converted to lowercase. Non-letter leading characters are removed. For example, 23Two_three becomes two_three. |
Names and headers support only lowercase letters, numbers, and the _ character. | Unsupported characters are replaced with the underscore _ character, unless it breaks one of the rules above. In that case, the unsupported characters are normalized by the respective rule. |
| Names and headers must be 56 characters or less. | No normalization is done. Names and headers that have more than 56 characters are rejected and need to be renamed. |
Create a Reference Table
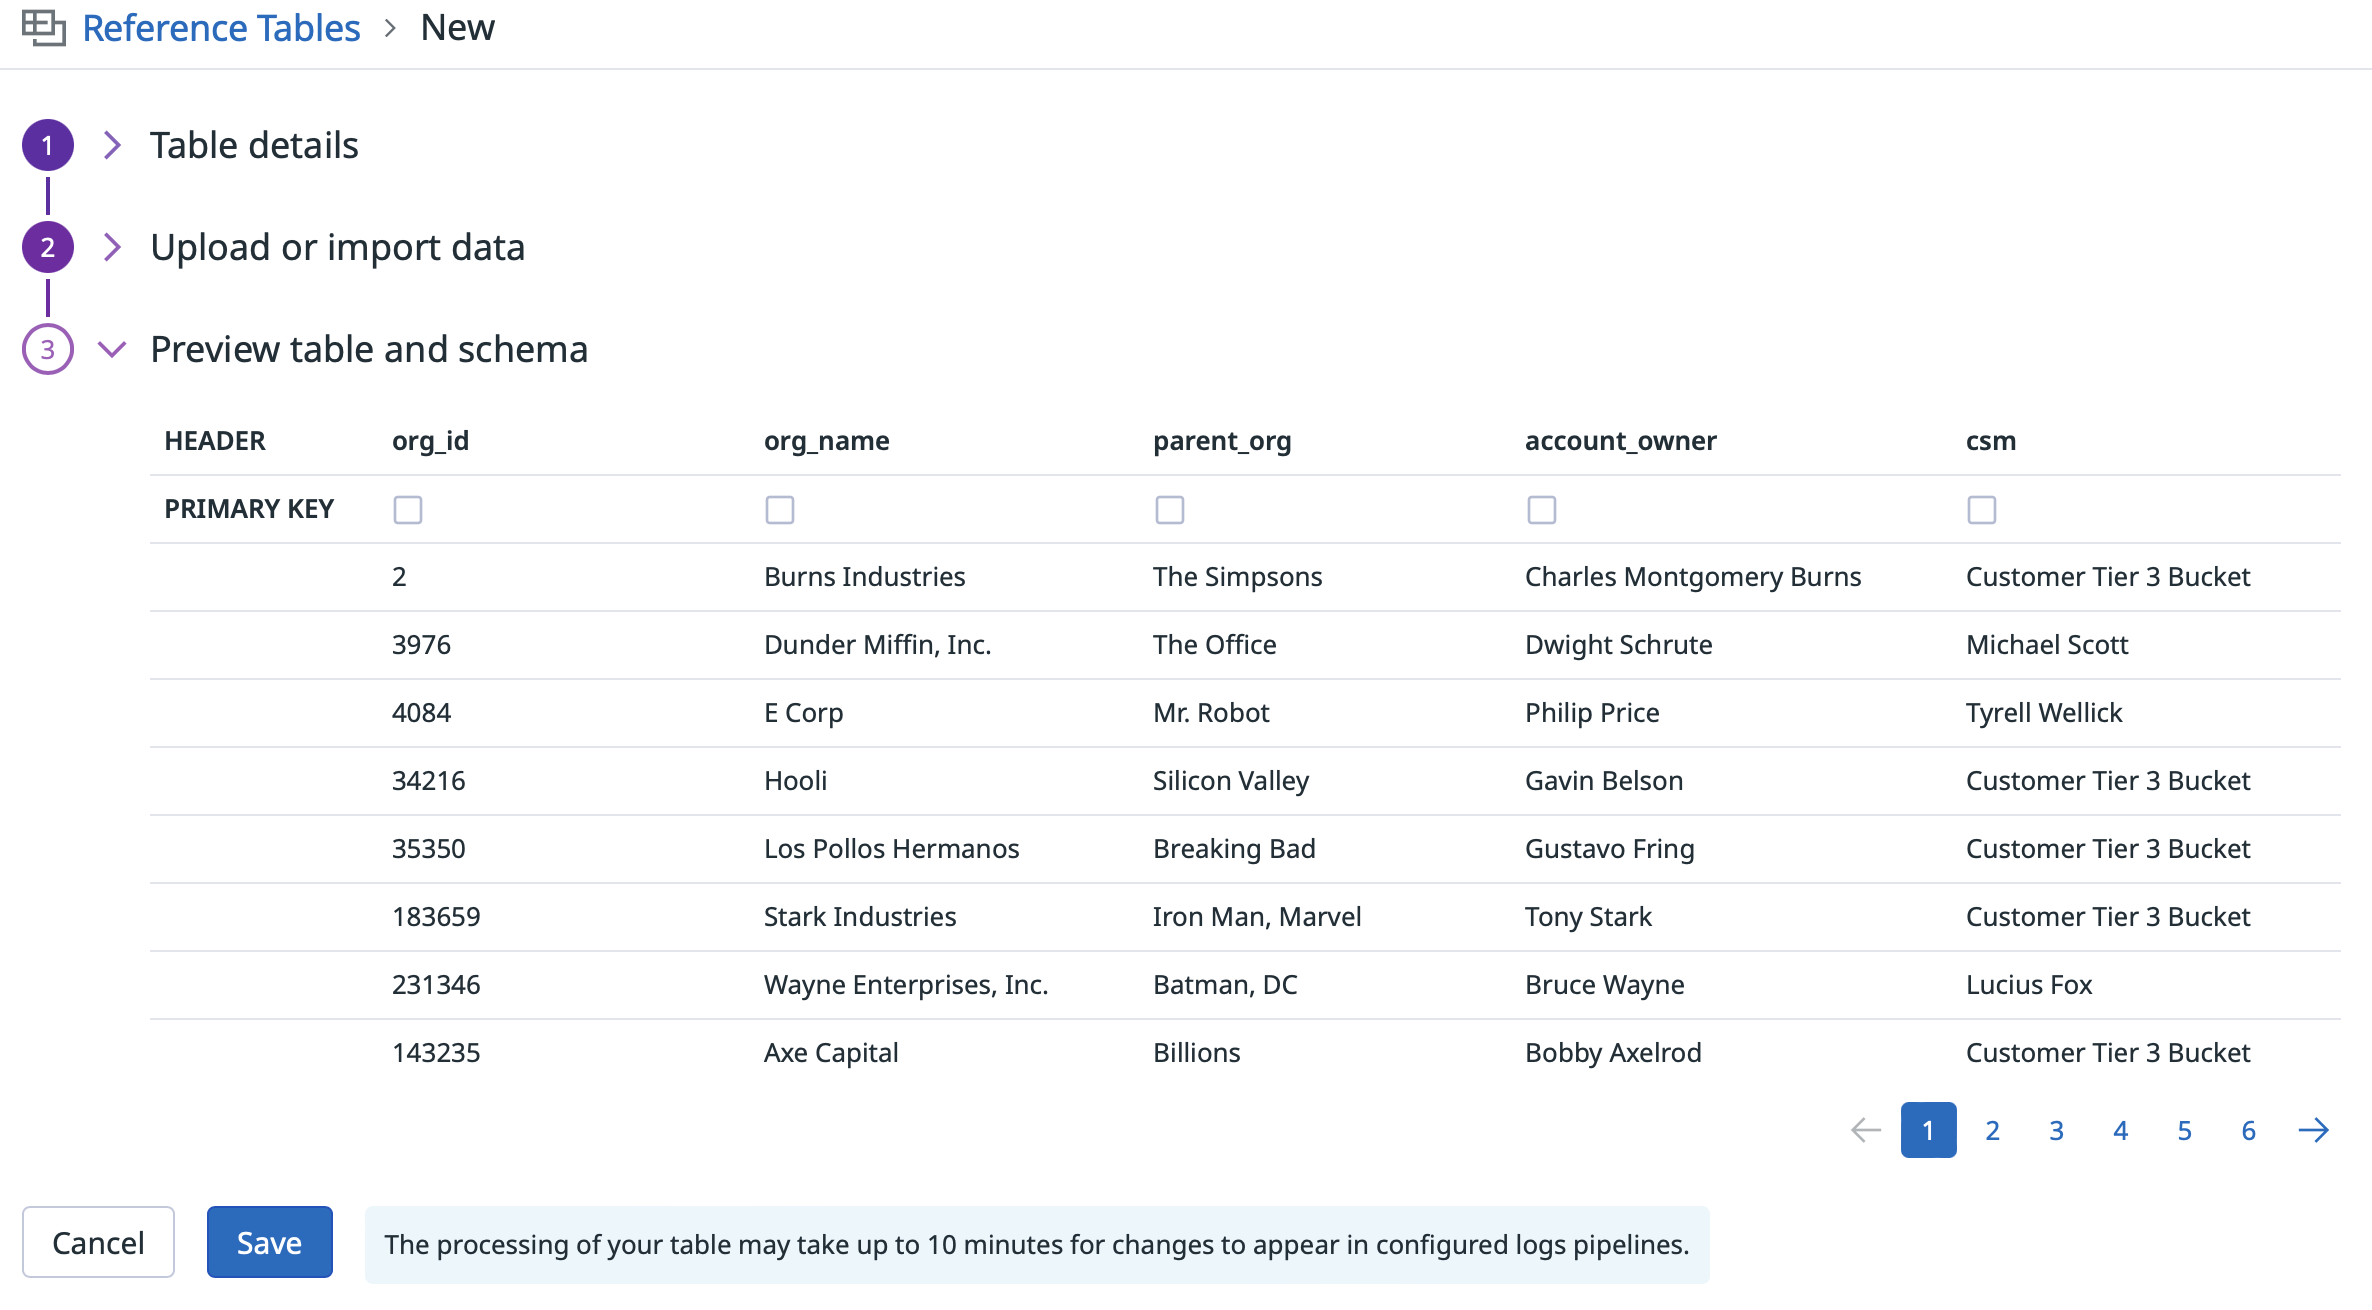
Click New Reference Table +, then upload a CSV file, name the appropriate columns, and define the primary key for lookups.
Note: The manual CSV upload method supports files up to 4MB.
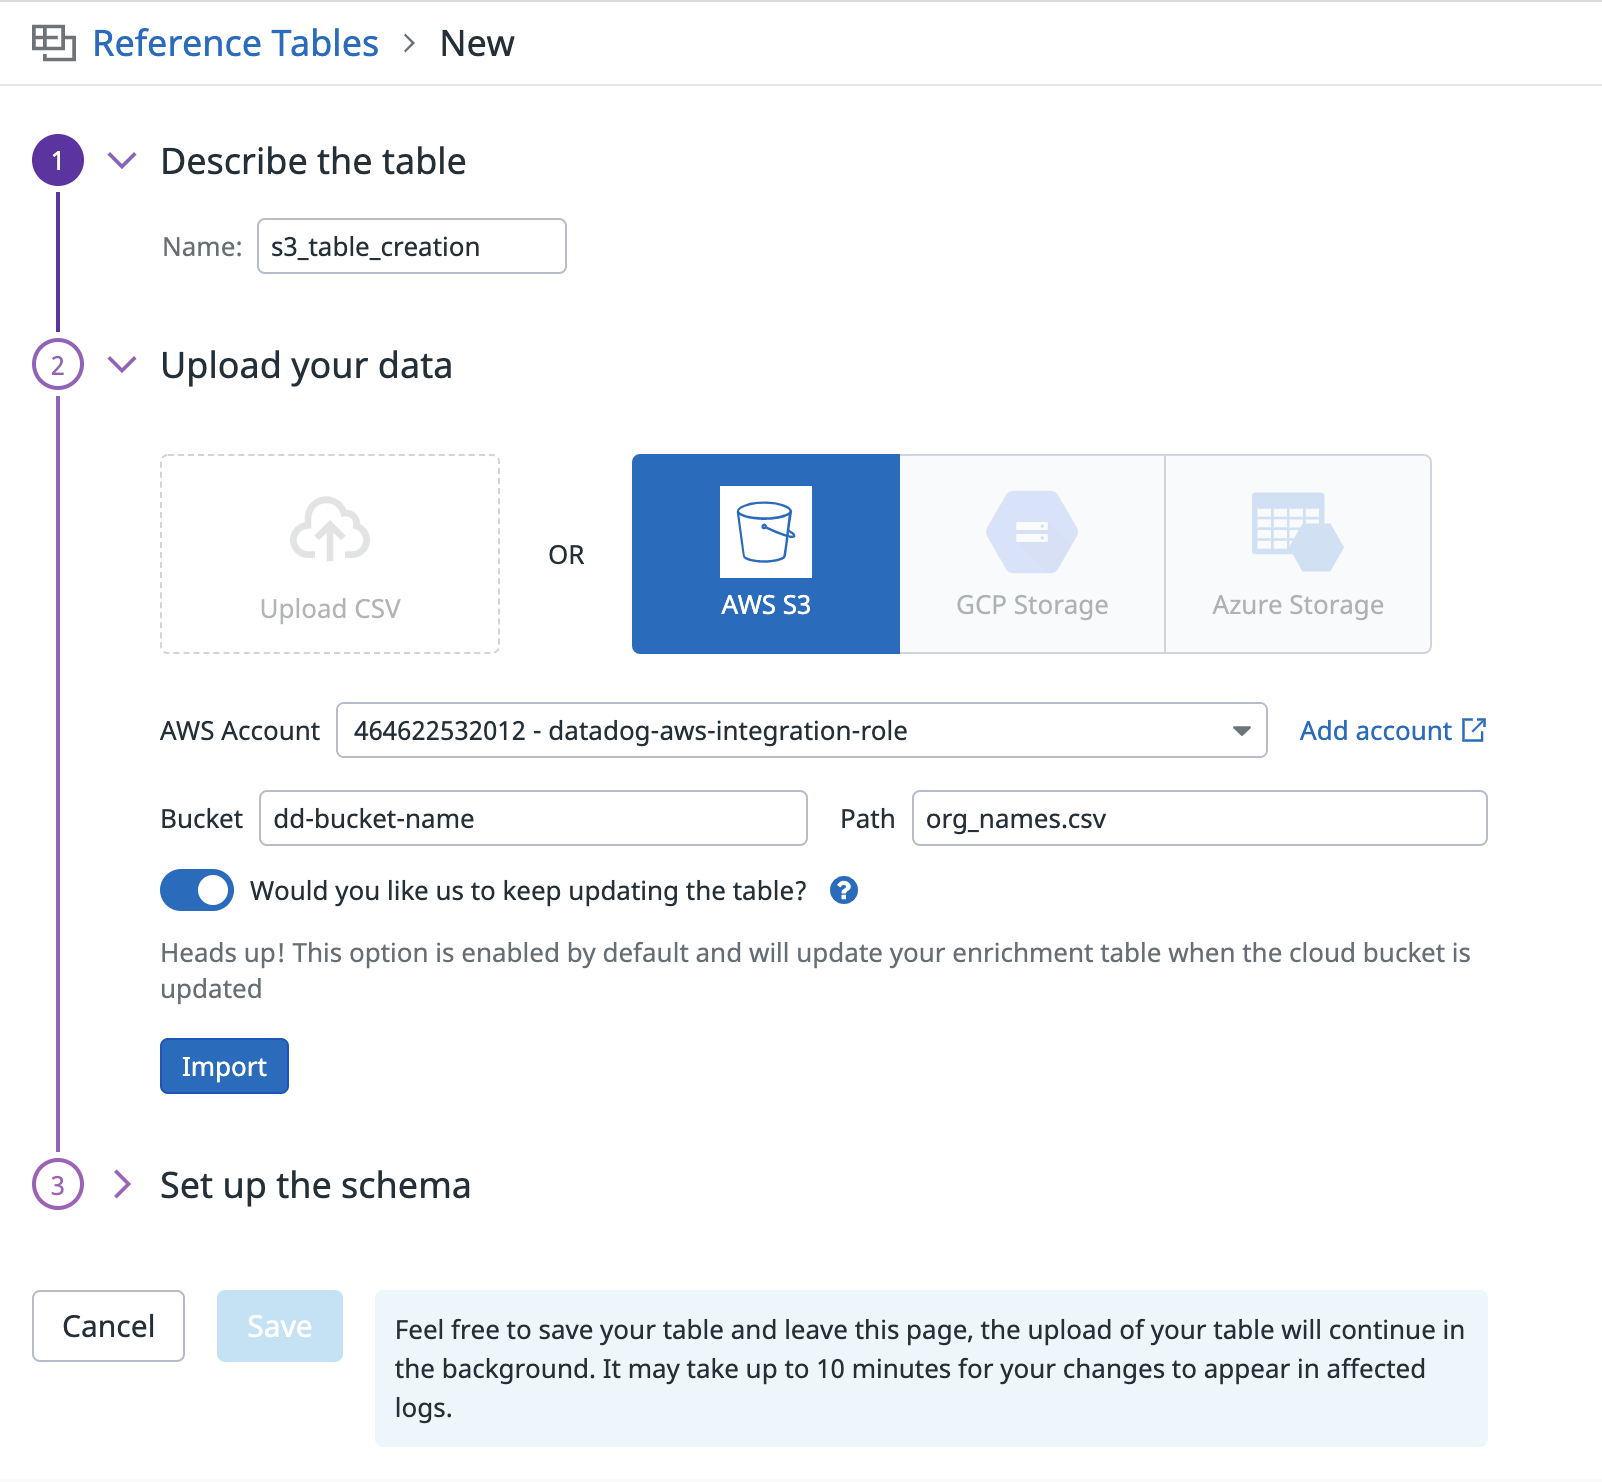
Reference Tables can automatically pull a CSV file from an Amazon S3 bucket to keep your data up to date. The integration looks for changes to the CSV file in S3, and when the file is updated it replaces the Reference Table with the new data. This also enables API updating with the S3 API once the initial Reference Table is configured.
To update Reference Tables from S3, Datadog uses the IAM role in your AWS account that you configured for the AWS integration. If you have not yet created that role, follow these steps to do so. To allow that role to update your Reference Tables, add the following permission statement to its IAM policies. Be sure to edit the bucket names to match your environment.
Note: If using server-side encryption, you can only upload Reference Tables encrypted with Amazon S3-managed keys (SSE-S3).
{
	"Statement": [
		{
			"Sid": "EnrichmentTablesS3",
			"Effect": "Allow",
			"Action": [
				"s3:GetObject",
				"s3:ListBucket"
			],
			"Resource": [
				"arn:aws:s3:::<MY_BUCKET_NAME_1/*>",
				"arn:aws:s3:::<MY_BUCKET_NAME_2>"
			]
		}
	],
	"Version": "2012-10-17"
}
Define the table
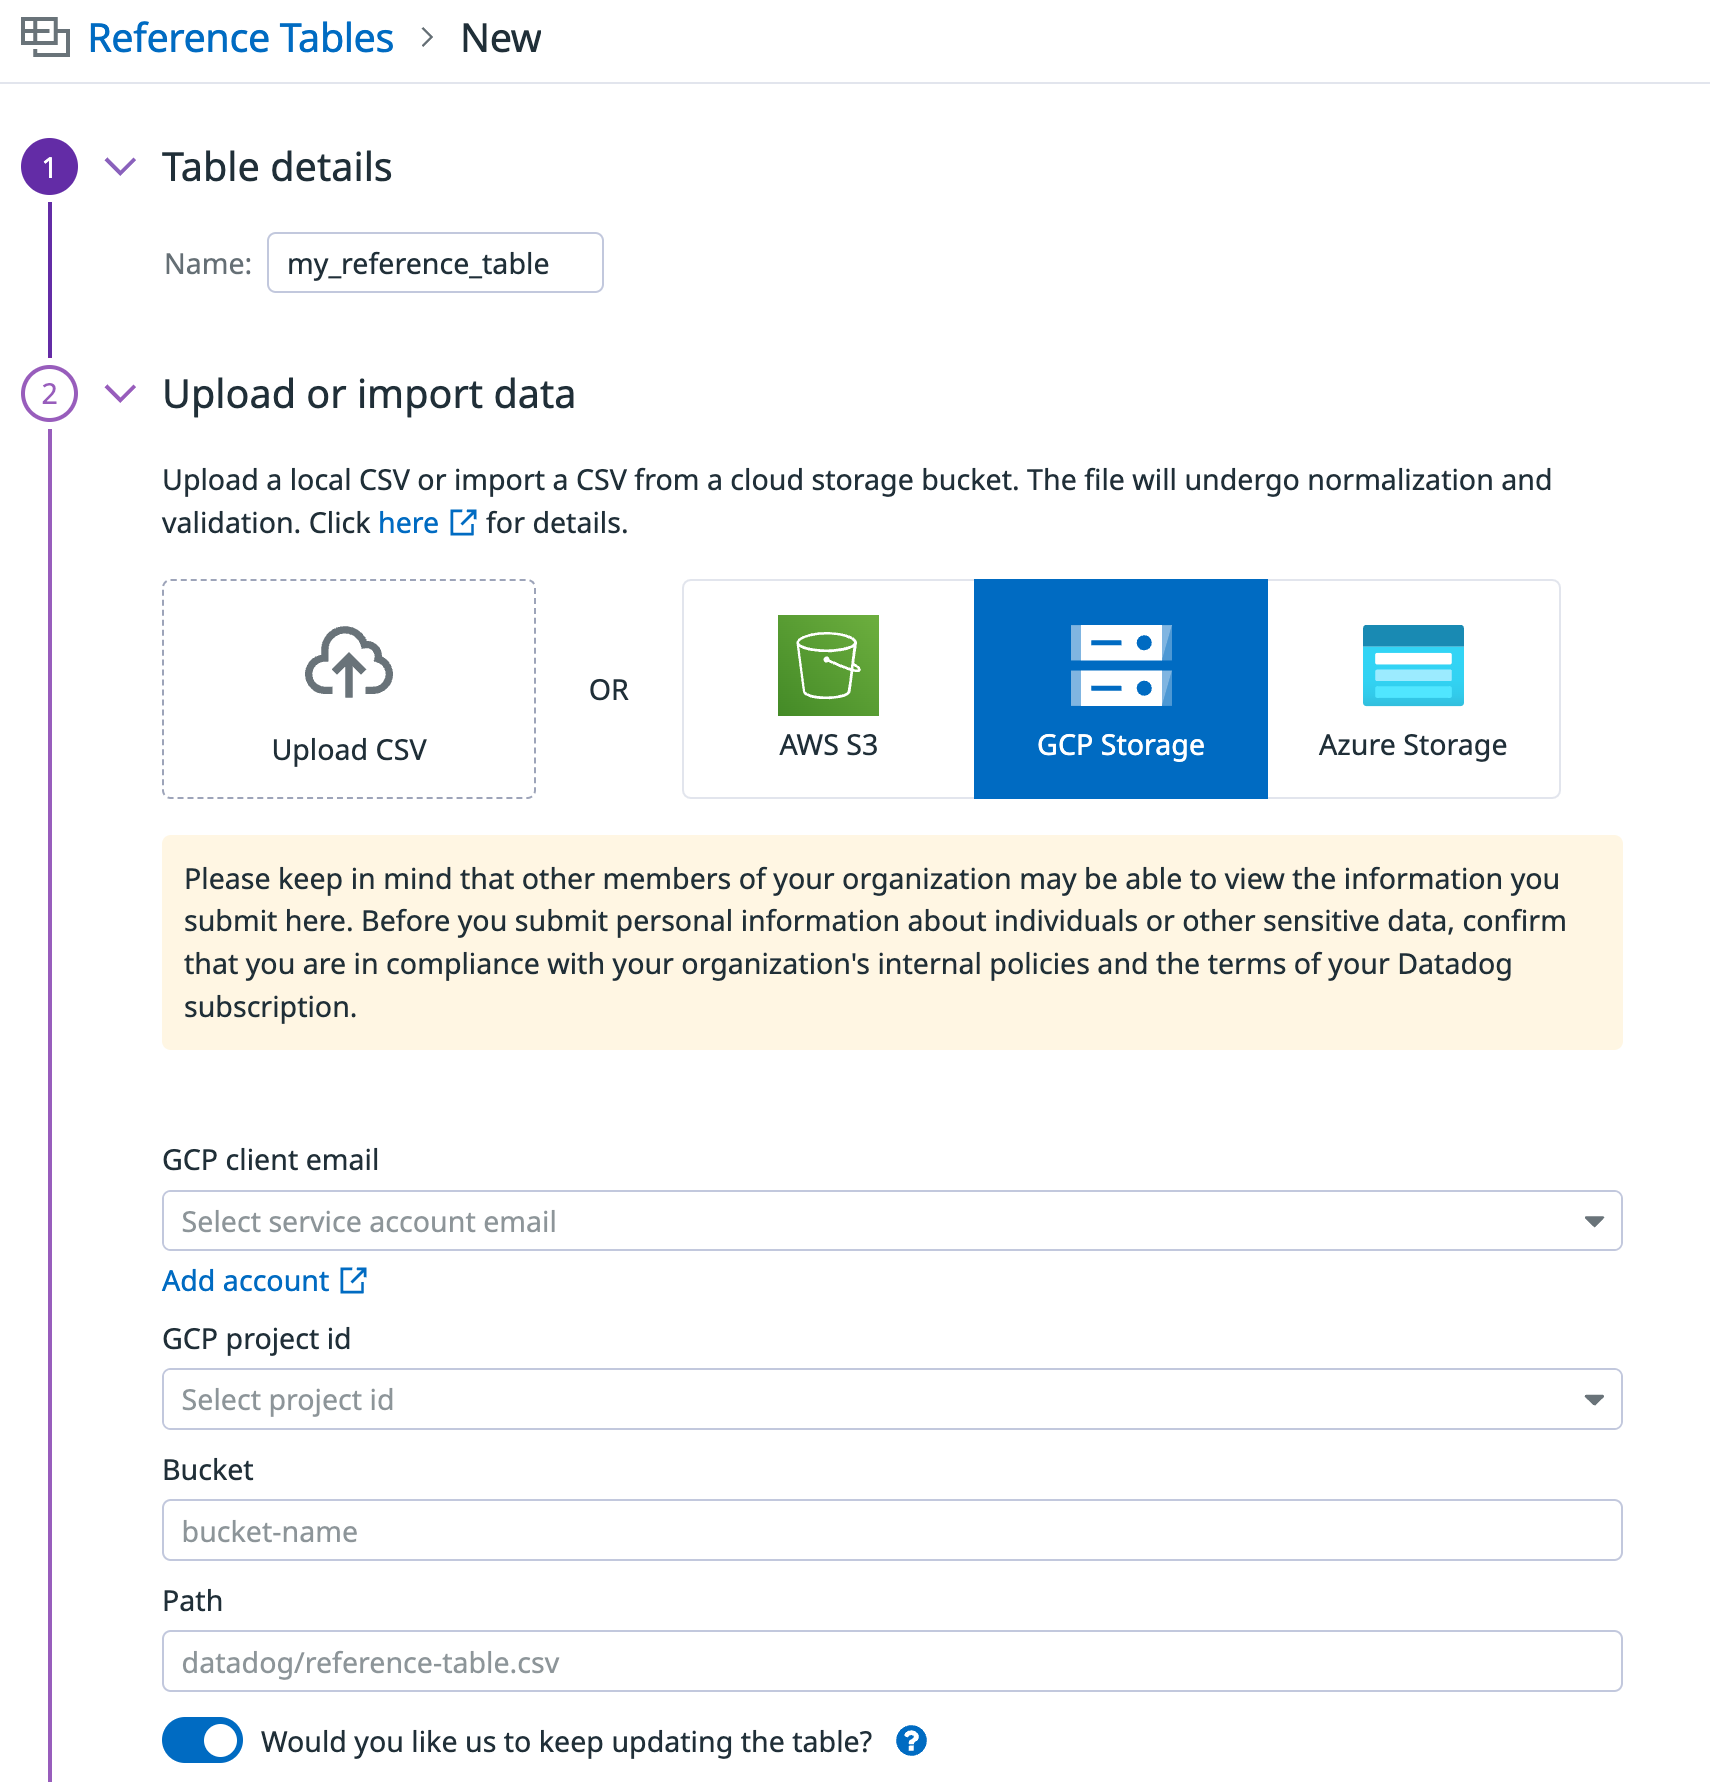
Click New Reference Table +, then add a name, select Amazon S3, fill out all fields, click import, and define the primary key for lookups.
Note: The upload from an S3 bucket method supports files up to 200MB.
If you haven’t already, set up the Azure integration within the subscription that holds the storage account from which you want to import your Reference Table. This involves creating an app registration that Datadog can integrate with.
In the Azure Portal, select the storage account that stores your Reference Table files.
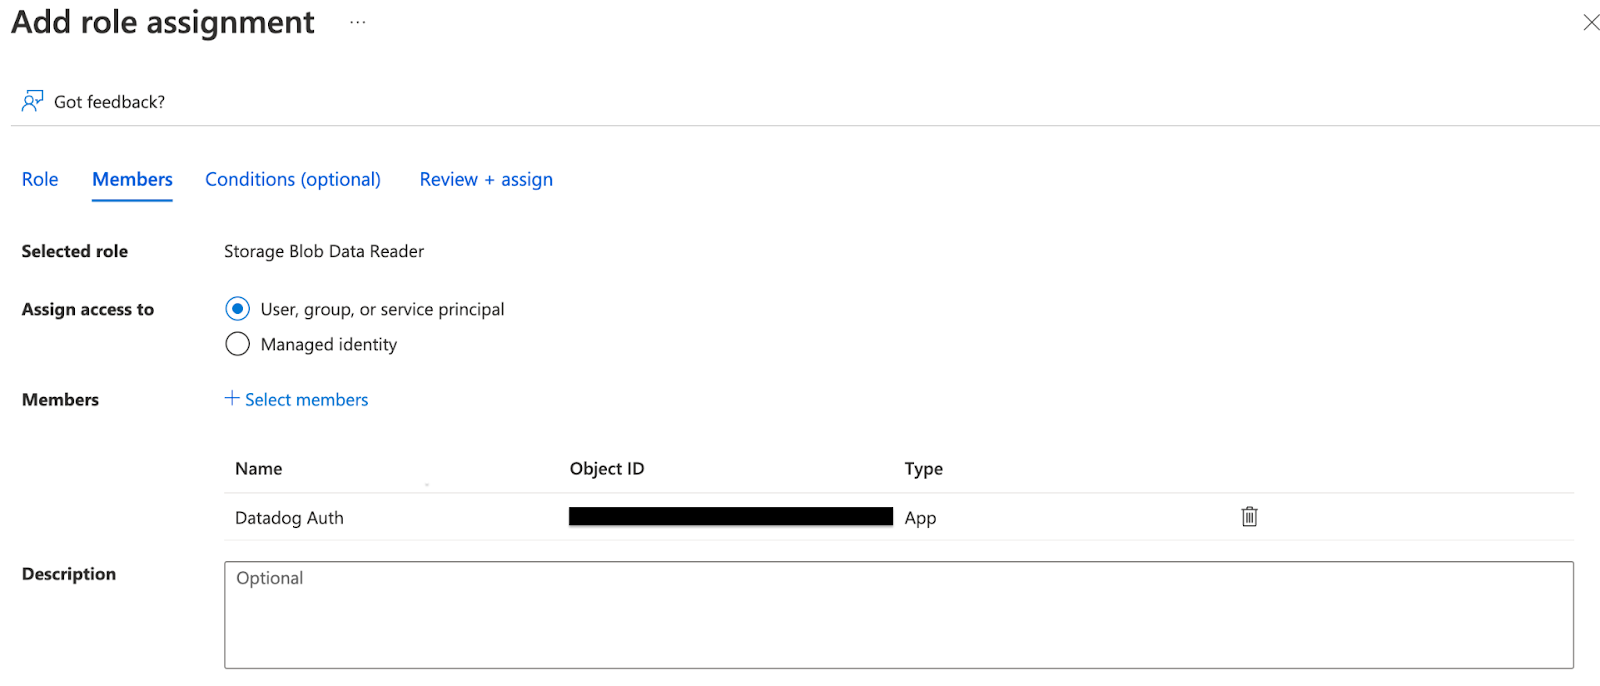
Within your storage account, navigate to Access Control (IAM) and select Add > Add Role Assignment.
Input and select the Storage Blob Data Reader Role. The Storage Blob Data Reader role allows Datadog to read and list storage containers and blobs.
In the Members tab, click + Select members. Select the app registration you created in Step 1.
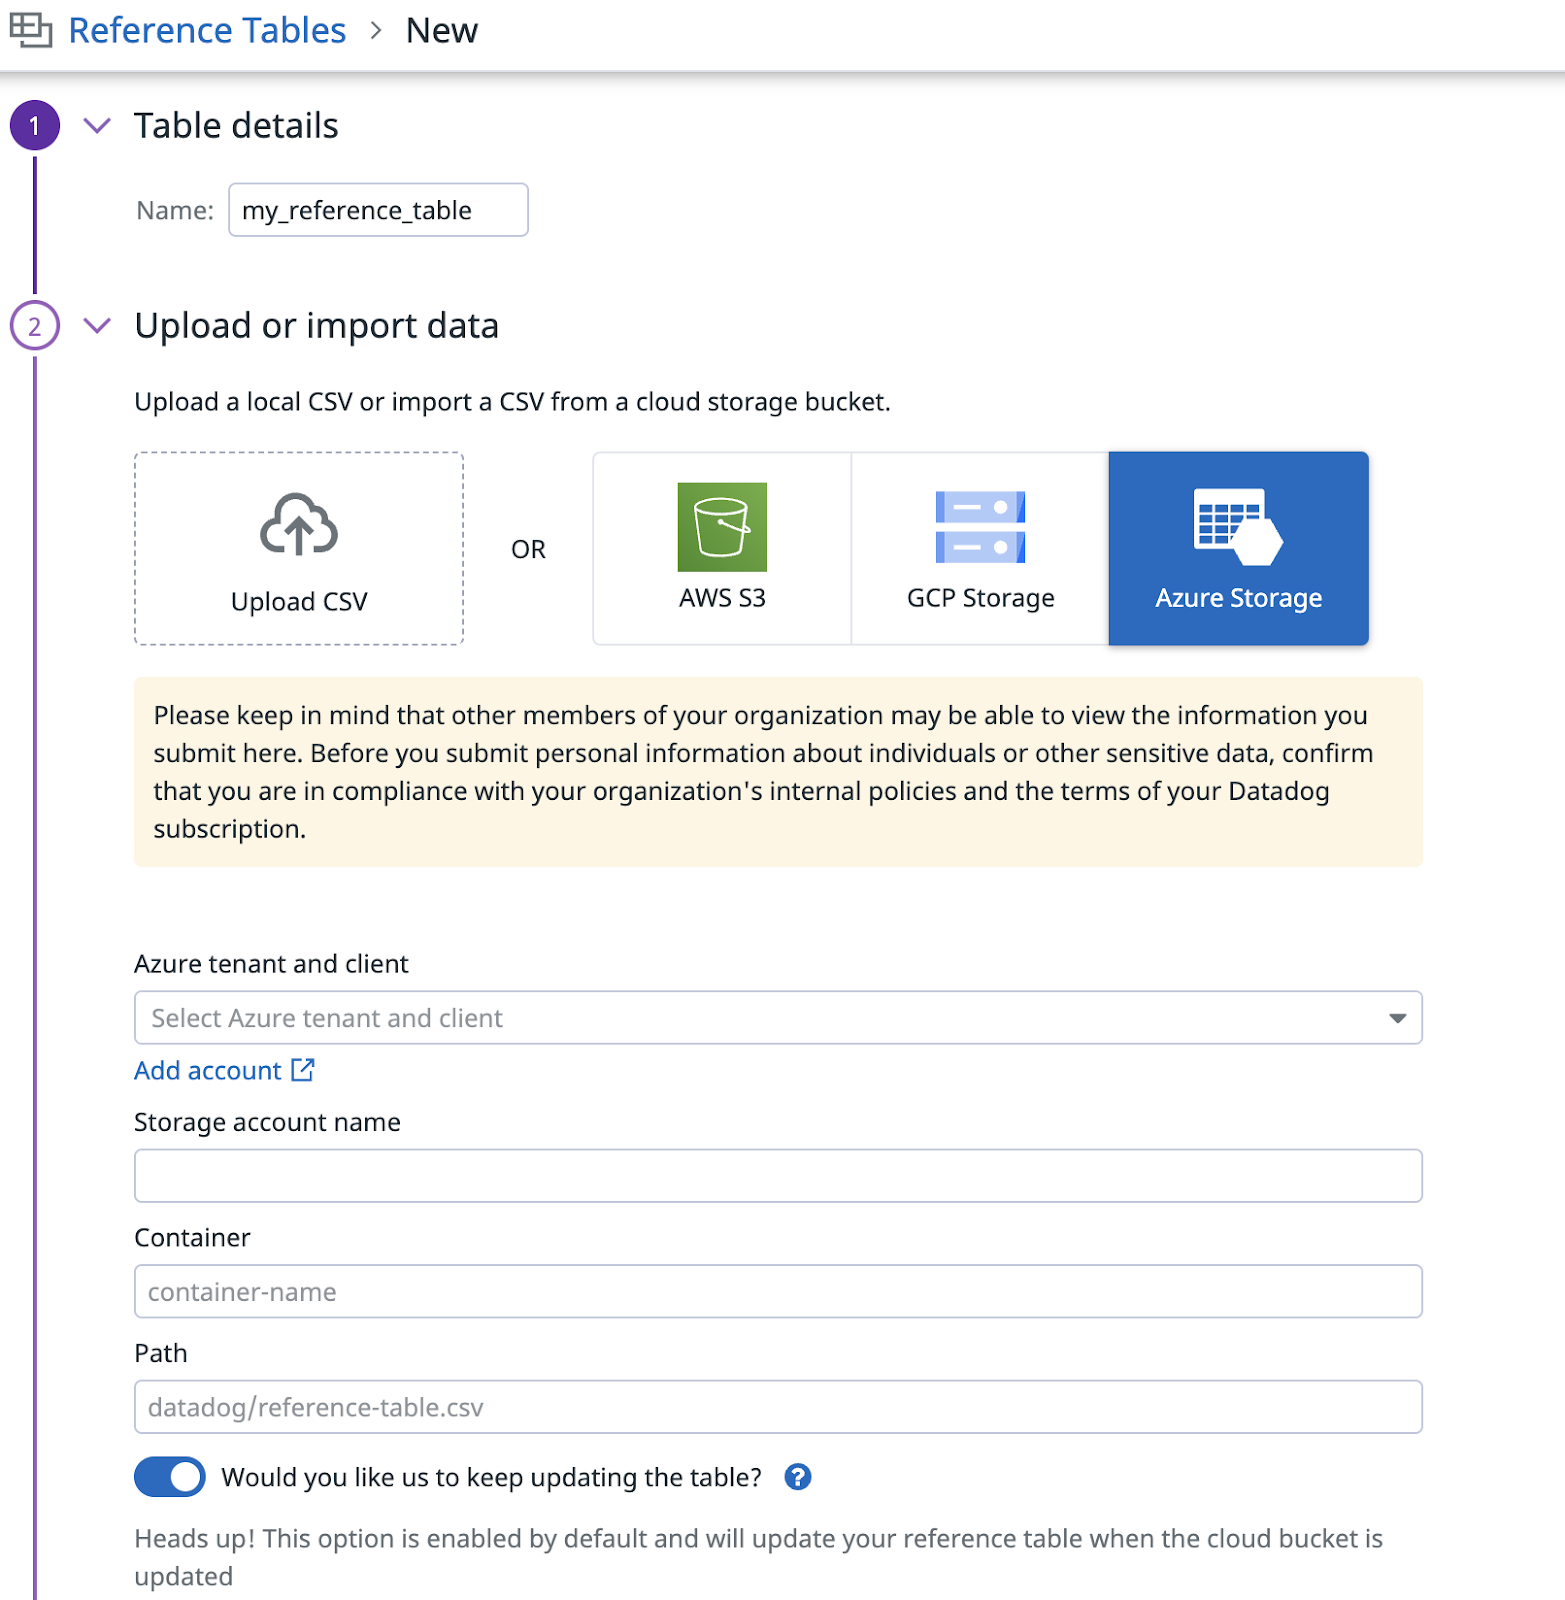
After reviewing and assigning the role, you can import into Reference Tables from Azure. It may take a few minutes for your Azure configuration to update in Datadog.
For more information, see the Azure integration documentation.
Note: The upload from cloud object storage supports files up to 200MB.
If you have not set up a Google Cloud integration with Datadog or you are using legacy Google project ID files (legacy projects are indicated in your GCP integration tile), follow the instructions for setting up the Google Cloud Platform integration. This involves creating a Google Cloud service account.
From the Google Cloud console, navigate to the Cloud Storage page.
Find the bucket you’d like to grant access to and click on it.
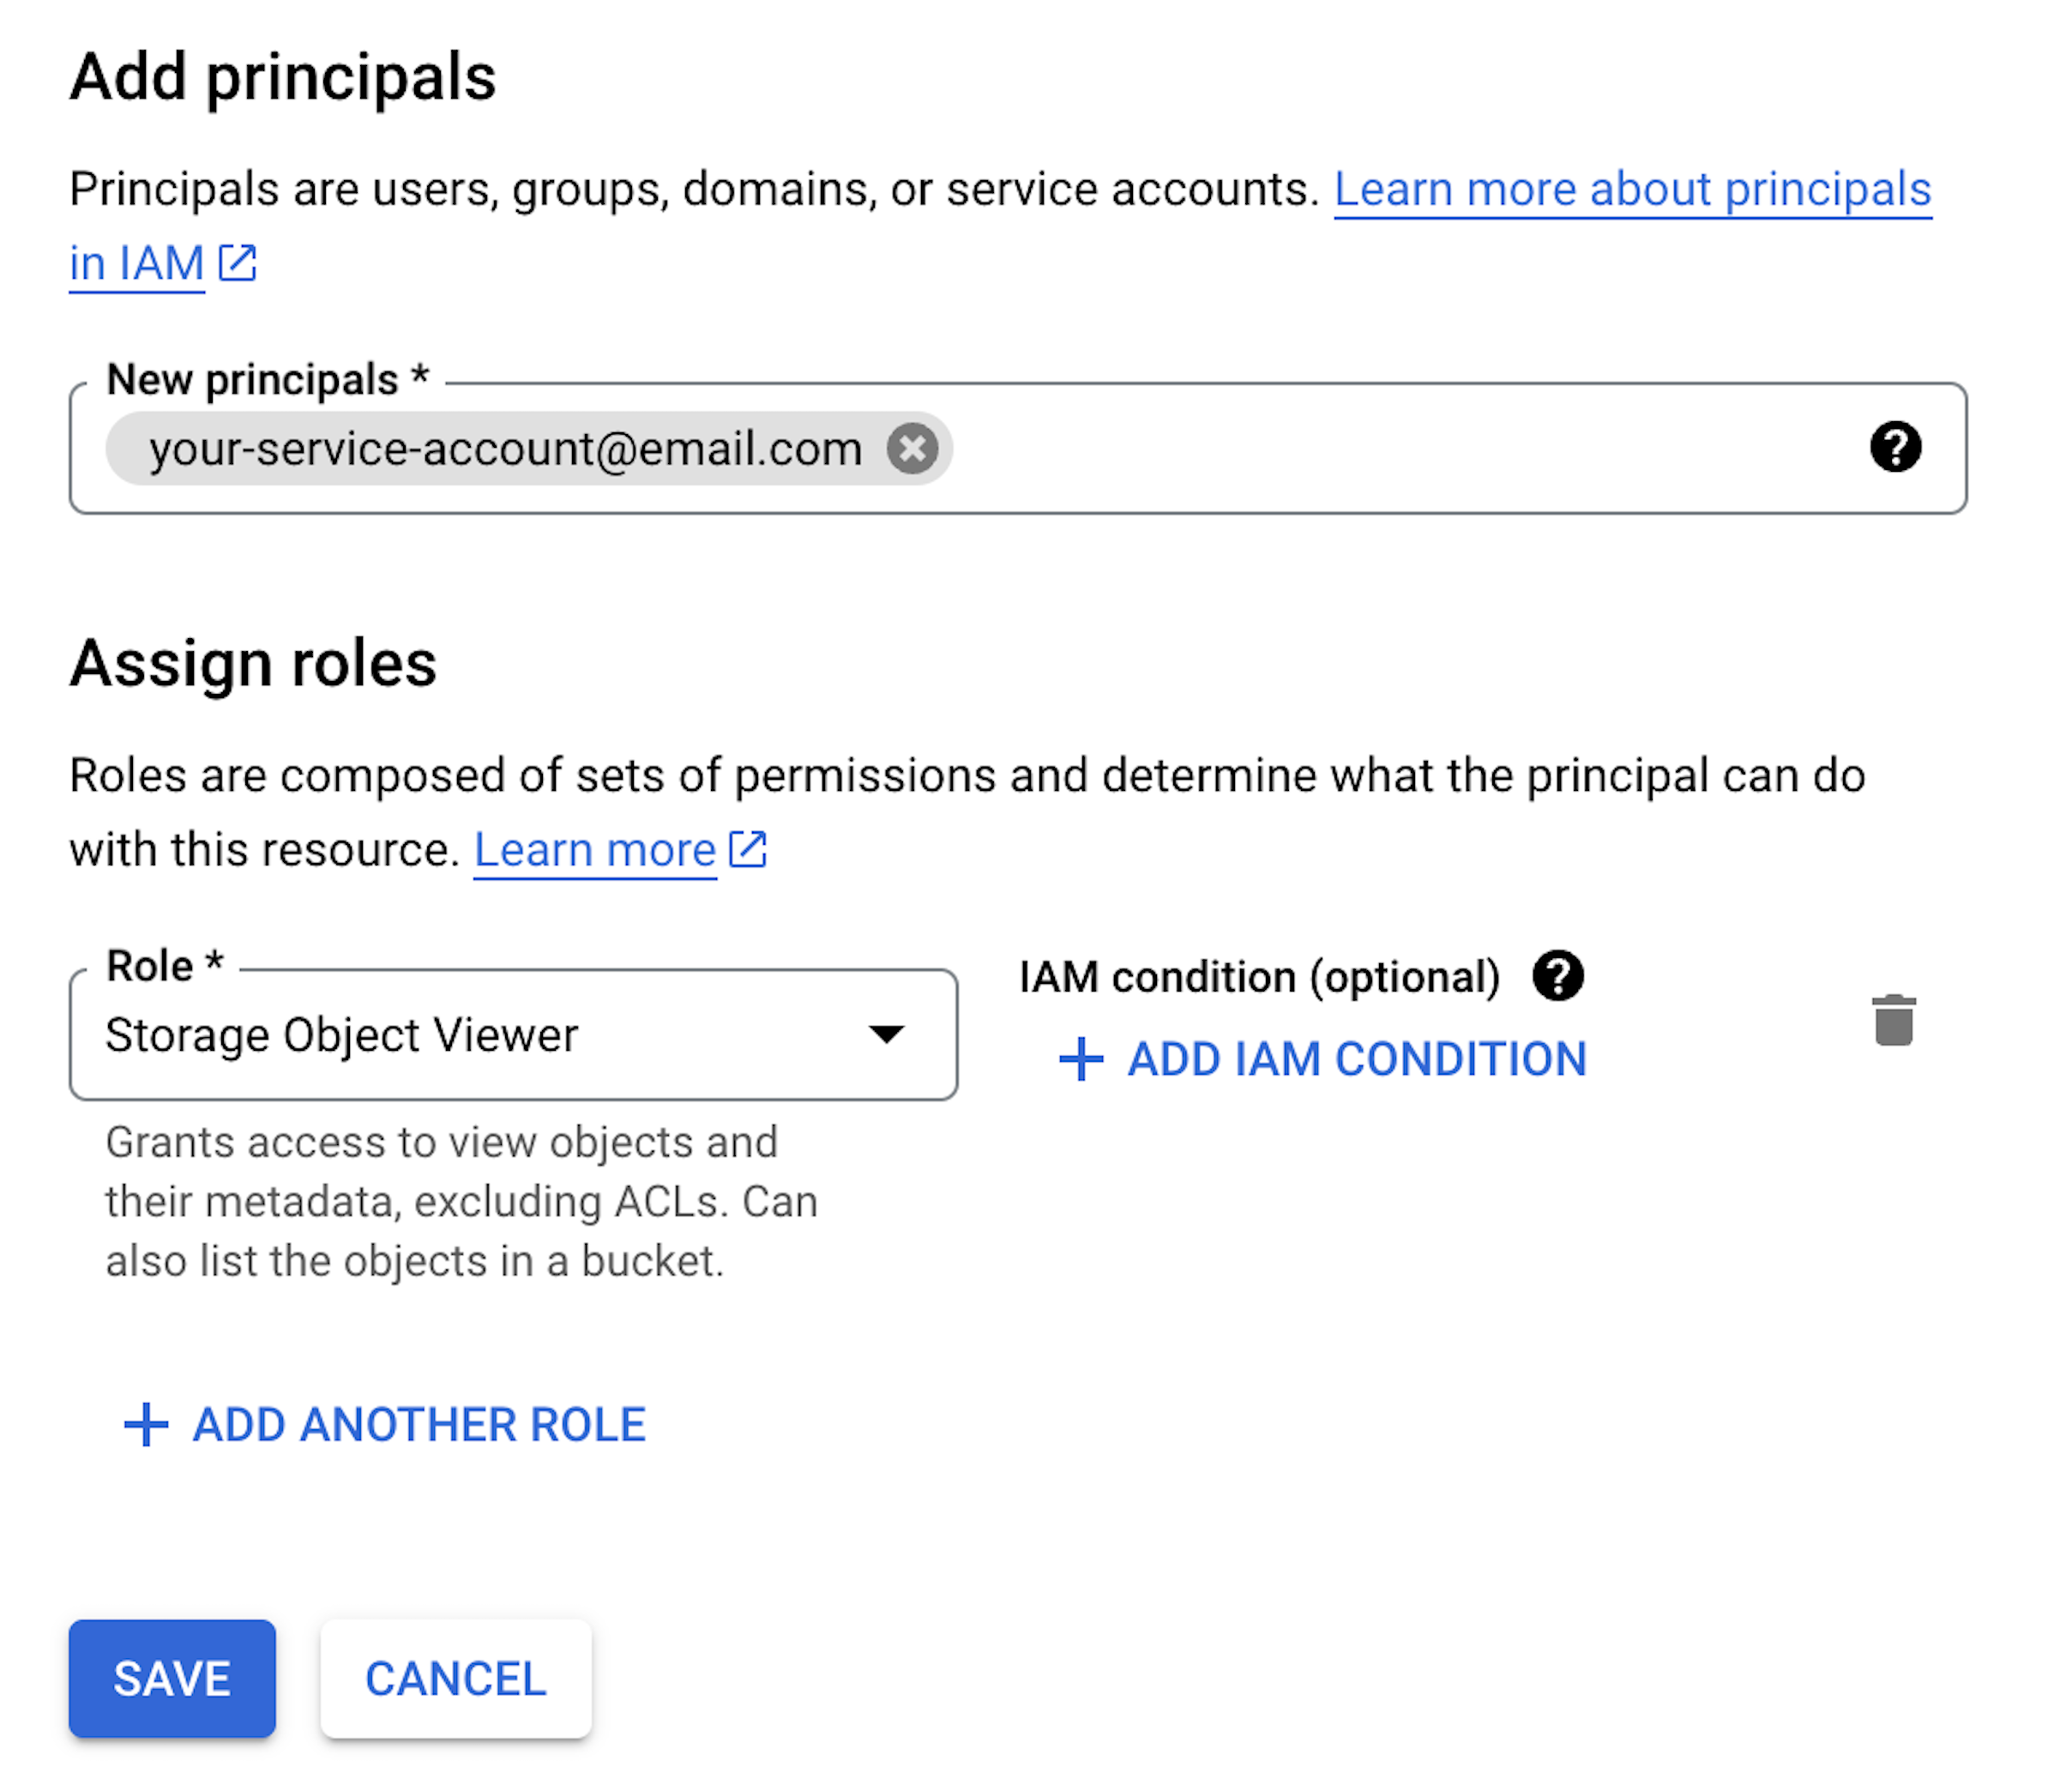
Click on the Permissions tab. Under “View By Principals”, click the Grant Access button.
In the window that appears, under the “New principals” field, enter the service account email that you created and added to the GCP tile in Step 1. Under “Assign roles”, select the Storage Object Viewer role. Click Save.
After reviewing and assigning the role, you can import into Reference Tables from Google Cloud. It may take a few minutes for your configuration to update in Datadog.
Note: The upload from cloud object storage supports files up to 200MB.
This Reference Table can be used to add additional attributes to logs with the Lookup Processor.
Modify a Reference Table
To modify an existing Reference Table with new data, select a table and click Update Config on the top right corner. The selected CSV is upserted into the table, meaning that:
- All existing rows with the same primary key are updated
- All new rows are added
- All old rows that are not in the new file are deleted
Once the table is saved, the upserted rows are processed asynchronously and updated in the preview. It may take up to 10 minutes for the update to complete.
Delete a Reference Table
To delete a Reference Table, select a table, click the gear icon in the top right corner, and then click Delete Table. The table and all associated rows is deleted.
If there is a Lookup Processor using a Reference Table for Log enrichment, then the enrichment stops. It may take up to 10 minutes for the enrichment to stop.
Monitor Reference Table Activity
You can monitor reference table activity with Audit Trail or Change Events. To view the audit trail and change events for a specific reference table, select the table and click the Settings icon next to Update Config. You need org management permissions to view the audit trail.
Audit Trail
Use the audit trail for reference tables to track user-triggered actions. Audit trail events are sent when a user initially uploads or imports a CSV file, or when a user creates, modifies, or deletes a reference table.
The reference_table_file Asset Type displays import/upload events and the reference_table Asset Type displays reference table events. The audit trail provides observability into the content of a reference table.
Change Events
Use change events for reference tables to track automated or user-triggered actions. They are sent when a cloud file is imported from a user or automatic refresh. While events can track user-triggered actions, they are mainly used to track triggered imports when a reference table automatically pulls a new CSV file.
Events contain information about the success status, path, and table name of the import. If an error occurs, information about the error type is provided.
Alerting
To be alerted on errors encountered during imports, use Event Monitors for reference table change events. Reference table change events are sent from the reference_tables source.
You can create monitors from the Monitors tab, or click on the Settings icon next to New Reference Table + to generate a pre-filled monitor.

