- 重要な情報
- はじめに
- Datadog
- Datadog サイト
- DevSecOps
- AWS Lambda のサーバーレス
- エージェント
- インテグレーション
- コンテナ
- ダッシュボード
- アラート設定
- ログ管理
- トレーシング
- プロファイラー
- タグ
- API
- Service Catalog
- Session Replay
- Continuous Testing
- Synthetic モニタリング
- Incident Management
- Database Monitoring
- Cloud Security Management
- Cloud SIEM
- Application Security Management
- Workflow Automation
- CI Visibility
- Test Visibility
- Intelligent Test Runner
- Code Analysis
- Learning Center
- Support
- 用語集
- Standard Attributes
- ガイド
- インテグレーション
- エージェント
- OpenTelemetry
- 開発者
- 認可
- DogStatsD
- カスタムチェック
- インテグレーション
- Create an Agent-based Integration
- Create an API Integration
- Create a Log Pipeline
- Integration Assets Reference
- Build a Marketplace Offering
- Create a Tile
- Create an Integration Dashboard
- Create a Recommended Monitor
- Create a Cloud SIEM Detection Rule
- OAuth for Integrations
- Install Agent Integration Developer Tool
- サービスのチェック
- IDE インテグレーション
- コミュニティ
- ガイド
- API
- モバイルアプリケーション
- CoScreen
- Cloudcraft
- アプリ内
- Service Management
- インフラストラクチャー
- アプリケーションパフォーマンス
- APM
- Continuous Profiler
- データベース モニタリング
- Data Streams Monitoring
- Data Jobs Monitoring
- Digital Experience
- Software Delivery
- CI Visibility (CI/CDの可視化)
- CD Visibility
- Test Visibility
- Intelligent Test Runner
- Code Analysis
- Quality Gates
- DORA Metrics
- セキュリティ
- セキュリティの概要
- Cloud SIEM
- クラウド セキュリティ マネジメント
- Application Security Management
- AI Observability
- ログ管理
- Observability Pipelines(観測データの制御)
- ログ管理
- 管理
GitLab パイプラインでトレースを設定する
CI Visibility is not available in the selected site () at this time.
Overview
GitLab is a DevOps platform that automates the software development lifecycle with integrated CI/CD features, enabling you to deploy applications quickly and securely.
Set up tracing in GitLab to collect data on your pipeline executions, analyze performance bottlenecks, troubleshoot operational issues, and optimize your deployment workflows.
Compatibility
| Pipeline Visibility | Platform | Definition |
|---|---|---|
| Running pipelines | Running pipelines | View pipeline executions that are running. Queued or waiting pipelines show with status “Running” on Datadog. |
| Partial retries | Partial pipelines | View partially retried pipeline executions. |
| Manual steps | Manual steps | View manually triggered pipelines. |
| Queue time | Queue time | View the amount of time pipeline jobs sit in the queue before processing. |
| Logs correlation | Logs correlation | Correlate pipeline spans to logs and enable job log collection. |
| Infrastructure metric correlation | Infrastructure metric correlation | Correlate jobs to infrastructure host metrics for self-hosted GitLab runners. |
| Custom pre-defined tags | Custom pre-defined tags | Set custom tags to all generated pipeline, stages, and job spans. |
| Custom tags and measures at runtime | Custom tags and measures at runtime | Configure custom tags and measures at runtime. |
| Parameters | Parameters | Set custom env or service parameters when a pipeline is triggered. |
| Pipeline failure reasons | Pipeline failure reasons | Identify pipeline failure reasons from error messages. |
| Approval wait time | Approval wait time | View the amount of time jobs and pipelines wait for manual approvals. |
| Execution time | Execution time | View the amount of time pipelines have been running jobs. Gitlab refers to this metric as duration. Duration in Gitlab and execution time may show different values. Gitlab does not take into consideration jobs that failed due to certain kinds of failures (such as runner system failures). |
| Custom spans | Custom spans | Configure custom spans for your pipelines. |
The following GitLab versions are supported:
- GitLab.com (SaaS)
- GitLab >= 14.1 (self-hosted)
- GitLab >= 13.7.0 (self-hosted) with the
datadog_ci_integrationfeature flag enabled
Configure the Datadog integration
Configure the integration on a project or group by going to Settings > Integrations > Datadog for each project or group you want to instrument.
Configure the integration on a project or group by going to Settings > Integrations > Datadog for each project or group you want to instrument.
You can also activate the integration at the GitLab instance level, by going to Admin > Settings > Integrations > Datadog.
Enable the datadog_ci_integration feature flag to activate the integration. Run one of the following commands, which use GitLab’s Rails Runner, depending on your installation type:
Omnibus installations
sudo gitlab-rails runner "Feature.enable(:datadog_ci_integration)"From source installations
sudo -u git -H bundle exec rails runner \
  -e production \
  "Feature.enable(:datadog_ci_integration)"
Kubernetes installations
kubectl exec -it <task-runner-pod-name> -- \
  /srv/gitlab/bin/rails runner "Feature.enable(:datadog_ci_integration)"
Then, configure the integration on a project by going to Settings > Integrations > Datadog for each project you want to instrument.
Note: Due to a bug in early versions of GitLab, the Datadog integration cannot be enabled at group or instance level on GitLab versions < 14.1, even if the option is available on GitLab's UI
For older versions of GitLab, you can use webhooks to send pipeline data to Datadog.
Note: Direct support with webhooks is not under development. Unexpected issues could happen. Datadog recommends that you update GitLab instead.
リポジトリ (または GitLab インスタンス設定) の Settings > Webhooks に移動し、新しい Webhook を追加します。
- URL:
https://webhook-intake./api/v2/webhook/?dd-api-key=<API_KEY>ここで、<API_KEY>は Datadog API キーです。 - Secret Token: 空白のままにします
- Trigger:
Job eventsとPipeline eventsを選択します。
カスタムの env または service パラメーターを設定するには、Webhook の URL で他のクエリパラメーターを追加します: &env=<YOUR_ENV>&service=<YOUR_SERVICE_NAME>
Set custom tags
インテグレーションによって生成されたすべてのパイプラインとジョブのスパンにカスタムタグを設定するには、URL に URL エンコードされたクエリパラメーター tags を追加し、key:value ペアをカンマで区切って指定します。key:value のペアにカンマが含まれる場合は、引用符で囲んでください。例えば、key1:value1, "key2: value with , comma",key3:value3 を追加するには、以下の文字列を Webhook URL に追記する必要があります。
?tags=key1%3Avalue1%2C%22key2%3A+value+with+%2C+comma%22%2Ckey3%3Avalue3
インテグレーションコンフィギュレーション設定を入力します。
- Active
- インテグレーションを有効にします。
- Datadog site
- データを送信する Datadog サイトを指定します。
デフォルト:datadoghq.com
選択したサイト: - API URL (オプション)
- データを直接送信するために使用される API URL をオーバーライドできます。これは、高度なシナリオでのみ使用されます。
デフォルト: (空、オーバーライドなし) - API key
- データを送信するときに使用する API キーを指定します。Datadog の Integrations セクションの APIs タブで生成できます。
- Service (オプション)
- インテグレーションによって生成された各スパンにアタッチするサービス名を指定します。これを使用して、GitLab インスタンスを区別します。
デフォルト:gitlab-ci - Env (オプション)
- インテグレーションによって生成された各スパンに接続する環境 (
envタグ) を指定します。これを使用して、GitLab インスタンスのグループを区別します (例: ステージングまたは本番)。
デフォルト:none - タグ (オプション)
- インテグレーションによって生成された各スパンに付ける任意のカスタムタグを指定します。1 行に 1 つのタグを
key:valueの形式で指定します。
デフォルト: (空、追加タグなし)
注: GitLab.com と GitLab >= 14.8 セルフホスティングでのみ利用可能です。
Test settings ボタンを使用してインテグレーションをテストできます (プロジェクトでインテグレーションを構成する場合にのみ使用できます)。成功したら、Save changes をクリックしてインテグレーションのセットアップを完了します。
Integrate with Datadog Teams
To display and filter the teams associated with your pipelines, add team:<your-team> as a custom tag. The custom tag name must match your Datadog Teams team handle exactly.
Datadog でパイプラインデータを視覚化する
インテグレーションが正常に構成されたら、パイプラインが終了した後、CI Pipeline List ページと Executions ページの両方にデータが入力されます。
Pipelines ページには、各リポジトリのデフォルトブランチのデータのみが表示されます。
部分的およびダウンストリームパイプライン
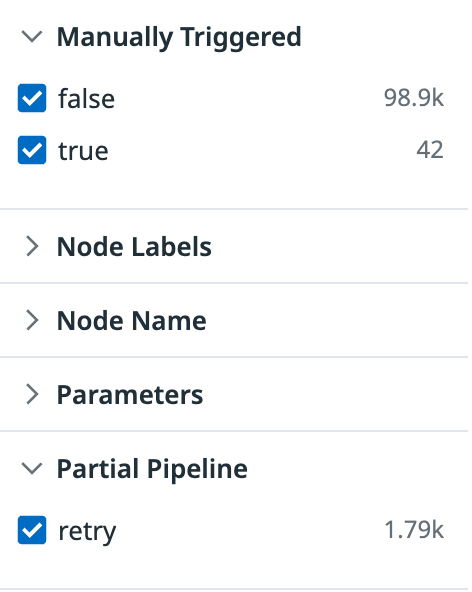
Executions ページでは、検索バーで以下のフィルターを使用することができます。
Downstream Pipeline- 可能な値:
true、false Manually Triggered- 可能な値:
true、false Partial Pipeline- 可能な値:
retry
これらのフィルターは、ページの左側にあるファセットパネルからも適用することができます。
インフラストラクチャーメトリクスとジョブの相関付け
If you are using self-hosted GitLab runners, you can correlate jobs with the infrastructure that is running them. Datadog infrastructure correlation is possible using different methods:
Tagging runners with hostname
The GitLab runner must have a tag of the form host:<hostname>. Tags can be added while registering a new runner. As a result, this method is only available when the runner is directly running the job. This excludes executors that are autoscaling the infrastructure in order to run the job
(such as the Kubernetes, Docker Autoscaler, or Instance executors) as it is not possible to add tags dynamically for those runners.
For existing runners:
Settings > CI/CD > Runners に移動して、該当するランナーを編集することで UI からタグを追加します。
ランナーの config.toml を更新することでタグを追加します。または、Settings > CI/CD > Runners に移動して、該当するランナーを編集することで UI からタグを追加します。
これらのステップの後、CI Visibility は各ジョブにホスト名を追加します。メトリクスを見るには、トレースビューでジョブスパンをクリックします。ドロワーに、ホストメトリクスを含む Infrastructure という新しいタブが表示されます。
Instance and Docker Autoscaler executors
CI Visibility は、“Instance” および “Docker Autoscaler” エグゼキューターについてもインフラストラクチャーメトリクスをサポートしています。詳細については、GitLab ジョブとインフラストラクチャーメトリクスの相関付けに関するガイドを参照してください。
Other executors
CI Visibility does not support Infrastructure metrics for other executors such as the Kubernetes executor.
パイプライン失敗時のエラーメッセージの表示
エラーメッセージは GitLab のバージョン 15.2.0 以降でサポートされています。
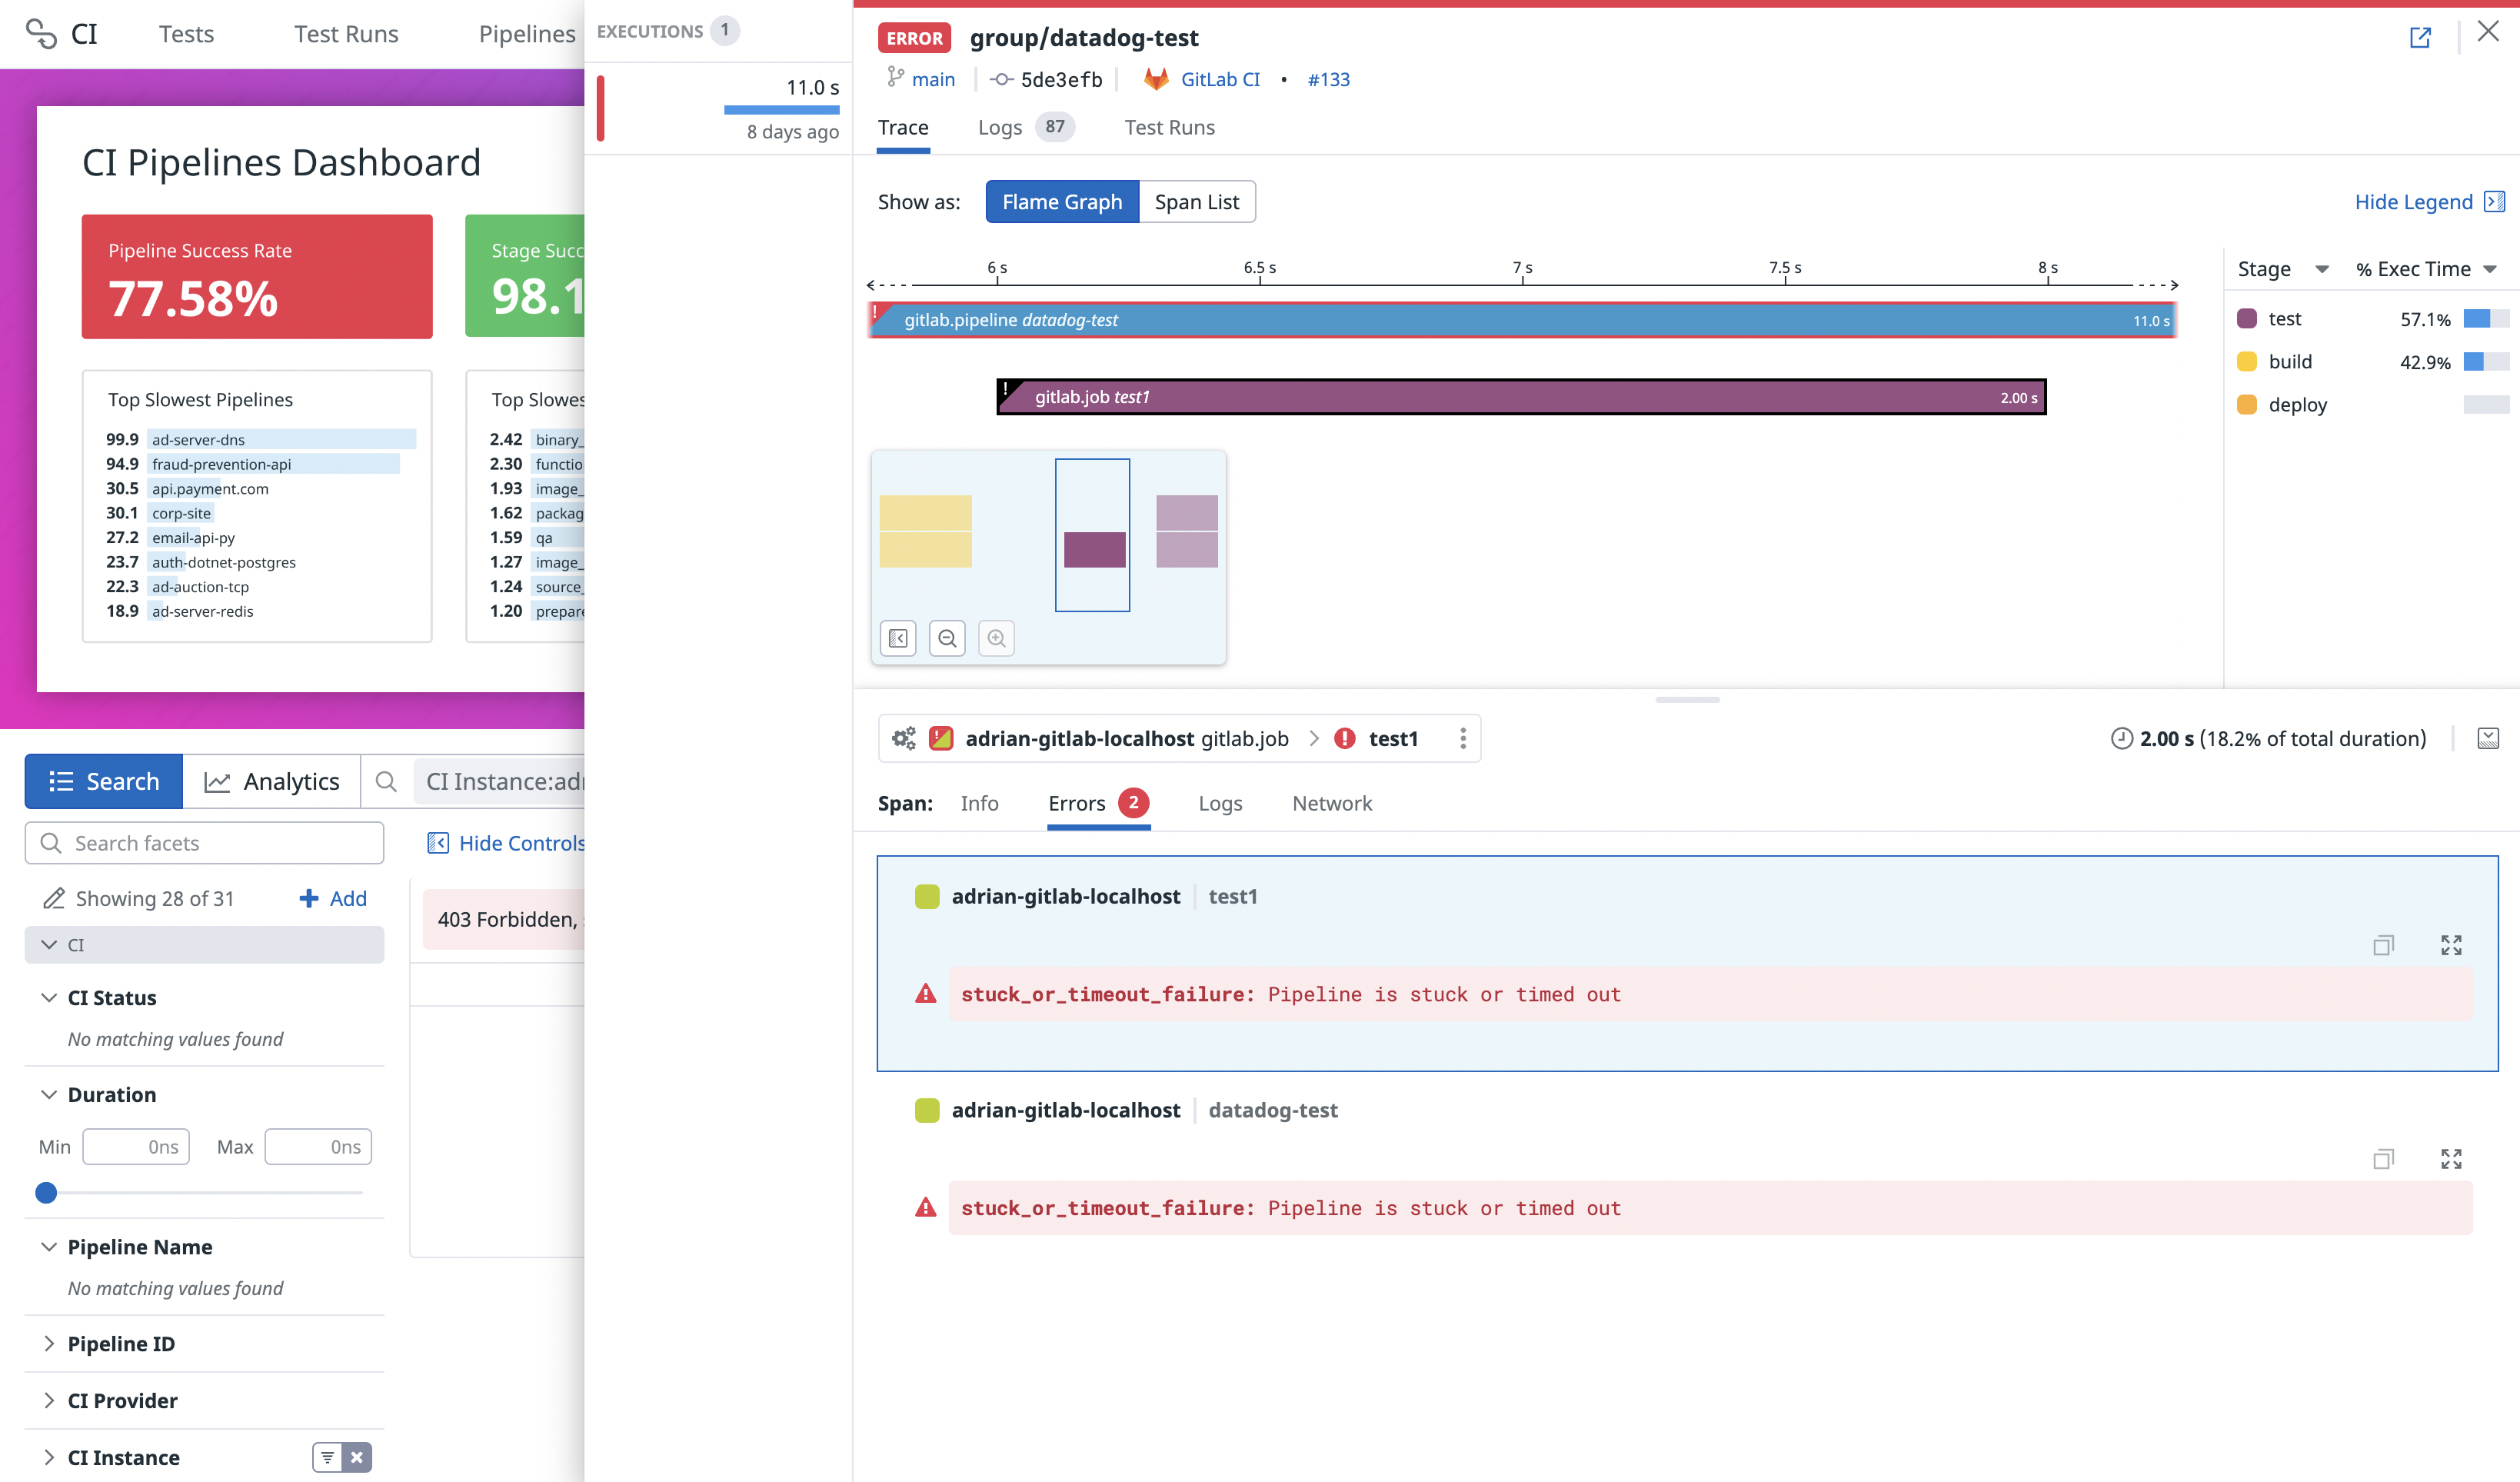
GitLab パイプラインの実行に失敗した場合、特定のパイプライン実行内の Errors タブの下の各エラーは、GitLab からのエラータイプに関連するメッセージを表示します。
各エラータイプに関連するメッセージとドメインについては、以下の表を参照してください。リストにないエラータイプは、Job failed というエラーメッセージと unknown というエラードメインになります。
| エラーの種類 | エラーメッセージ | エラードメイン |
|---|---|---|
| unknown_failure | 原因不明で失敗 | 不明 |
| config_error | CI/CD コンフィギュレーションファイルのエラーによる失敗 | ユーザー |
| external_validation_failure | 外部パイプラインの検証に失敗 | 不明 |
| user_not_verified | ユーザーが認証されていないため、パイプラインが失敗した | ユーザー |
| activity_limit_exceeded | パイプラインのアクティビティ制限を超過した | プロバイダー |
| size_limit_exceeded | パイプラインのサイズ制限を超過した | プロバイダー |
| job_activity_limit_exceeded | パイプラインのジョブアクティビティ制限を超過した | プロバイダー |
| deployments_limit_exceeded | パイプラインのデプロイ制限を超過した | プロバイダー |
| project_deleted | このパイプラインに関連するプロジェクトが削除された | プロバイダー |
| api_failure | API の失敗 | プロバイダー |
| stuck_or_timeout_failure | パイプラインが停止している、またはタイムアウトしている | 不明 |
| runner_system_failure | ランナーシステムの不具合による失敗 | プロバイダー |
| missing_dependency_failure | 依存関係がないため失敗 | 不明 |
| runner_unsupported | 未対応のランナーのため失敗 | プロバイダー |
| stale_schedule | スケジュールが古くなったため失敗 | プロバイダー |
| job_execution_timeout | ジョブのタイムアウトによる失敗 | 不明 |
| archived_failure | アーカイブの失敗 | プロバイダー |
| unmet_prerequisites | 前提条件が満たされていないため失敗 | 不明 |
| scheduler_failure | スケジュール不具合による失敗 | プロバイダー |
| data_integrity_failure | データ整合性のため失敗 | プロバイダー |
| forward_deployment_failure | デプロイメントの失敗 | 不明 |
| user_blocked | ユーザーによってブロックされた | ユーザー |
| ci_quota_exceeded | CI の割り当て超過 | プロバイダー |
| pipeline_loop_detected | パイプラインループを検出 | ユーザー |
| builds_disabled | ビルド無効 | ユーザー |
| deployment_rejected | デプロイメントが拒否された | ユーザー |
| protected_environment_failure | 環境に関する失敗 | プロバイダー |
| secrets_provider_not_found | シークレットプロバイダーが見つからない | ユーザー |
| reached_max_descendant_pipelines_depth | 子孫パイプラインの最大値に到達 | ユーザー |
| ip_restriction_failure | IP 制限の失敗 | プロバイダー |
ジョブログ収集を有効にする
以下の GitLab バージョンは、ジョブログの収集をサポートしています。
- GitLab.com (SaaS)
- GitLab >= 15.3 (self-hosted) only if you are using object storage to store job logs
- GitLab >= 14.8 (self-hosted) by enabling the
datadog_integration_logs_collectionfeature flag
Note: Logs are billed separately from CI Visibility.
Note: Job log collection is not available for PCI-compliant organizations.
Job logs are collected in Log Management and are automatically correlated with the GitLab pipeline in CI Visibility. Log files larger than one GiB are truncated.
For more information about processing job logs collected from the GitLab integration, see the Processors documentation.
ジョブログの収集を有効にするには
- Click the Enable job logs collection checkbox in the GitLab integration Settings > Integrations > Datadog.
- Save changes をクリックします。
Datadog は、事前に署名された期間限定の URL を使って、GitLab ログのオブジェクトストレージからログファイルを直接ダウンロードします。
これは、Datadog サーバーがストレージにアクセスするためには、ストレージにネットワークの制限がかかっていてはいけないことを意味します。
エンドポイントが設定されている場合は、一般にアクセス可能な URL に解決される必要があります。
- Click Enable job logs collection checkbox in the GitLab integration under Settings > Integrations > Datadog.
- Save changes をクリックします。
Datadog は、事前に署名された期間限定の URL を使って、GitLab ログのオブジェクトストレージからログファイルを直接ダウンロードします。
これは、Datadog サーバーがストレージにアクセスするためには、ストレージにネットワークの制限がかかっていてはいけないことを意味します。
エンドポイントが設定されている場合は、一般にアクセス可能な URL に解決される必要があります。
- Enable the
datadog_integration_logs_collectionfeature flag in your GitLab. This allows you to see the Enable job logs collection checkbox in the GitLab integration under Settings > Integrations > Datadog. - Click Enable job logs collection.
- Save changes をクリックします。
注: ログは CI Visibility とは別に課金されます。ログの保持、除外、インデックスの構成は、ログの設定で行います。GitLab ジョブのログは
Datadog.product:cipipeline と source:gitlab のタグで識別できます。


