- 重要な情報
- はじめに
- Datadog
- Datadog サイト
- DevSecOps
- AWS Lambda のサーバーレス
- エージェント
- インテグレーション
- コンテナ
- ダッシュボード
- アラート設定
- ログ管理
- トレーシング
- プロファイラー
- タグ
- API
- Service Catalog
- Session Replay
- Continuous Testing
- Synthetic モニタリング
- Incident Management
- Database Monitoring
- Cloud Security Management
- Cloud SIEM
- Application Security Management
- Workflow Automation
- CI Visibility
- Test Visibility
- Intelligent Test Runner
- Code Analysis
- Learning Center
- Support
- 用語集
- Standard Attributes
- ガイド
- インテグレーション
- エージェント
- OpenTelemetry
- 開発者
- 認可
- DogStatsD
- カスタムチェック
- インテグレーション
- Create an Agent-based Integration
- Create an API Integration
- Create a Log Pipeline
- Integration Assets Reference
- Build a Marketplace Offering
- Create a Tile
- Create an Integration Dashboard
- Create a Recommended Monitor
- Create a Cloud SIEM Detection Rule
- OAuth for Integrations
- Install Agent Integration Developer Tool
- サービスのチェック
- IDE インテグレーション
- コミュニティ
- ガイド
- API
- モバイルアプリケーション
- CoScreen
- Cloudcraft
- アプリ内
- Service Management
- インフラストラクチャー
- アプリケーションパフォーマンス
- APM
- Continuous Profiler
- データベース モニタリング
- Data Streams Monitoring
- Data Jobs Monitoring
- Digital Experience
- Software Delivery
- CI Visibility (CI/CDの可視化)
- CD Visibility
- Test Visibility
- Intelligent Test Runner
- Code Analysis
- Quality Gates
- DORA Metrics
- セキュリティ
- セキュリティの概要
- Cloud SIEM
- クラウド セキュリティ マネジメント
- Application Security Management
- AI Observability
- ログ管理
- Observability Pipelines(観測データの制御)
- ログ管理
- 管理
Windows 用 Agent の基本的な使用方法
概要
This page outlines the basic features of the Datadog Agent for Windows. If you haven’t installed the Agent yet, see the installation instructions below or follow the instructions in the app.
Agent のインストール
要件
- Windows version: Windows Server 2016 or later, or Windows 10 or later. See the Agent Supported Platforms documentation for supported OS versions.
- Datadog account: Ensure you have access to a Datadog account and have your Datadog API key.
- Administrator privileges: Administrator access is required on the Windows machine.
The core and APM/trace components of the Windows Agent run under the ddagentuser account. The Live Processes component, if enabled, runs under the LOCAL_SYSTEM account. Learn more about the Datadog Windows Agent User.
Install with the GUI
- Download the Datadog Agent installer to install the latest version of the Agent.
datadog-agent-7-latest.amd64.msiを開いてインストーラーを実行します。プロンプトが表示されたら、管理者資格情報を入力します。- Follow the prompts, accept the license agreement, and enter your Datadog API key.
インストールが終了したら、オプションから Datadog Agent Manager を起動できます。
Install with the command line
- Open PowerShell with Administrator privileges.
- Run the following command to install the Datadog Agent:
Start-Process -Wait msiexec -ArgumentList '/qn /i datadog-agent-7-latest.amd64.msi APIKEY="<YOUR_DATADOG_API_KEY>"'
When deploying the Datadog Agent in an Active Directory environment, Datadog recommends using a Group Managed Service Account (gMSA).
Using gMSA can enhance security and simplify management. Some of the benefits include:
- Deployment across multiple servers: Unlike traditional Managed Service Accounts (MSAs) or standalone Managed Service Accounts (sMSAs), gMSAs can be deployed across multiple servers.
- Automated password management: The passwords for gMSAs are handled at the operating system level, and are rotated on a regular basis without requiring manual intervention.
When running with a gMSA, the core and APM/trace components of the Windows Agent run under the configured account. The Live Processes component, if enabled, runs under the LOCAL_SYSTEM account. Learn more about the Datadog Windows Agent User.
前提条件
- An Active Directory environment
- Permission to create and manage gMSAs
- See further requirements in the Microsoft documentation.
Note: For a comprehensive understanding of setting up gMSAs, see Microsoft’s Group Managed Service Accounts Overview.
Create and configure a gMSA
Create a Security Group:
- Open Active Directory Users and Computers (ADUC).
- Navigate to the appropriate Organizational Unit (OU).
- Right-click and select New > Group.
- Name the group. For example,
DatadogAgentsGroup. - Set the correct group scope for your organization. For example, Domain local.
- Set the type to Security.
Create the gMSA:
- Open PowerShell with Administrator privileges.
- Run the following command to create the gMSA, replacing
<YOUR_DOMAIN_NAME>with your domain name:New-ADServiceAccount -Name DatadogGMSA -DNSHostName <YOUR_DOMAIN_NAME> -PrincipalsAllowedToRetrieveManagedPassword DatadogAgentsGroup
Verify that the gMSA can be used on the target machine:
- Ensure the target machine is part of the
DatadogAgentsGroup. - On the target machine, open PowerShell and run:Ensure the command ran without errors.
Install-ADServiceAccount -Identity DatadogGMSA
- Ensure the target machine is part of the
Agent のインストール
If you need to install a specific version of the Agent, see the installer list.
Install via the GUI
- Datadog Agent インストーラーをダウンロードし、最新バージョンの Agent をインストールします。
datadog-agent-7-latest.amd64.msiを開いてインストーラーを実行します。プロンプトが表示されたら、管理者資格情報を入力します。- プロンプトに従ってライセンス契約に同意し、Datadog API キーを入力します。
- When prompted for the “Datadog Agent User Account”, enter the username of the gMSA. For example,
<YOUR_DOMAIN_NAME>\DatadogGMSA$and no password. インストールが終了したら、オプションから Datadog Agent Manager を起動できます。
Install with the command line
- Open PowerShell with Administrator privileges.
- Run the following command to install the Datadog Agent:
Note: Replace DatadogGMSA$ with the username of your gMSA. The username must end with a $ symbol.
Start-Process -Wait msiexec -ArgumentList '/qn /i datadog-agent-7-latest.amd64.msi APIKEY="<YOUR_DATADOG_API_KEY>" DDAGENTUSER_NAME="<YOUR_DOMAIN_NAME>\DatadogGMSA$'
Installation configuration options
Windows に Agent をインストールする際、以下の各構成オプションをコマンドラインのプロパティとして追加することができます。その他の Agent 構成オプションについては、その他の Agent 構成オプションを参照してください。
| 変数 | タイプ | 説明 |
|---|---|---|
APIKEY | 文字列 | Datadog API キーを構成ファイルに追加します。 |
SITE | 文字列 | Datadog インテークサイトを設定します。例: SITE= |
TAGS | 文字列 | 構成ファイル内で割り当てるタグのカンマ区切りリスト。例: TAGS="key_1:val_1,key_2:val_2" |
HOSTNAME | 文字列 | Agent から Datadog に報告されるホスト名を設定します (実行時に計算されたホスト名を上書きします)。 |
DDAGENTUSER_NAME | 文字列 | Agent インストール時に使用されるデフォルトの ddagentuser ユーザー名を上書きします (v6.11.0 以降)。Datadog Windows Agent ユーザーについては、こちらを参照してください。 |
DDAGENTUSER_PASSWORD | 文字列 | Agent インストール時に ddagentuser ユーザー用に生成された暗号論的に安全なパスワードを上書きします (v6.11.0 以降)。ドメインサーバー上のインストールにはこれを提供する必要があります。Datadog Windows Agent ユーザーについては、こちらを参照してください。 |
APPLICATIONDATADIRECTORY | パス | 構成ファイルのディレクトリツリーに使用するディレクトリを上書きします。初期インストール時にのみ提供でき、アップグレードでは無効です。デフォルト: C:\ProgramData\Datadog (v6.11.0 以降) |
PROJECTLOCATION | パス | バイナリファイルのディレクトリツリーに使用するディレクトリを上書きします。初期インストール時にのみ提供でき、アップグレードでは無効です。デフォルト: %ProgramFiles%\Datadog\Datadog Agent (v6.11.0 以降) |
注
/qnオプションはバックグラウンドインストールを実行します。GUI プロンプトを表示する場合は、削除してください。- Agent のバージョンによっては、強制的に再起動する場合があります。これを防ぐには、パラメーター
REBOOT=ReallySuppressを追加します。 - Agent コンポーネントの中には、データを収集するためにカーネルドライバーを必要とするものがあります。お使いのコンポーネントにカーネルドライバーが必要かどうかは、そのコンポーネントのドキュメントページを参照するか、関連する Agent コンフィギュレーションファイルで
kernel driverを検索してください。 - 有効な
datadog.yamlが見つかった場合は、そのファイルが、指定されているすべてのコマンドラインオプションより優先されます。
その他の Agent 構成オプション
Windows に Agent をインストールする際、以下の各構成オプションをコマンドラインのプロパティとして追加することができます。
注: 有効な datadog.yaml が見つかった場合は、そのファイルが、指定されているすべてのコマンドラインオプションより優先されます。
| 変数 | タイプ | 説明 |
|---|---|---|
LOGS_ENABLED | 文字列 | Enable ("true") or disable ("false") the log collection feature in the configuration file. Logs are disabled by default. |
APM_ENABLED | 文字列 | 構成ファイルで、APM Agent を有効 ("true") または無効 ("false") にします。デフォルトでは、APM は有効です。 |
PROCESS_ENABLED | 文字列 | 構成ファイルで、Process Agent を有効 ("true") または無効 ("false") にします。デフォルトでは、Process Agent は無効です。 |
HOSTNAME_FQDN_ENABLED | 文字列 | Agent のホスト名に対する FQDN の使用を有効 ("true") または無効 ("false") にします。これは、Agent コンフィギュレーションファイルの hostname_fqdn を設定することと同等です。ホスト名の FQDN の使用は、デフォルトでは無効になっています。(v6.20.0+) |
CMD_PORT | 数値 | 0 から 65534 までの有効なポート番号。Datadog Agent はコマンド API をポート 5001 で公開します。このポートが既に別のプログラムで使用されている場合は、この変数でデフォルトを上書きできます。 |
PROXY_HOST | 文字列 | (If using a proxy) sets your proxy host. Learn more about using a proxy with the Datadog Agent. |
PROXY_PORT | 数値 | (If using a proxy) sets your proxy port. Learn more about using a proxy with the Datadog Agent. |
PROXY_USER | 文字列 | (If using a proxy) sets your proxy user. Learn more about using a proxy with the Datadog Agent. |
PROXY_PASSWORD | 文字列 | (If using a proxy) sets your proxy password. For the process/container Agent, this variable is required for passing in an authentication password and cannot be renamed. Learn more about using a proxy with the Datadog Agent. |
EC2_USE_WINDOWS_PREFIX_DETECTION | Boolean | EC2 上の Windows ホストの EC2 インスタンス ID を使用します。(v7.28.0+) |
[非推奨] ADDLOCAL | 文字列 | Enable additional Agent component. Setting to "MainApplication,NPM" causes the driver component for Network Performance Monitoring to be installed. (version 7.44.0 and previous) |
Note: Agent 7 only supports Python 3. Before upgrading, confirm that your custom checks are compatible with Python 3. See the Python 3 Custom Check Migration guide for more information. If you’re not using custom checks or have already confirmed their compatibility, upgrade normally.
If you’re upgrading from a Datadog Agent version < 5.12.0, first upgrade to a more recent version of Agent 5 (>= 5.12.0 but < 6.0.0) using the EXE installer and then upgrade to Datadog Agent version >= 6.
インストールログファイル
Agent のインストールログファイルは %TEMP%\MSI*.LOG にあります。
検証
インストールを確認するには、Agent のステータスと情報 セクションの手順に従ってください。
Agent のコマンド
Agent の実行は、Windows サービスコントロールマネージャーによって制御されます。
- メインの実行可能ファイルは
agent.exeです。場所は以下の通り、Agent のバージョンにより異なります。- Agent バージョン 6.11 以前:
"C:\Program Files\Datadog\Datadog Agent\embedded\agent.exe" - Agent バージョン 6.12 以降:
"C:\Program Files\Datadog\Datadog Agent\bin\agent.exe"
- Agent バージョン 6.11 以前:
- 構成 GUI は、ブラウザベースの構成アプリケーションです (Windows 64 ビット版のみ)。
- コマンドは**管理者特権 (管理者として実行)**のコマンドライン (PowerShell またはコマンドプロンプト) から、構文
<PATH_TO_AGENT.EXE> <COMMAND>を使用して実行できます。 - コマンドラインのオプションは次の通りです。
| コマンド | 説明 |
|---|---|
| check | 指定されたチェックを実行します。 |
| diagnose | システムに対して接続診断を実行します。 |
| flare | フレアを収集して Datadog に送信します。 |
| help | コマンドのヘルプを表示します。 |
| hostname | Agent が使用するホスト名を出力します。 |
| import | 以前のバージョンの Agent から構成ファイルをインポートして変換します。 |
| launch-gui | Datadog Agent Manager を起動します。 |
| restart-service | サービスコントロールマネージャー内で Agent を再起動します。 |
| run | Agent を起動します。 |
| start | Agent を起動します。(非推奨ですが、受け付けられます。代わりに run を使用してください。) |
| start-service | サービスコントロールマネージャー内で Agent を起動します。 |
| status | 現在のステータスを出力します。 |
| stopservice | サービスコントロールマネージャー内で Agent を停止します。 |
| version | バージョン情報を出力します。 |
- 例:
PowerShell (
powershell.exe)& "$env:ProgramFiles\Datadog\Datadog Agent\bin\agent.exe" status & "$env:ProgramFiles\Datadog\Datadog Agent\bin\agent.exe" launch-gui & "$env:ProgramFiles\Datadog\Datadog Agent\bin\agent.exe" flareコマンドプロンプト (
cmd.exe)"%ProgramFiles%\Datadog\Datadog Agent\bin\agent.exe" status "%ProgramFiles%\Datadog\Datadog Agent\bin\agent.exe" launch-gui "%ProgramFiles%\Datadog\Datadog Agent\bin\agent.exe" flare
構成
Datadog Agent Manager を使ってチェックを有効化、無効化、および構成します。Agent を再起動して変更内容を適用します。
メインの Agent コンフィギュレーションファイルの場所:
C:\ProgramData\Datadog\datadog.yaml
インテグレーション用構成ファイルの場所:
C:\ProgramData\Datadog\conf.d\ または
C:\Documents and Settings\All Users\Application Data\Datadog\conf.d\
注: ProgramData は隠しフォルダーです。
Agent のアンインストール
Windows で Agent をアンインストールするには、2 つの異なる方法があります。どちらの方法でも Agent は削除されますが、ホスト上の C:\ProgramData\Datadog 構成フォルダは削除されません。
プログラムの追加と削除
- CTRL キーと Esc キーを押すか、Windows キーで Windows Search を実行します。
addを検索し、Add or remove programs をクリックします。Datadog Agentを検索し、Uninstall をクリックします。
PowerShell
注: 以下のコマンドを使用する場合は、WinRM を有効にしてください。
以下の PowerShell コマンドを使用して、再起動せずに Agent をアンインストールします。
$productCode = (@(Get-ChildItem -Path "HKLM:SOFTWARE\Microsoft\Windows\CurrentVersion\Uninstall" -Recurse) | Where {$_.GetValue("DisplayName") -like "Datadog Agent" }).PSChildName
start-process msiexec -Wait -ArgumentList ('/log', 'C:\uninst.log', '/q', '/x', "$productCode", 'REBOOT=ReallySuppress')
トラブルシューティング
Agent のステータスと情報
Agent が実行されていることを確認するには、サービスパネルで DatadogAgent サービスが “Started” になっているかどうかをチェックします。また、Datadog Metrics Agent (agent.exe) というプロセスがタスクマネージャーに存在している必要があります。
Agent の状態に関する詳細な情報が必要な場合は、次のようにして Datadog Agent Manager を起動します。
- Datadog Agent のシステムトレイアイコンを右クリックし、“構成” を選択します。
- **管理者特権 (管理者として実行)**のコマンドラインから
launch-guiコマンドを実行- PowerShell:
& "<PATH_TO_AGENT.EXE>" launch-gui - cmd:
"<PATH_TO_AGENT.EXE>" launch-gui
- PowerShell:
次に、Status -> General と移動して、ステータスページを開きます。 Status -> Collector および Checks -> Summary で、チェックの実行に関する詳細な情報を取得します。
PowerShell では、次の status コマンドを使用できます。
& "$env:ProgramFiles\Datadog\Datadog Agent\bin\agent.exe" status
cmd.exe では、次のようにします。
"%ProgramFiles%\Datadog\Datadog Agent\bin\agent.exe" status
ログの場所
Agent のログは C:\ProgramData\Datadog\logs\agent.log にあります。
注: ProgramData は隠しフォルダーです。
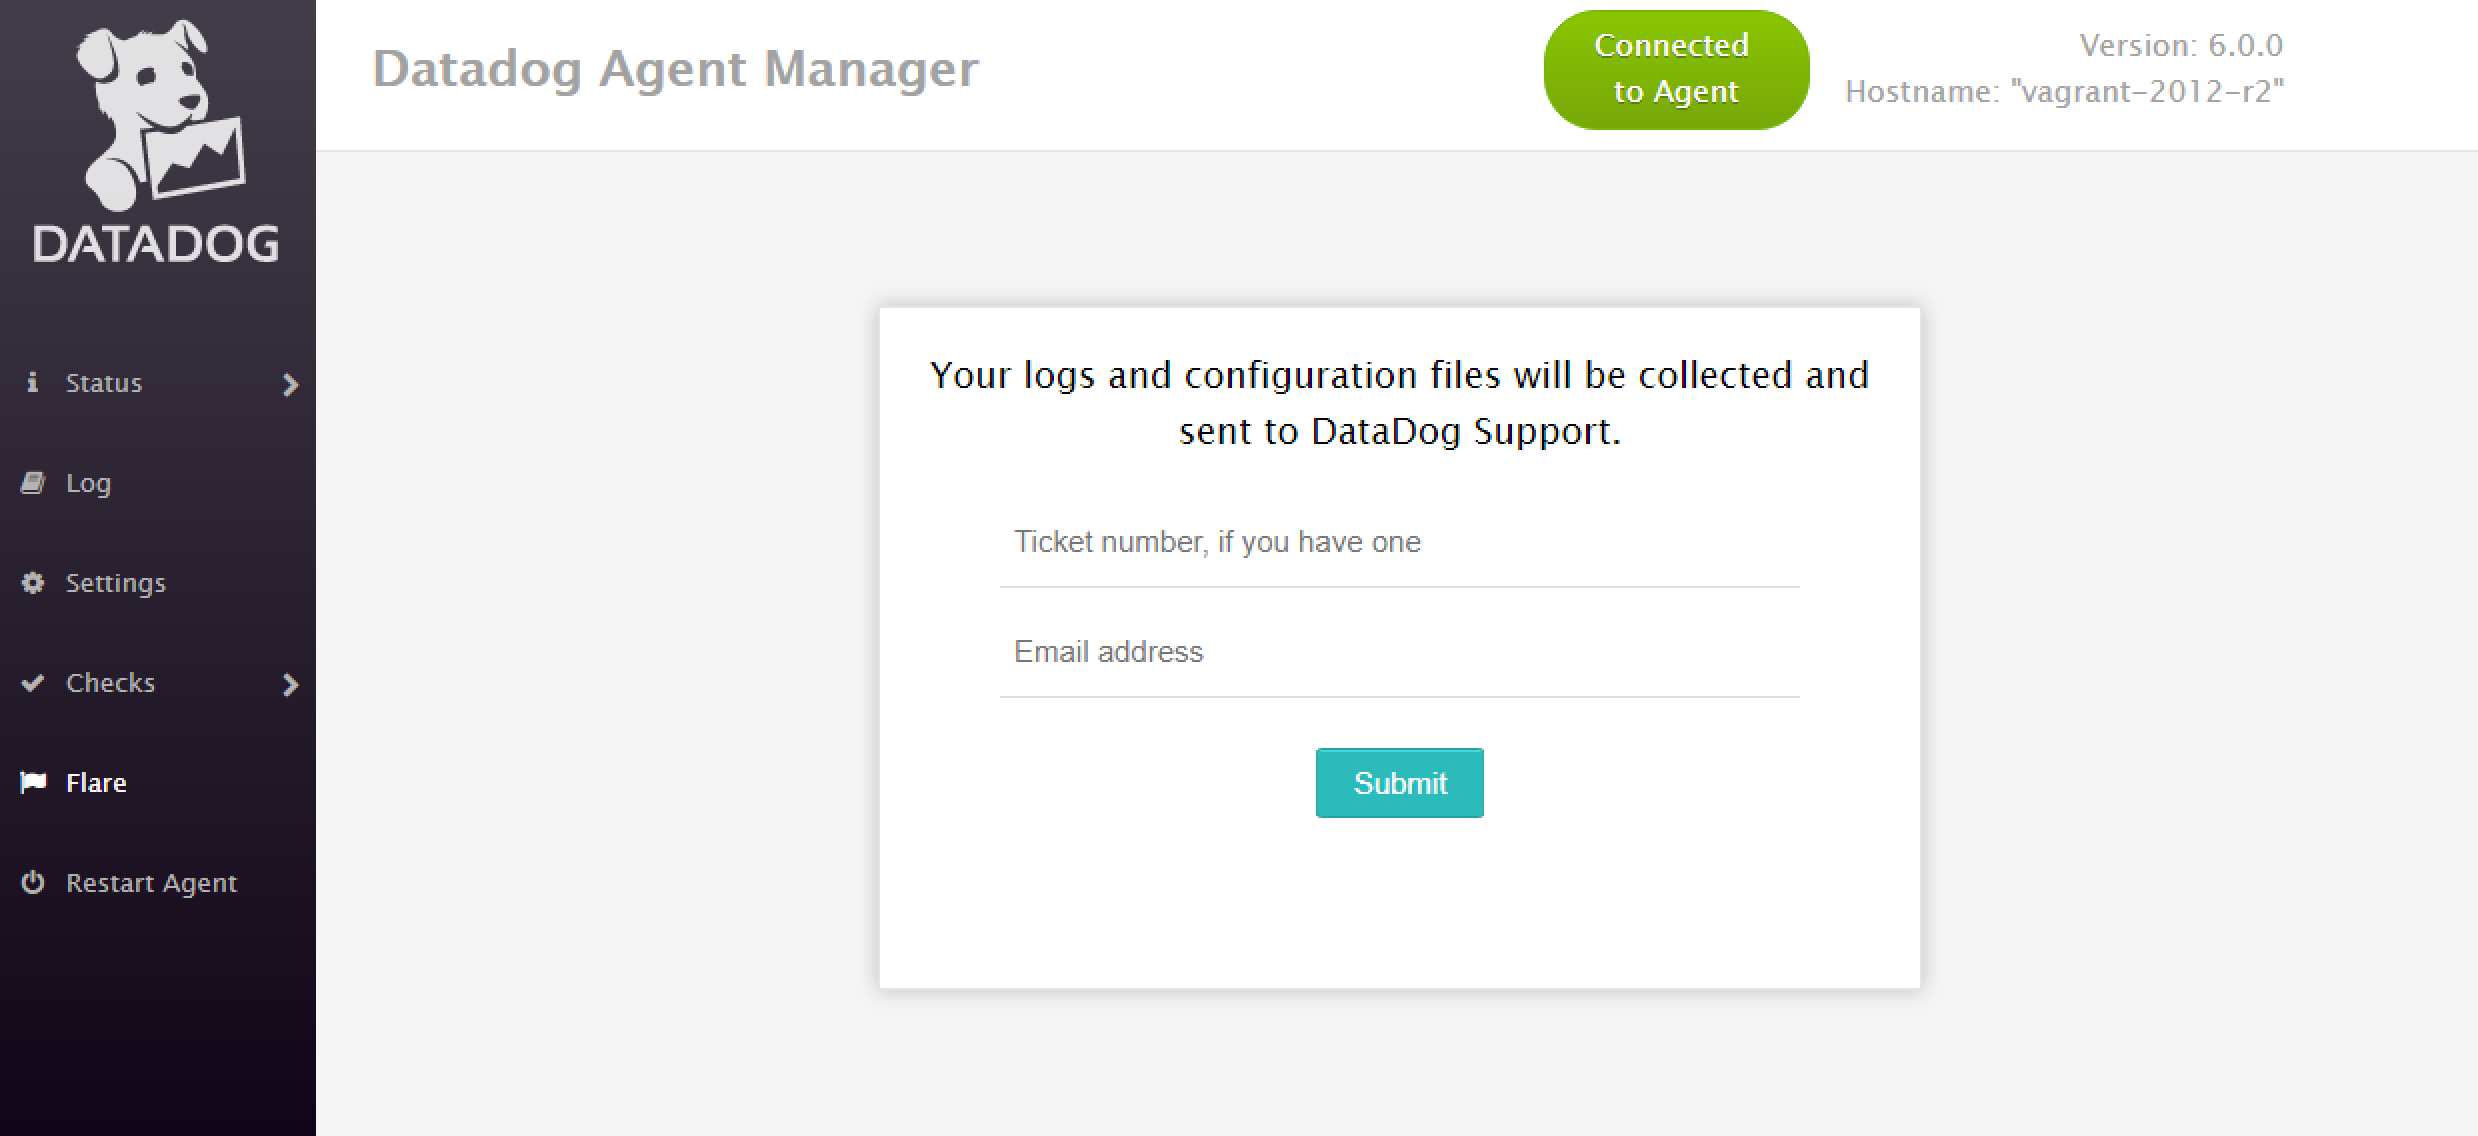
フレアの送信
http://127.0.0.1:5002 にアクセスして Datadog Agent Manager を表示します。
Flare タブを選択します。
チケット番号を入力します (お持ちの場合)。
Datadog へのログインに使用するメールアドレスを入力します。
Submit を押します。
PowerShell では、次の flare コマンドを使用できます。
& "$env:ProgramFiles\Datadog\Datadog Agent\bin\agent.exe" flare <CASE_ID>
cmd.exe では、次のようにします。
"%ProgramFiles%\Datadog\Datadog Agent\bin\agent.exe" flare <CASE_ID>
ユースケース
Windows サービスの監視
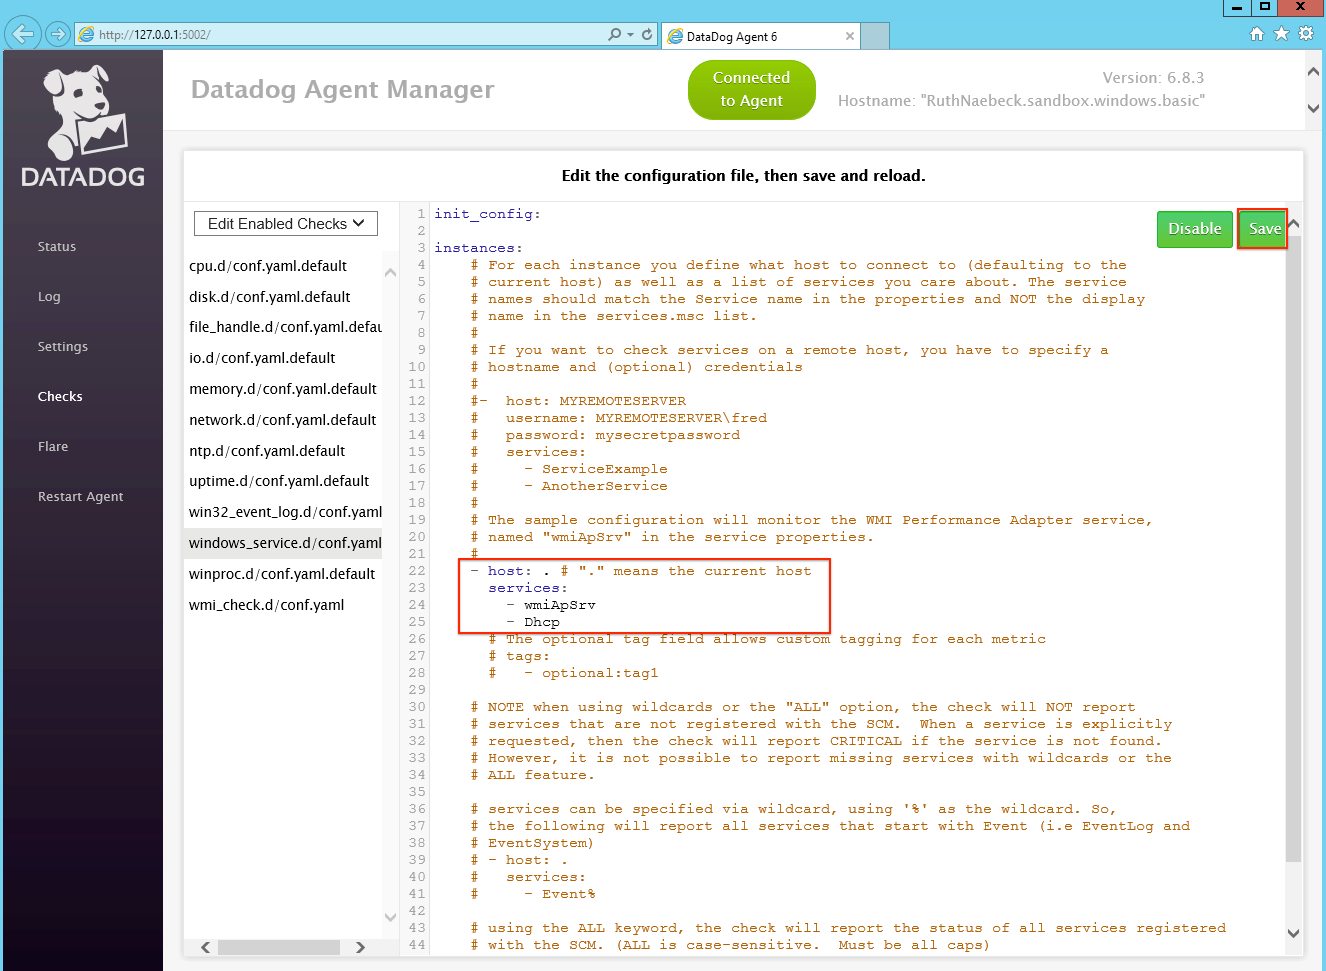
ターゲットホスト上で Datadog Agent Manager を起動し、リストから “Windows Service” インテグレーションを選択します。すぐに使用できるサンプルもありますが、この例では DHCP を使用します。
サービスの名前を確認するために、services.msc を開き、目的のサービスを見つけます。ターゲットとして DHCP を選択すると、次のように、サービスのプロパティウィンドウの上部にサービス名が表示されます。
独自のサービスを追加する場合は、次に示す書式に厳密に従ってください。書式が正しくないと、インテグレーションが失敗します。注: サービス名の特殊文字はエスケープする必要があります。たとえば、MSSQL$BILLING という名前の場合、MSSQL\$BILLING のように特殊文字を追加します。
また、インテグレーションを変更するたびに、Datadog サービスを再起動する必要があります。これは、services.msc または UI のサイドバーから行うことができます。
サービスの場合、Datadog が追跡するのはアベイラビリティのみで、メトリクスは追跡されません (メトリクスについては、プロセスまたは WMI インテグレーションを使います)。モニターをセットアップするには、インテグレーションモニタータイプを選択し、続いて Windows Service を検索します。Integration Status -> Pick Monitor Scope から、モニターしたいサービスを選びます。
Windows のシステム負荷の監視
Datadog Agent は、デフォルトで多数のシステムメトリクスを収集します。最も一般的に使用されるシステムメトリクスは system.load.* ですが、これらのメトリクスは Unix 固有です。
Windows は system.load.* メトリクスを提供していませんが、デフォルトで使用できる同等のオプションは system.proc.queue.length です。このメトリクスは、実行を待機しているプロセッサーレディキューで遅延として観察されたスレッドの数を示します。
Windows プロセスの監視
ライブプロセスモニタリングで Windows プロセスをモニターすることができます。これを Windows で有効にするには、次のパラメーターを真に設定することで Agent のメイン構成ファイルを編集します:
datadog.yaml:
process_config:
  enabled: "true"
構成が完了したら、Agent を再起動します。


