Supported OS
![Linux]()
![Mac OS]()
概要
Datadog Agent は、Gunicorn の主要なメトリクスとして、実行中のワーカープロセス数のみを収集します。サービスチェックについても、Gunicorn が実行中かどうかのみを送信します。
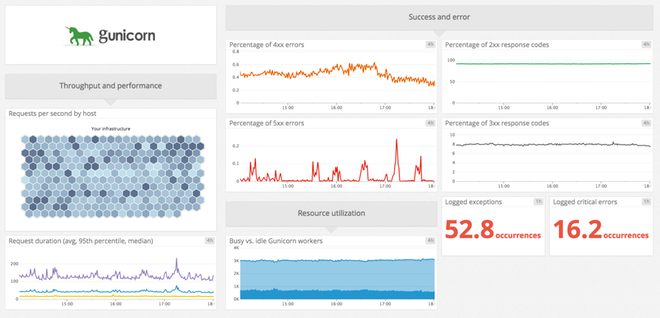
Gunicorn 自身は、これ以外にも以下のようなメトリクスを DogStatsD を使用して提供しています。
- 合計リクエスト率
- ステータスコード (2xx、3xx、4xx、5xx) 別のリクエスト率
- リクエスト処理時間 (平均値、中央値、最大値、95 パーセンタイルなど)
- ログレベル (重大、エラー、警告、例外) 別のログメッセージ率
セットアップ
インストール
Datadog Agent の Gunicorn チェックは Datadog Agent パッケージに含まれています。Gunicorn サーバーに追加でインストールする必要はありません。
Gunicorn チェックでは、Gunicorn アプリの Python 環境に setproctitle パッケージが含まれている必要があります。これがないと、Datadog Agent は常に gunicorn マスタープロセスが見つからない (したがって、ワーカーも見つからない) と報告します。gunicorn.workers メトリクスを収集する場合は、アプリの Python 環境に setproctitle パッケージをインストールしてください。
構成
Gunicorn のメトリクスとログの収集を開始するには、Agent の構成ディレクトリのルートにある conf.d/ フォルダーの gunicorn.d/conf.yaml ファイルを編集します。
使用可能なすべての構成オプションの詳細については、サンプル gunicorn.yaml を参照してください。
メトリクスの収集
Gunicorn の DogStatsD への接続
バージョン 19.1 以降の Gunicorn では、DogStatsD のような StatsD プロトコルを実装するデーモンにメトリクスを送信するオプションが提供されるようになりました。Gunicorn の多くのオプションと同様に、このオプションは CLI (--statsd-host) で gunicorn に渡すか、アプリの構成ファイル (statsd_host) で設定できます。すべての Gunicorn メトリクスを収集するには、"localhost:8125" で DogStatsD へメトリクスを送信するようにアプリを構成し、アプリを再起動します。
Gunicorn のメトリクスの収集を開始するには、gunicorn.d/conf.yaml ファイルに次の構成ブロックを追加します。
init_config:

instances:
    ## @param proc_name - 文字列 - 必須
    ## gunicorn プロセスの名前。次の gunicorn サーバーの場合:
    ##
    ## gunicorn --name <WEB_APP_NAME> <WEB_APP_CONFIG>.ini
    ##
    ## 名前は `<WEB_APP_NAME>` です
  - proc_name: <YOUR_APP_NAME>
- Agent を再起動すると、Datadog への Gunicorn メトリクスの送信が開始されます。
ログ収集
Agent バージョン 6.0 以降で利用可能
Datadog Agent で、ログの収集はデフォルトで無効になっています。以下のように、datadog.yaml ファイルでこれを有効にします。
アクセスログファイルのパスを構成する場合は、次のコマンドを使用します。
--access-logfile <MY_FILE_PATH>
エラーログファイルのパスを構成する場合は、次のコマンドを使用します。
--error-logfile FILE, --log-file <MY_FILE_PATH>
Gunicorn のログの収集を開始するには、次の構成ブロックを gunicorn.d/conf.yaml ファイルに追加します。
logs:
  - type: file
    path: /var/log/gunicorn/access.log
    service: "<MY_SERVICE>"
    source: gunicorn

  - type: file
    path: /var/log/gunicorn/error.log
    service: "<MY_SERVICE>"
    source: gunicorn
    log_processing_rules:
      - type: multi_line
        name: log_start_with_date
        pattern: \[\d{4}-\d{2}-\d{2}
service パラメーターと path パラメーターの値を変更し、環境に合わせて構成します。使用可能なすべてのコンフィギュレーションオプションについては、サンプル gunicorn.yaml を参照してください。
Agent を再起動します。
検証
Agent の status サブコマンドを実行し、Checks セクションで gunicorn を探します。
ステータスが OK でない場合は、トラブルシューティングセクションを参照してください。
netstat を使用して、Gunicorn が自身のメトリクスを送信していることを確認します。
$ sudo netstat -nup | grep "127.0.0.1:8125.*ESTABLISHED"
udp        0      0 127.0.0.1:38374         127.0.0.1:8125          ESTABLISHED 15500/gunicorn: mas
収集データ
メトリクス
イベント
Gunicorn チェックには、イベントは含まれません。
サービスチェック
gunicorn.is_running
Agent が Gunicorn マスタープロセスを見つけられない場合は、CRITICAL を返します。それ以外の場合は、OK を返します。
Statuses: ok, クリティカル
トラブルシューティング
Agent が Gunicorn プロセスを見つけられない
  Checks
  ======

    gunicorn (5.12.1)
    -----------------
      - instance #0 [ERROR]: 'Found no master process with name: gunicorn: master [my_web_app]'
      - Collected 0 metrics, 0 events & 1 service check
      - Dependencies:
          - psutil: 4.4.1
Gunicorn が実際には実行されていないか、アプリの Python 環境に setproctitle パッケージがインストールされていないことが原因です。
setproctitle がインストールされていない場合は、プロセステーブルに Gunicorn が次のように表示されます。
$ ps -ef | grep gunicorn
ubuntu   18013 16695  2 20:23 pts/0    00:00:00 /usr/bin/python /usr/bin/gunicorn --config test-app-config.py gunicorn-test:app
ubuntu   18018 18013  0 20:23 pts/0    00:00:00 /usr/bin/python /usr/bin/gunicorn --config test-app-config.py gunicorn-test:app
ubuntu   18019 18013  0 20:23 pts/0    00:00:00 /usr/bin/python /usr/bin/gunicorn --config test-app-config.py gunicorn-test:app
インストールされている場合は、Datadog Agent が想定する形式で gunicorn プロセスが表示されます。
$ ps -ef | grep gunicorn
ubuntu   18457 16695  5 20:26 pts/0    00:00:00 gunicorn: master [my_app]
ubuntu   18462 18457  0 20:26 pts/0    00:00:00 gunicorn: worker [my_app]
ubuntu   18463 18457  0 20:26 pts/0    00:00:00 gunicorn: worker [my_app]
その他の参考資料