- Principales informations
- Getting Started
- Datadog
- Site Datadog
- DevSecOps
- Serverless for AWS Lambda
- Agent
- Intégrations
- Conteneurs
- Dashboards
- Monitors
- Logs
- Tracing
- Profileur
- Tags
- API
- Service Catalog
- Session Replay
- Continuous Testing
- Surveillance Synthetic
- Incident Management
- Database Monitoring
- Cloud Security Management
- Cloud SIEM
- Application Security Management
- Workflow Automation
- CI Visibility
- Test Visibility
- Intelligent Test Runner
- Code Analysis
- Learning Center
- Support
- Glossary
- Standard Attributes
- Guides
- Agent
- Intégrations
- OpenTelemetry
- Développeurs
- Authorization
- DogStatsD
- Checks custom
- Intégrations
- Create an Agent-based Integration
- Create an API Integration
- Create a Log Pipeline
- Integration Assets Reference
- Build a Marketplace Offering
- Create a Tile
- Create an Integration Dashboard
- Create a Recommended Monitor
- Create a Cloud SIEM Detection Rule
- OAuth for Integrations
- Install Agent Integration Developer Tool
- Checks de service
- IDE Plugins
- Communauté
- Guides
- API
- Application mobile
- CoScreen
- Cloudcraft
- In The App
- Dashboards
- Notebooks
- DDSQL Editor
- Alertes
- Infrastructure
- Métriques
- Watchdog
- Bits AI
- Service Catalog
- API Catalog
- Error Tracking
- Service Management
- Infrastructure
- Universal Service Monitoring
- Conteneurs
- Sans serveur
- Surveillance réseau
- Cloud Cost
- Application Performance
- APM
- Profileur en continu
- Database Monitoring
- Agent Integration Overhead
- Setup Architectures
- Configuration de Postgres
- Configuration de MySQL
- Configuration de SQL Server
- Setting Up Oracle
- Setting Up MongoDB
- Connecting DBM and Traces
- Données collectées
- Exploring Database Hosts
- Explorer les métriques de requête
- Explorer des échantillons de requêtes
- Dépannage
- Guides
- Data Streams Monitoring
- Data Jobs Monitoring
- Digital Experience
- RUM et Session Replay
- Product Analytics
- Surveillance Synthetic
- Continuous Testing
- Software Delivery
- CI Visibility
- CD Visibility
- Test Visibility
- Exécuteur de tests intelligent
- Code Analysis
- Quality Gates
- DORA Metrics
- Securité
- Security Overview
- Cloud SIEM
- Cloud Security Management
- Application Security Management
- AI Observability
- Log Management
- Pipelines d'observabilité
- Log Management
- Administration
Incident Details Page
Cette page n'est pas encore disponible en français, sa traduction est en cours.
Si vous avez des questions ou des retours sur notre projet de traduction actuel, n'hésitez pas à nous contacter.
Si vous avez des questions ou des retours sur notre projet de traduction actuel, n'hésitez pas à nous contacter.
Overview
Every incident in Datadog has its own Incident Details page where you can manage your incident’s property fields, signals, tasks, documents, responders, and notifications. An Incident Details page is available after you create a new incident. The Incident Details page contains a global header for quick access to key actions, while the remaining body of the page is divided into different sections using tabs to group related incident data together. The first of these sections is the Overview tab.
Global header
The global header provides access to the Status and Severity selectors, and links to your Incident Integrations. For more information on how to configure automatic links with every new incident for Slack and Microsoft Teams links, see Incident Settings.
After you’ve moved an incident to the resolved status, an option appears in the header to generate a postmortem Notebook using a postmortem template. Configure your postmortem templates in the Incident Settings page to predefine the structure and content of your postmortems.
Incident details overview tab
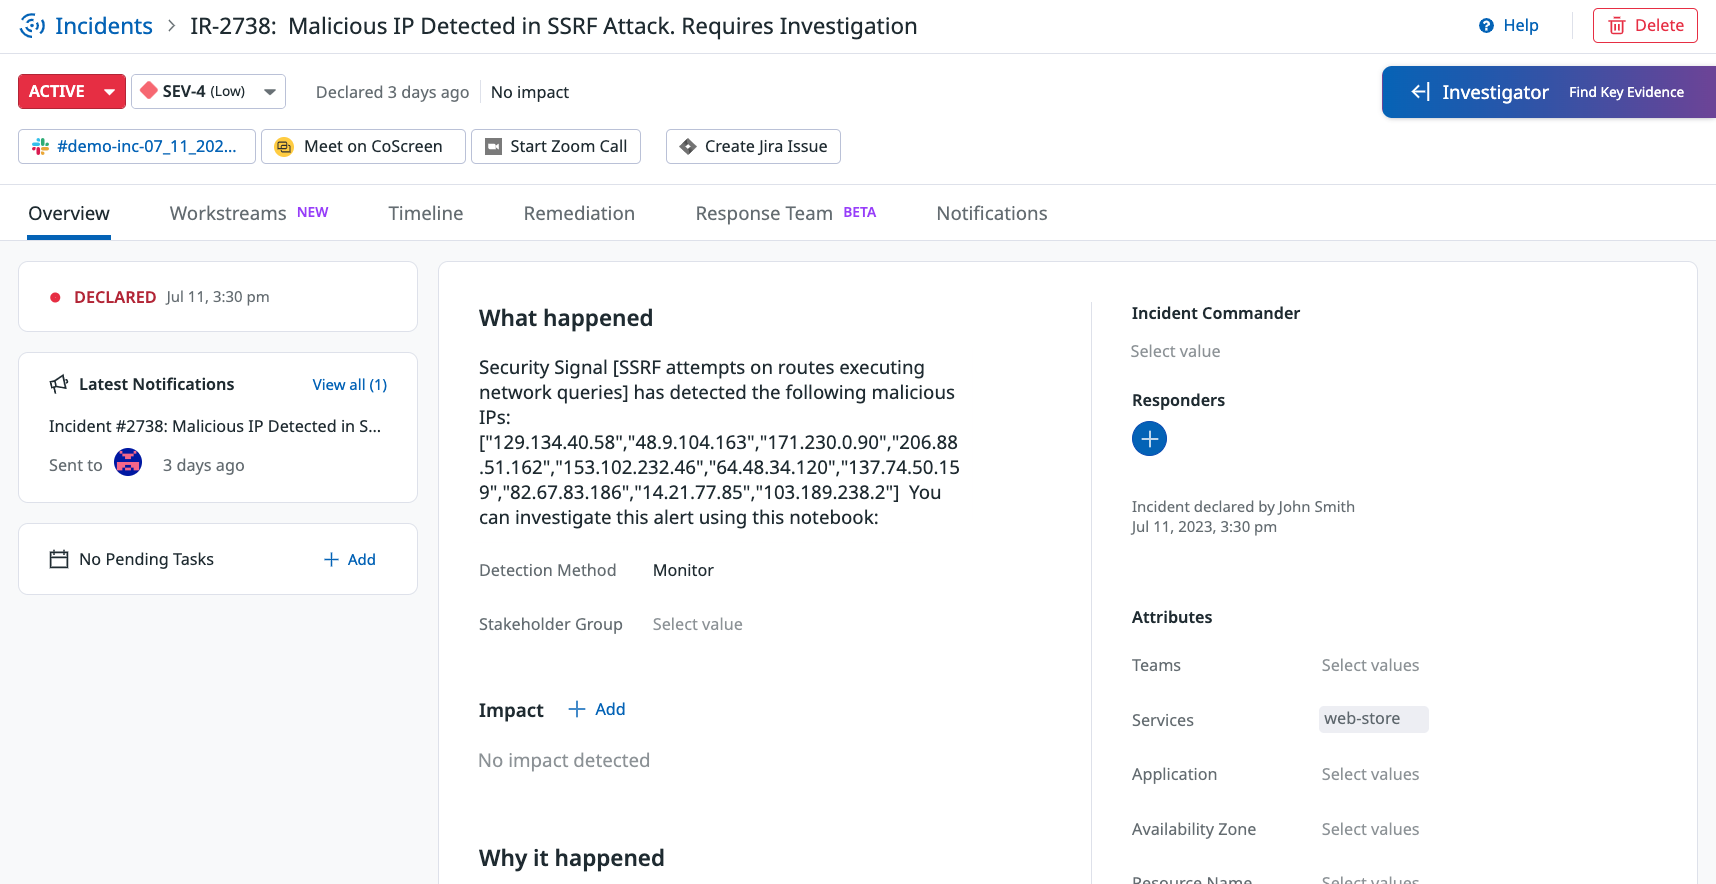
Use the Overview tab to specify an incident’s properties and define customer impact.
By default, all incidents have the following properties:
- Root Cause
- Services
- Teams
- Detection Method
- Summary
Properties are divided into the following three sections:
- What happened
- Why it happened
- Attributes
In Incident Settings, add additional property fields using the <KEY>:<VALUE> pairs from your Datadog metric tags, or create custom ones. Assign values to an incident’s properties to enable you to search for a subset of incidents on the Incident Homepage and to form queries when using Incident Management Analytics. You can also reorder your property fields and move them to different headings so the most important properties are in prominent locations.
If your incident is customer-facing, specify the details in the Impact section:
- Click Add.
- Specify a start date and time for the impact.
- Specify an end date and time for the impact or leave blank if the impact is still ongoing.
- Describe the nature of the impact on customers in
Scope of impact. - Click Save.
In addition to housing your property fields, the Overview tab also provides the following at-a-glance summary modules:
- Condensed Timeline: Displays the times when the incident changes state as well as when impact started and ended for a high-level view of the incident’s lifecycle.
- Latest Notifications: Displays the most recent notification sent for the incident, with quick access to the full list of notifications in the Notification section.
- Pending Tasks: Displays the most recent incomplete task, with quick access to the full list of tasks in the Remediation section.
- Responders: Displays the current incident commander and avatars for the remaining responders assigned to the incident.
- Recent timeline entries: Displays the five most recent entries in the incident timeline, with quick access to see the entire Timeline section.
Timeline section
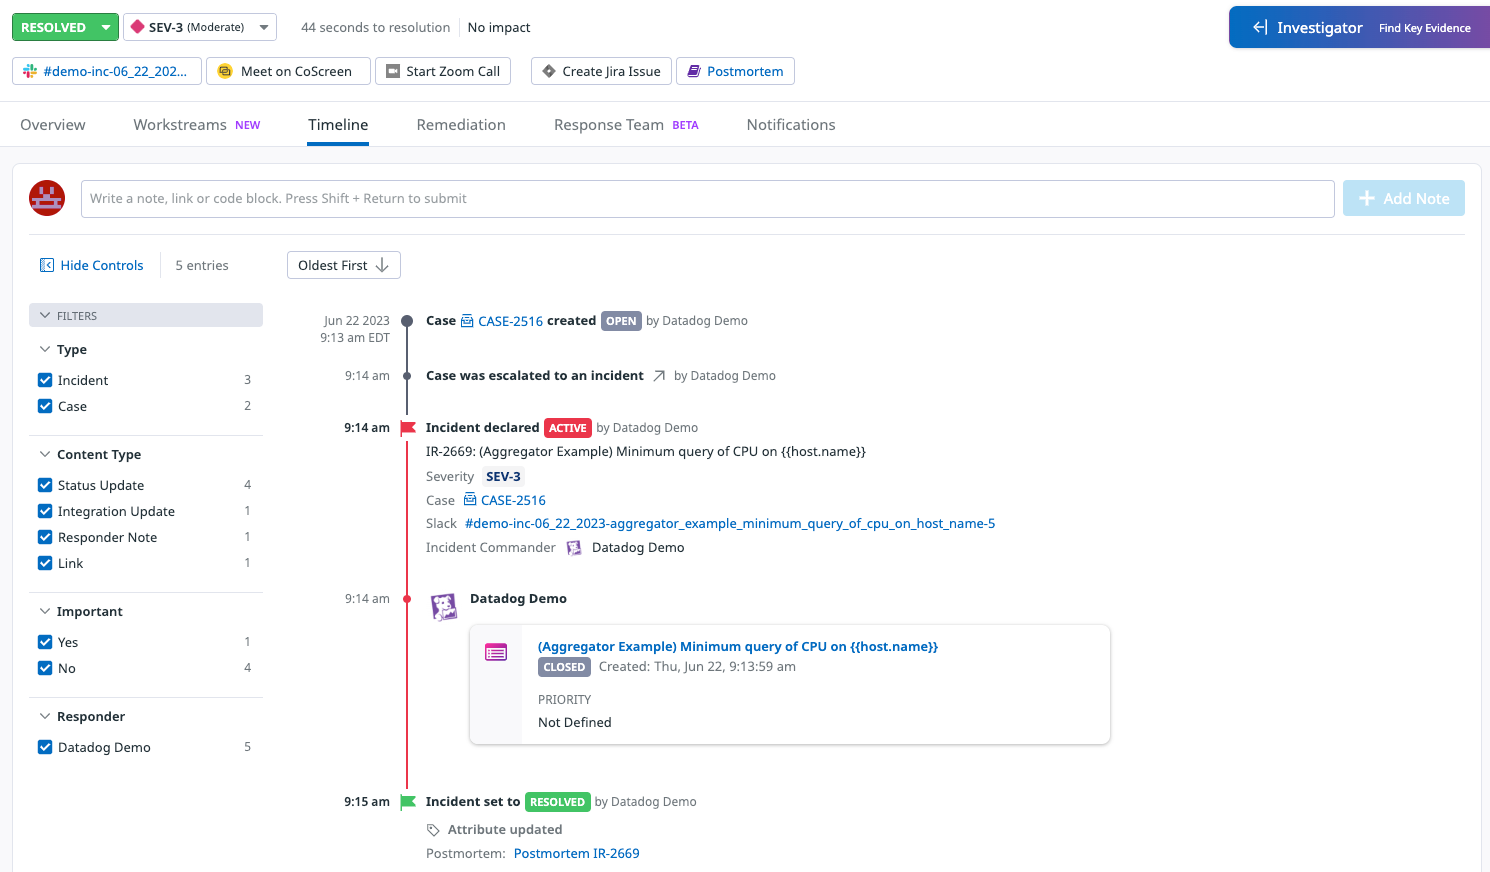
The Incident Timeline is the primary source of information for the work done during an incident. As actions are performed, new cells are added to the timeline in chronological order to capture the changes made, the person who made the change, and the time the changes were made.
Content types
Each cell has its own content type that indicates the kind of information the cell contains:
| Content type | Description |
|---|---|
| Responder note | A note manually written by an incident responder. Responder notes have the following sub-types: - Graph: The responder note contains one or more Datadog graphs - Link: The responder note contains a hyperlink - Code: The responder note contains text wrapped in Markdown syntax for code blocks |
| Incident update | Any changes made to an incident’s properties (including status and severity) or its impact. |
| Integration update | Any changes made through the Incident Management product’s integrations. |
| Task | Any changes made to incident tasks in the Remediation section of the Incident Details page. |
| Notification sent | An update when a manual notification is sent by an incident responder. |
Add responder notes directly to the timeline using the text box just underneath the tabs for switching between the different sections of the Incident Details page. Customize the timestamp of the responder note at creation time to capture important information that was relevant at an earlier point in time in the chronological order of the timeline. For responder notes you’ve authored, you can edit the content or timestamp, or delete the note entirely. You can also copy a link to a specific cell to share with teammates. Responder notes can be added to the timeline from Slack.
For graph cells specifically, graph definitions are stored using share URLs for graphs if enabled in your Organization Settings. When a graph cell is added to the timeline, it has full interactive hover states as found in Dashboards, Notebooks, and other pages. After 24 hours of being added to the timeline, the graphs are replaced with static images capturing what the graph was displaying. This is to ensure that graphs that are displaying short retention data have backup images captured even after the live data in the graphs has expired.
By default, timeline cells are sorted in oldest first order, but this can be changed to newest first using the button at the top of the timeline.
Remediation section
Use the Remediation section to store any documents or resources that are relevant to the remediation process of an incident, as well as to track key tasks for the remediation process.
Documents can be added by pasting the document URL and giving the link a human-readable name for quick access.
Incident tasks are created directly in the Remediation section, as well as through Datadog’s Slack integration.
From the Remediation section, type the description of your task in the creation text box. To assign a task to a Datadog user, type @ in the description text box, or use the Assignees column after the task has been created. An incident task can have more than one assignee. After a task has been created, it can also be assigned a due date.
As work for different tasks is finished, individual tasks can be marked as completed by clicking the checkbox to the left of the task’s description. If you have a large number of tasks, you can filter them down by searching for key words or by hiding completed tasks from view.
Response Team section
This feature is in open beta.
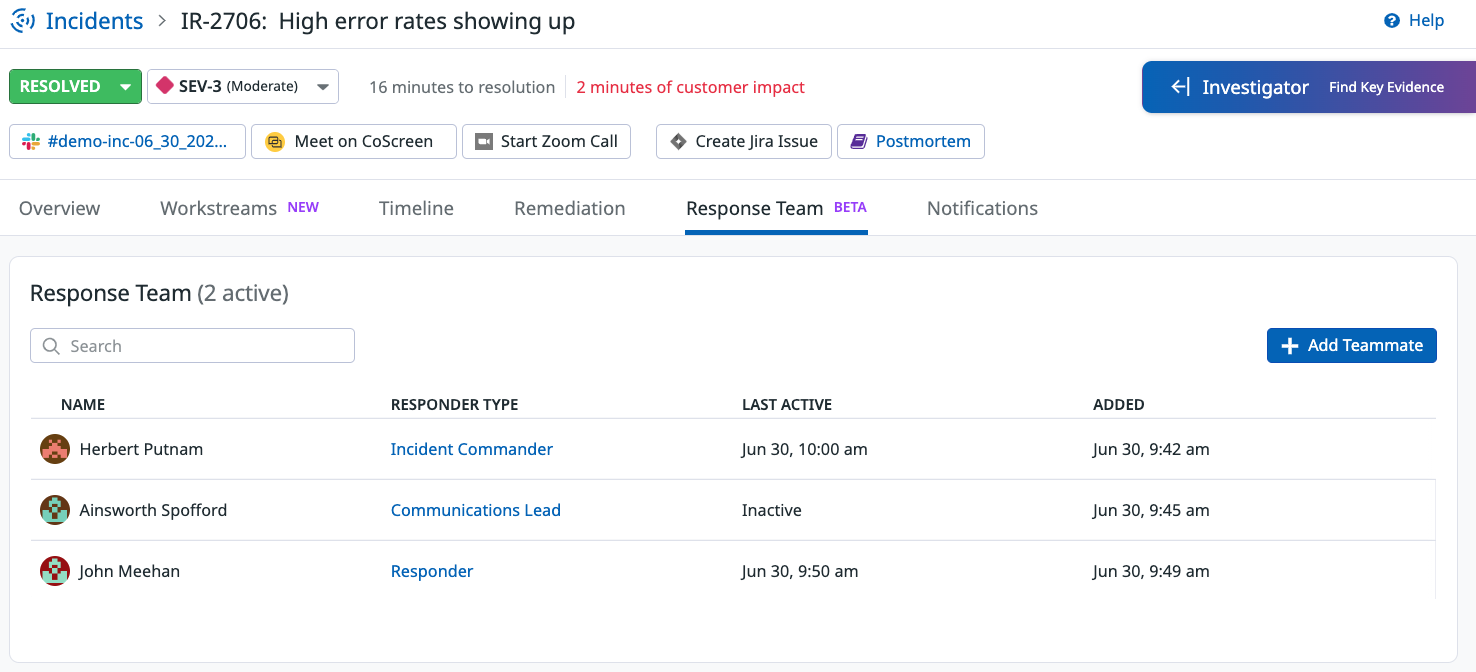
In the Response Team section, you can form your response team by adding other users and assigning them roles to carry out in the process of resolving an incident. The two default responder types provided by Datadog are:
Incident Commander- The individual responsible for leading the response teamResponder- An individual that actively contributes to investigating an incident and resolving its underlying issue
If you wish to create custom responder roles, you can do so in the Incident Settings for Responder Types. This allows you to create new responder types with custom names and descriptions. It also allows you to choose if a responder type should be a one person role or a multi person role.
Note: These roles are unrelated to those found in the Role Based Access Control (RBAC) system. RBAC roles control a user’s permissions to access certain features in Datadog. The Responder Types system in Incident Management does not change a user’s permissions in any capacity. It is instead about inviting responders to your incidents and giving them documented roles in your response process for visibility.
If you add an individual as a responder, they are notified through the email associated with their Datadog account. Anyone is able to change the role of a responder, but you can only remove an individual from an incident’s Response Team if they have the general Responder role assigned and have no activity in the incident. If there is already an Incident Commander assigned to an incident, assigning another individual as the Incident Commander transfers that role over to them. The previous Incident Commander is reassigned the general Responder role. A similar reassignment happens whenever you reassign one of your custom one person roles.
The Response Team list also saves the date and time when an individual was originally added to the response team of an incident, as well as the date and time when they last contributed something to the Incident Timeline.
Notifications section
All stakeholder notifications for an incident are consolidated in the Notifications section. You can manually create, save as draft, and send notifications directly from this page. Automated notifications sent by Notification Rules for the incident in question are also listed in this section.
To create a manual notification:
- Click the + New Notification button in the top right of the section.
- Enter your desired recipients. These can be any notification handles supported by Datadog including emails, Slack channels, PagerDuty handles, webhooks, and more.
- Select a Message Template.
- Edit the title and message of your notification as necessary using Markdown and any supported incident template variable by typing
{{.- Template variables are based on the properties of an incident. Before a message is sent, all template variables are replaced by the corresponding value of the referenced property that is available to the message when it was sent.
- Use the
{{incident.created}}variable to customize your message timezone. This template variable will display the option to set your variable time zone. - Send your notification or save it as a draft.
The Notifications section is separated into lists: Drafts and Sent.
Both lists display:
- The (intended) recipients of a notification
- The contents of the notification’s message and any renotification messages that were sent
- When the notification was last updated
- The original author of the notification
The Sent list also displays if a notification was manually or automatically sent by a notification rule. If the notification was automated, the rule that triggered the notification is displayed.
Getting started
Work through an example workflow in the Getting Started with Incident Management guide.
Further Reading
Documentation, liens et articles supplémentaires utiles:


