- Essentials
- Getting Started
- Datadog
- Datadog Site
- DevSecOps
- Serverless for AWS Lambda
- Agent
- Integrations
- Containers
- Dashboards
- Monitors
- Logs
- APM Tracing
- Profiler
- Tags
- API
- Service Catalog
- Session Replay
- Continuous Testing
- Synthetic Monitoring
- Incident Management
- Database Monitoring
- Cloud Security Management
- Cloud SIEM
- Application Security Management
- Workflow Automation
- CI Visibility
- Test Visibility
- Intelligent Test Runner
- Code Analysis
- Learning Center
- Support
- Glossary
- Standard Attributes
- Guides
- Agent
- Integrations
- OpenTelemetry
- Developers
- Authorization
- DogStatsD
- Custom Checks
- Integrations
- Create an Agent-based Integration
- Create an API Integration
- Create a Log Pipeline
- Integration Assets Reference
- Build a Marketplace Offering
- Create a Tile
- Create an Integration Dashboard
- Create a Recommended Monitor
- Create a Cloud SIEM Detection Rule
- OAuth for Integrations
- Install Agent Integration Developer Tool
- Service Checks
- IDE Plugins
- Community
- Guides
- API
- Datadog Mobile App
- CoScreen
- Cloudcraft
- In The App
- Dashboards
- Notebooks
- DDSQL Editor
- Sheets
- Monitors and Alerting
- Infrastructure
- Metrics
- Watchdog
- Bits AI
- Service Catalog
- API Catalog
- Error Tracking
- Service Management
- Infrastructure
- Application Performance
- APM
- Continuous Profiler
- Database Monitoring
- Data Streams Monitoring
- Data Jobs Monitoring
- Digital Experience
- Real User Monitoring
- Product Analytics
- Synthetic Testing and Monitoring
- Continuous Testing
- Software Delivery
- CI Visibility
- CD Visibility
- Test Visibility
- Intelligent Test Runner
- Code Analysis
- Quality Gates
- DORA Metrics
- Security
- Security Overview
- Cloud SIEM
- Cloud Security Management
- Application Security Management
- AI Observability
- Log Management
- Observability Pipelines
- Log Management
- Administration
Incident Settings
Overview
Use Incident Settings to customize aspects of the Incident Management experience for your entire organization. The individual settings are categorized and divided into different sub-sections. The main categories are: General, Notifications, and Remediation.
General
The General subsection of Incident Settings is used to define your organization’s severity levels and status levels, and to declare incident helper text.
Information
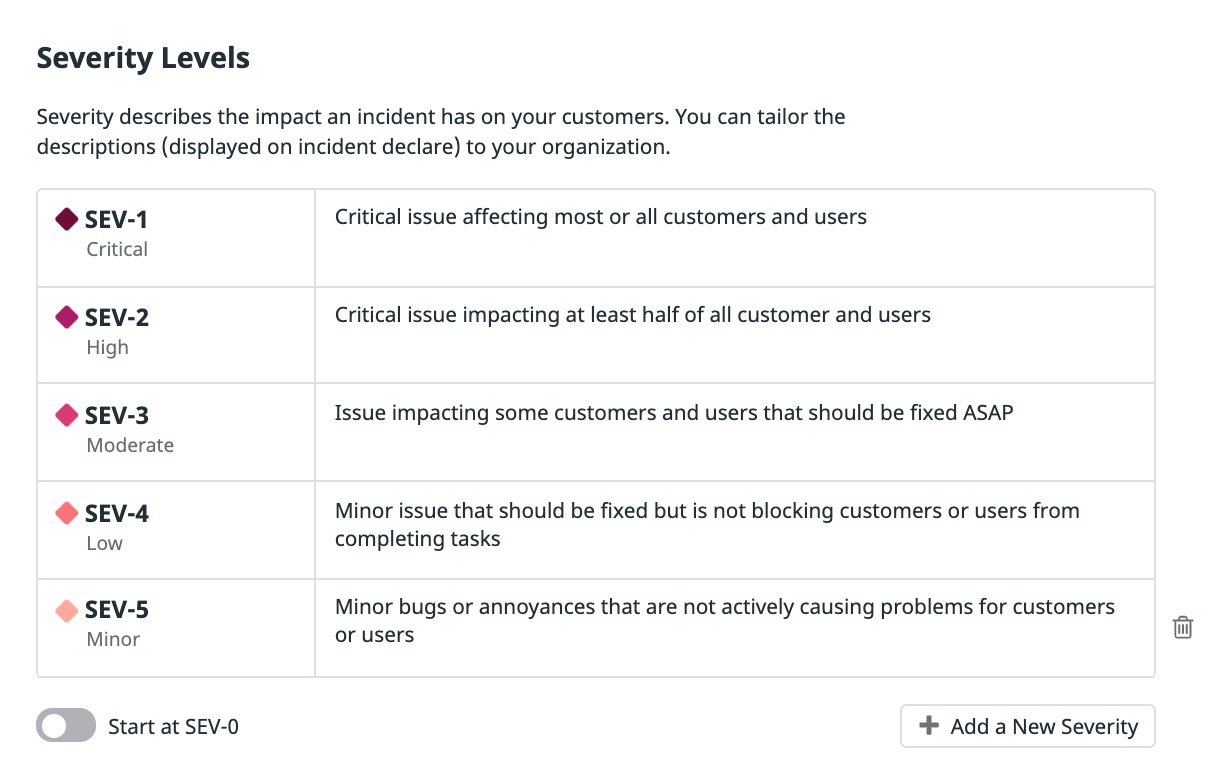
Use severity level settings to:
- Define your most critical severity as
SEV-0orSEV-1(defaults toSEV-1). - Customize the sub-labels of your severities (Defaults: Critical, High, Moderate, Low, Minor)
- Customize the descriptions of your severities.
- Add or delete severities from the bottom of your list, with a minimum of three and a maximum of ten.
Note: If you attempt to delete a severity that is referenced in a notification rule, you are prompted to confirm your decision. Choosing to proceed disables the impacted notification rules as they are no longer valid. Deleting a severity or changing the starting severity does not automatically update any Incident Management Analytics queries.
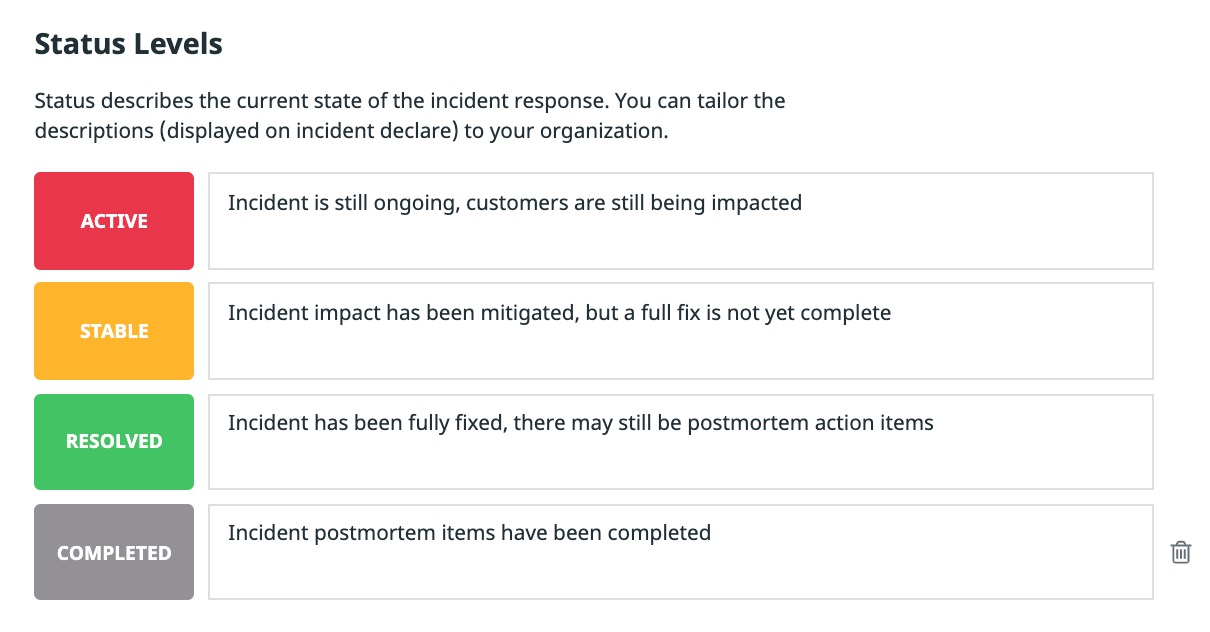
Use status level settings to:
- Customize the descriptions of the statuses.
- Choose whether to enable the optional
Completedstatus.
Note: Deleting the Completed status does not automatically update any incidents that are already in the Completed status, nor does it automatically update any Incident Management Analytics queries that explicitly reference it. Any notification rule that references the Completed status is disabled, as that rule is no longer valid.
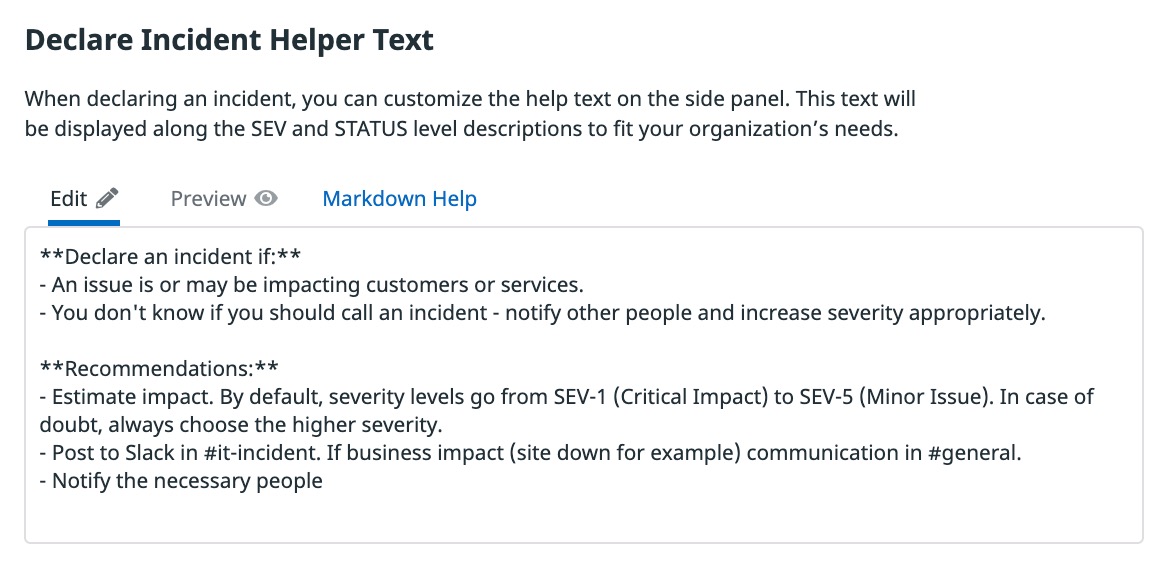
For the Declare Incident Helper Text settings, you can customize the helper text that appears alongside the severity and status level descriptions in the Incident Creation Modal. The helper text has Markdown support, which allows indented lists, text formatting, and hyperlinks to other instruction resources for incident responders.
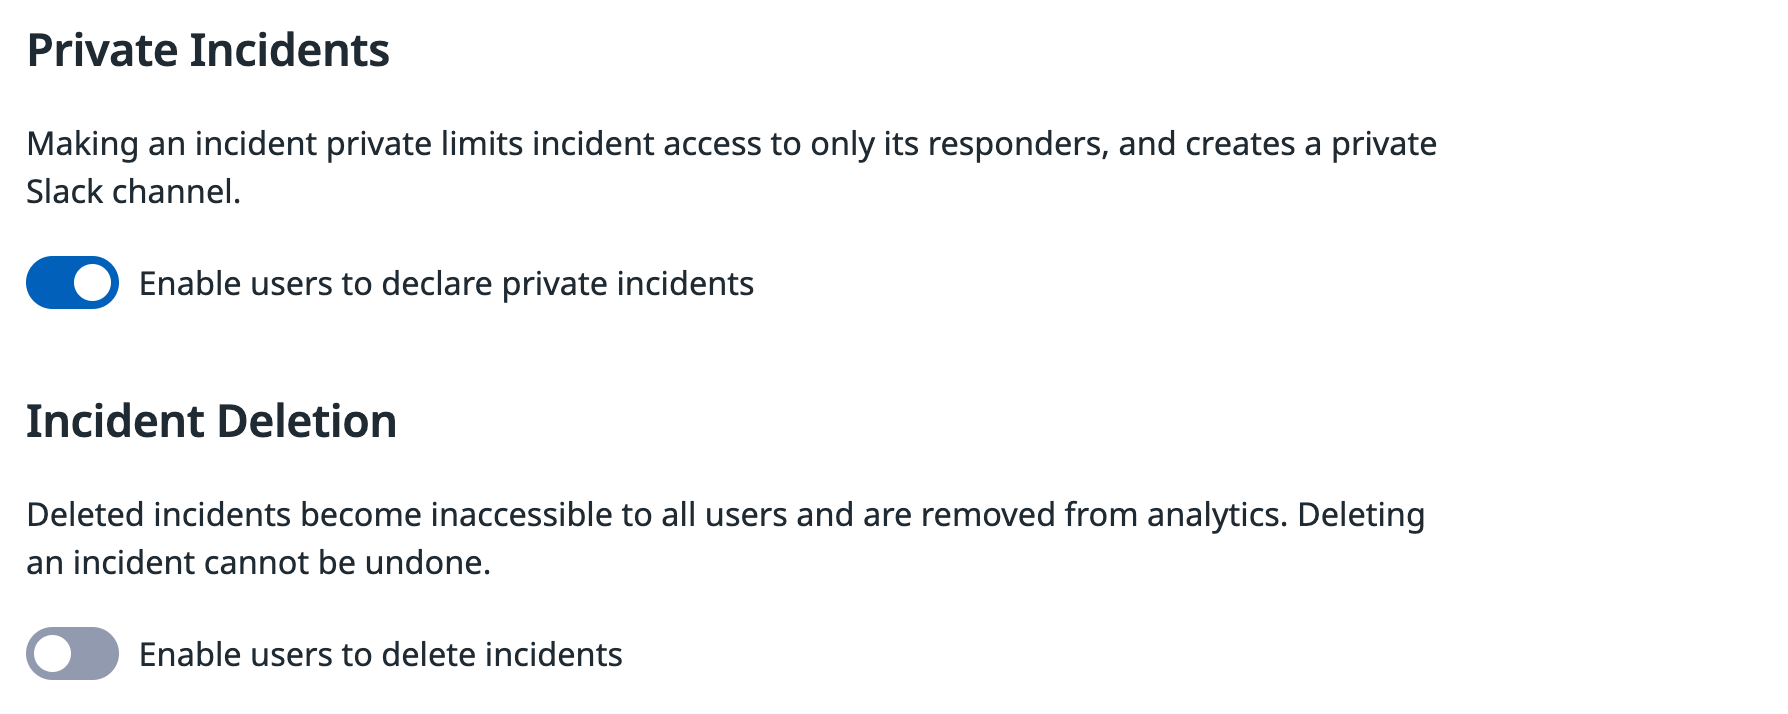
Enable users in your organization to make incidents private and to delete incidents. Private Incidents gives users the ability to limit access to incidents with sensitive information so that only responders of the incident can see it the details. Any previously created notification rules will not be sent when an incident is private. Incident Deletion gives users the ability to remove the incidents from the UI, including the analytics. By default, incident deletion is disabled.
Property fields
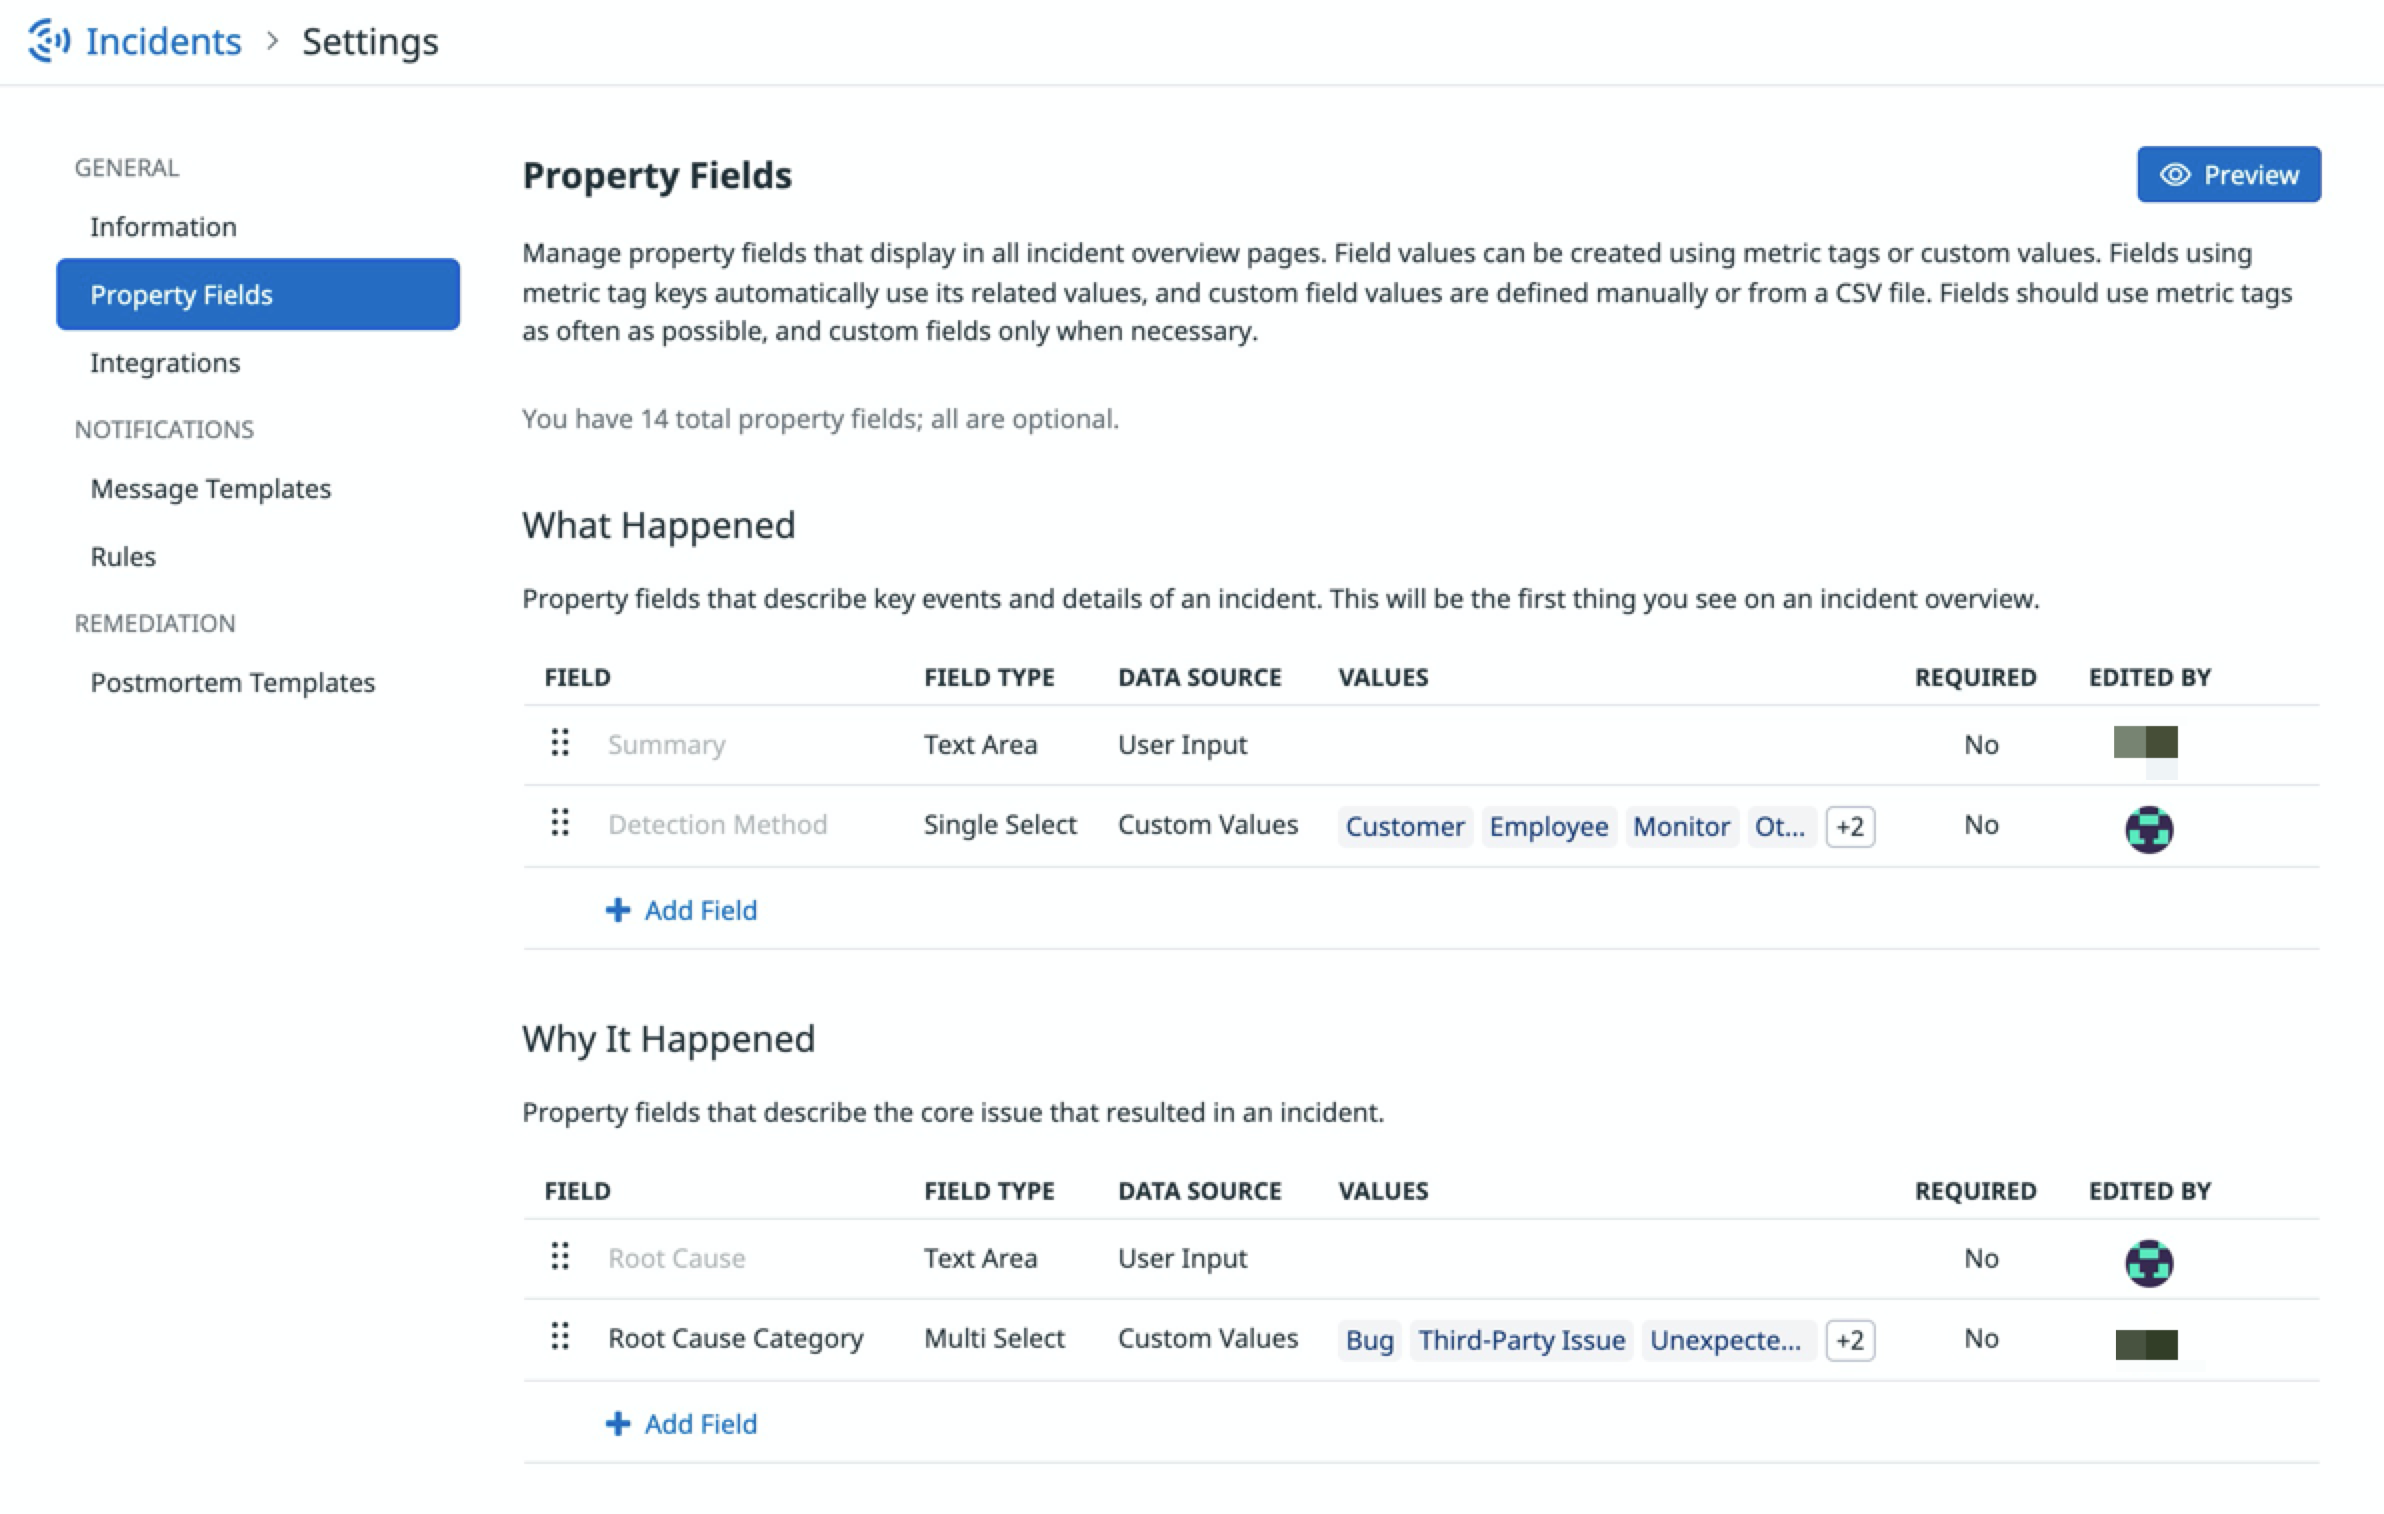
Property fields are key pieces of metadata you can tag your incidents with. This makes it easier to search for specific subsets of incidents on the Homepage and make more robust queries in Incident Management Analytics. There are five default property fields:
Root CauseServicesTeamsDetection MethodSummary
If you have Datadog APM configured, the Services property field automatically leverages your APM Service names. To edit the values of Services, upload a CSV of the values you wish to associate with each field. Your CSV file must start with your field’s name in the top row, with the desired values listed immediately below it.
The Teams property field automatically populates from the teams defined in your organization.
You can add more property fields to your settings by selecting one of your existing key:value pair metric tags. When you do this, the key of your property field is the start case of your metric tag’s key (each word is capitalized and separated by spaces), and the values for the property field are equal to the values reported by the metric tag.
Property fields are organized into three tables that correspond to where the fields appear in the Overview tab of the Incident Details page:
What HappenedWhy It HappenedAttributes
You can move any property field into a different table or reorder them in the same table by dragging and dropping the field using the drag handle icon. Preview what your property fields look like by clicking the Preview button on the top right.
Custom property fields and required fields
In addition to the five default fields and the fields based on metric tags, you can also create custom property fields and mark them as required at the creation of an incident. There are four kinds of custom fields you can create:
- Single-Select: A dropdown field that can only have one value assigned at a time per incident. Values can be predefined in-line from the UI or by uploading values through a CSV file.
- Multi-Select: A dropdown field that can have multiple values assigned per incident. Values can be predefined in-line from the UI or by uploading values through a CSV file.
- Text Area: A free-form text box. Values are entered by a responder on a per-incident basis.
- Number: A text area that only accepts digits and a single period as input. Values are entered by a responder on a per-incident basis.
Single-Select, Multi-Select, and Number custom fields are searchable facets in the Incident Homepage and Incident Management Analytics for easy filtering of incidents. Number fields are measures in Incident Management Analytics that can be graphed and visualized in Dashboards and Notebooks.
Responder types
This feature is in open beta.
The responder types settings provide you with the ability to create custom roles to assign to your incident responders and to specify if those roles are meant to be held by one person or multiple people per incident. These roles are unrelated to the Role Based Access Control (RBAC) system. Responder types allow your responders to understand what their responsibilities are in an incident based on the definitions of your own incident response process. By default there are two roles:
Incident Commander- The individual responsible for leading the response teamResponder- An individual that actively contributes to investigating an incident and resolving its underlying issue
Note: The Incident Commander responder type appears in Incident Settings so that you may customize its description. Incident Commander cannot be deleted as a responder type, nor can its name or status as a One person role be changed. The Responder role is a generic fallback role if a responder is not otherwise assigned a different role, and does not appear in Incident Settings.
To create a custom responder type:
- Click the + Add Responder Type button below the table.
- Give your new responder type a name.
- Choose if the responder type is a
One person roleor aMulti person role. AOne person rolecan be held by a single person per incident, while aMulti person rolecan be held by an unlimited number of people per incident. - Give the responder type a description. This description appears in the UI for selecting a role to assign to your teammates.
- Click Save.
Integrations
The integrations settings provide additional configurations for the Incident Management features of Slack and Microsoft Teams. Navigate to Incidents > Settings and select Integrations.
Toggle the option to Automatically create a channel for each new incident to enable the following:
- Automatic Slack or Microsoft Teams channel creation for every new incident and the name template for those channels.
- Incident updates channel.
Configure either of these settings to use any Slack or Microsoft Teams workspace you have set up in your organization’s integration tile. The incident updates channel sends a message whenever an incident is declared or changes status, severity, or incident commander.
Channel name template options
Datadog recommends you keep your prefix short as Slack enforces an 80 character limit in channel names.
Changing your channel name template does not rename any existing incident channels. The new name template only applies going forward. By default, dedicated incident channels use incident-{public_id} as their name template. Add additional title options to add clarity to slack channels:
- The
incidentprefix can be changed to any string composed of lowercase letters, numbers, and dashes. - Click the Incident ID checkbox to prevent duplicate channel names.
- Click the Title of Incident checkbox to enable the Datadog Slack App to automatically rename the channel if an incident’s title changes.
Slack features
The following features are available to use with the Incident Management Slack integration. Enable or configure these options in Service Management > Incidents > Settings > Integrations.
- Mirror Slack channel messages, to import and retain all slack conversations in the incident timeline. Note: This counts every slack message commenter as a monthly active user. Alternately, push pinned message to your timeline to create a system of record for all incident-related conversations.
- You can also automatically add team members to an incident Slack channel when a team is added to the incident. Only members who have connected their Slack and Datadog accounts by running the “/datadog connect” command in Slack are added to the channel.
- Automatically archive a slack channel after a certain amount of time.
Notifications
Message templates
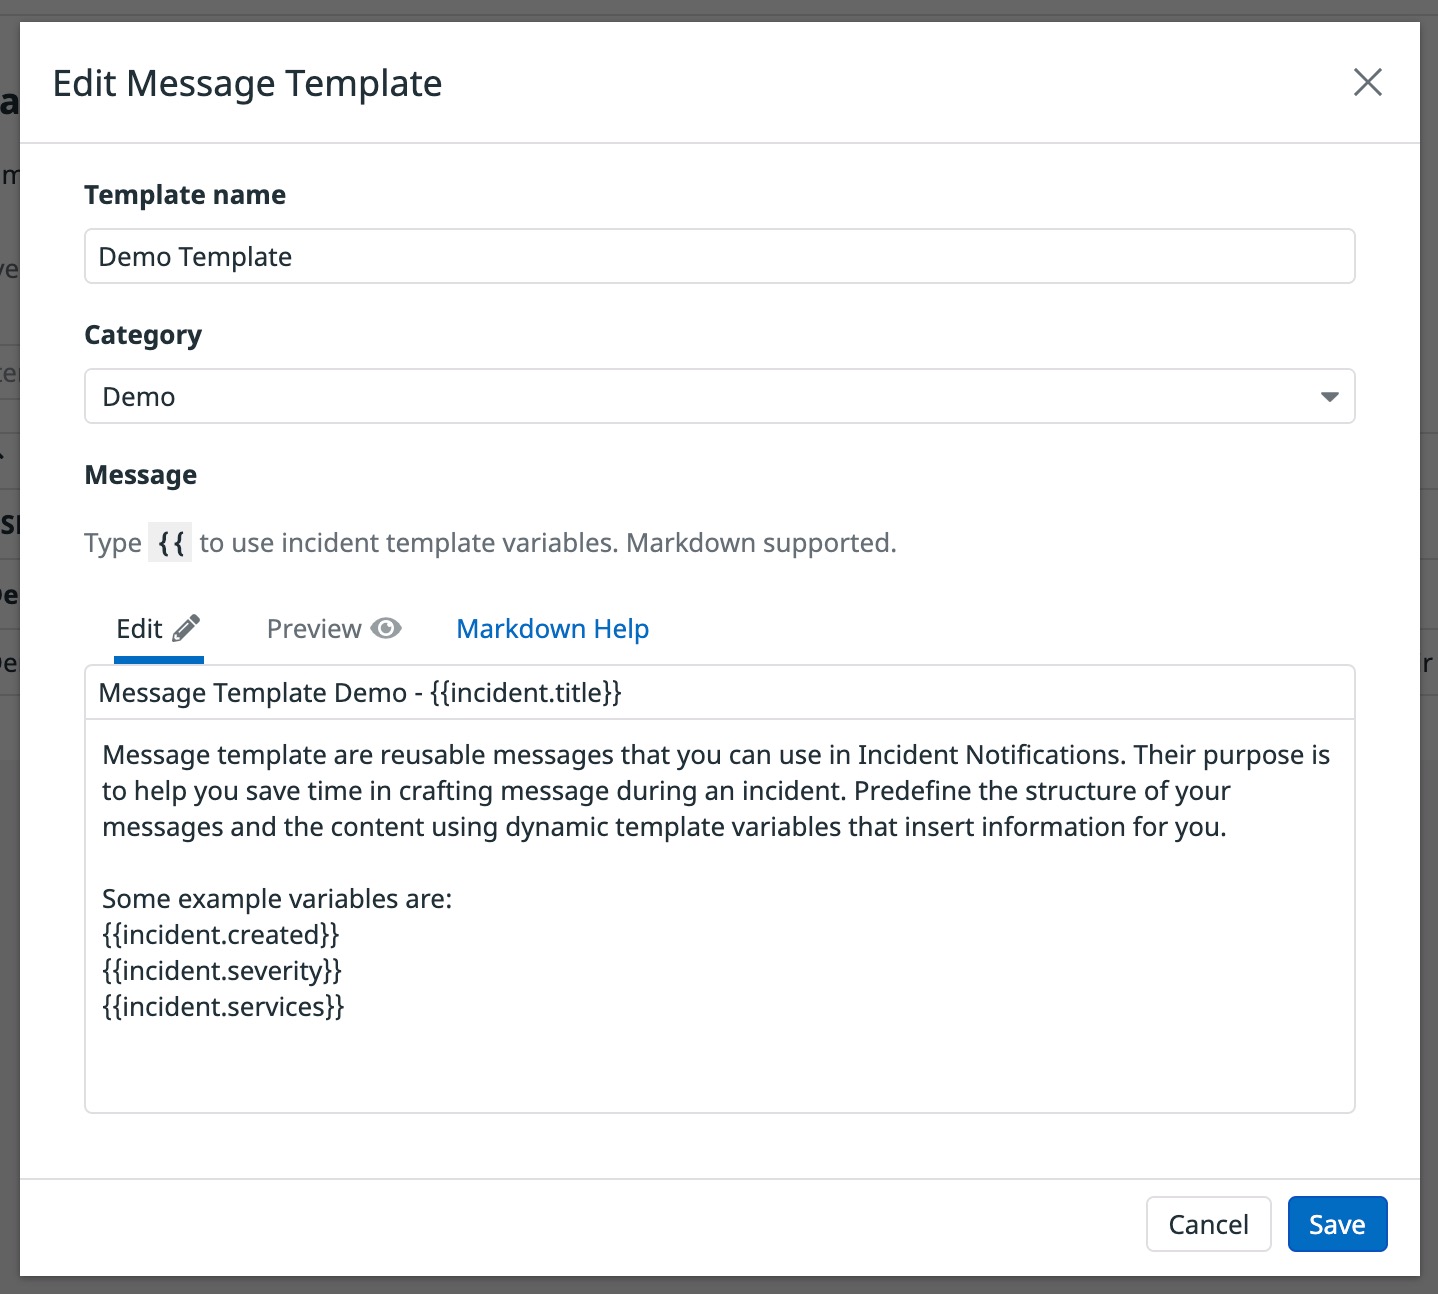
Message templates are dynamic, reusable messages that can be used in manual incident notifications, or automated notification rules. Message templates leverage template variables, such as {{incident.severity}}, to dynamically inject the corresponding value from the incident that the notification is being sent for. Message templates have Markdown support so that incident notifications can include text formatting, tables, indented lists, and hyperlinks. To better organize a large number of message templates, each template requires a category during the creation process.
To create a message template:
- Click the + New Message Template button
- Give the template a name
- Assign it a new or existing category
- Give the template a subject line (for emails)
- Write the template’s message
- Click Save
Note: Template variables are supported in both the message’s title and body.
Rules
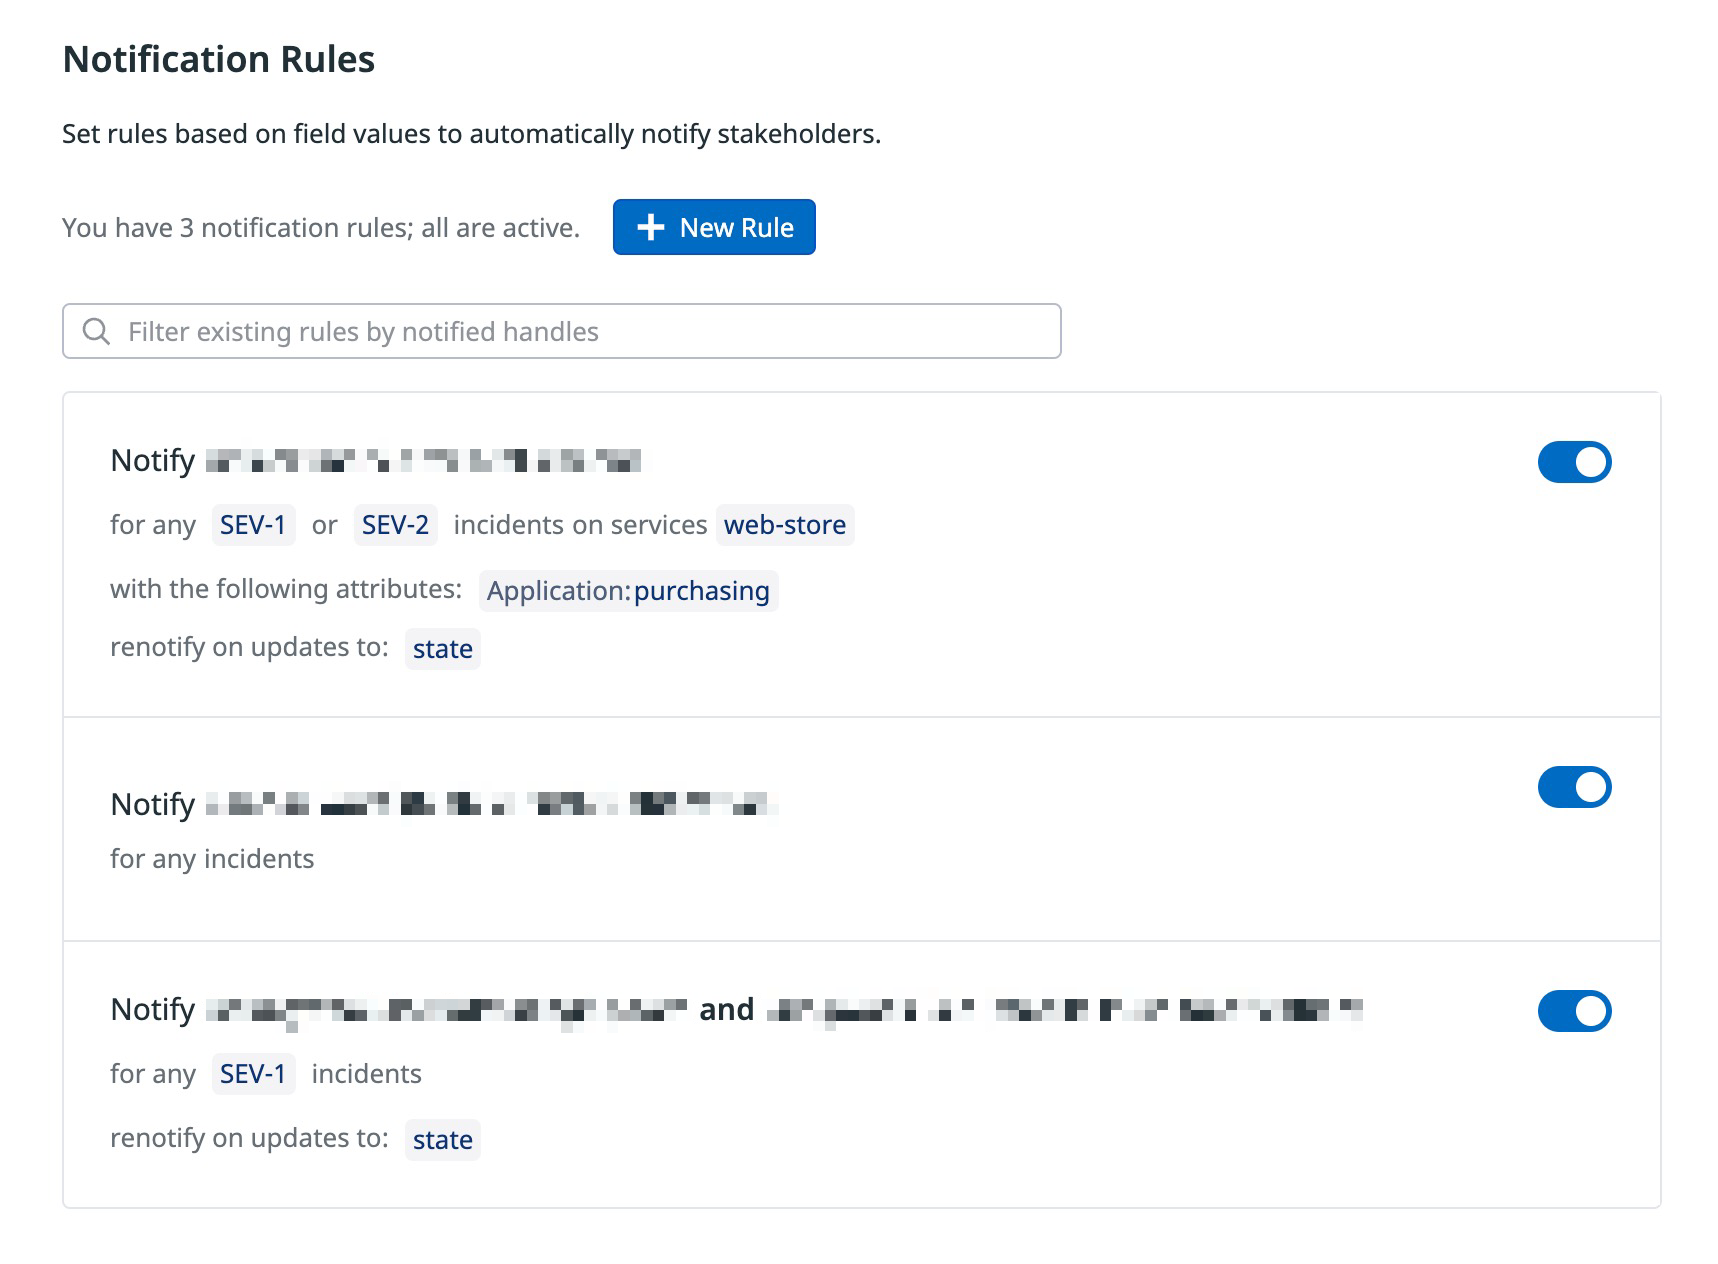
Notification rules allow you to configure scenarios when specific stakeholders should be automatically notified of an incident. You can use notification rules to ensure key stakeholders are always made aware of high priority incidents, to notify external systems whenever a new incident is declared or updated, or to notify specific responders when a particular service or team experiences an incident.
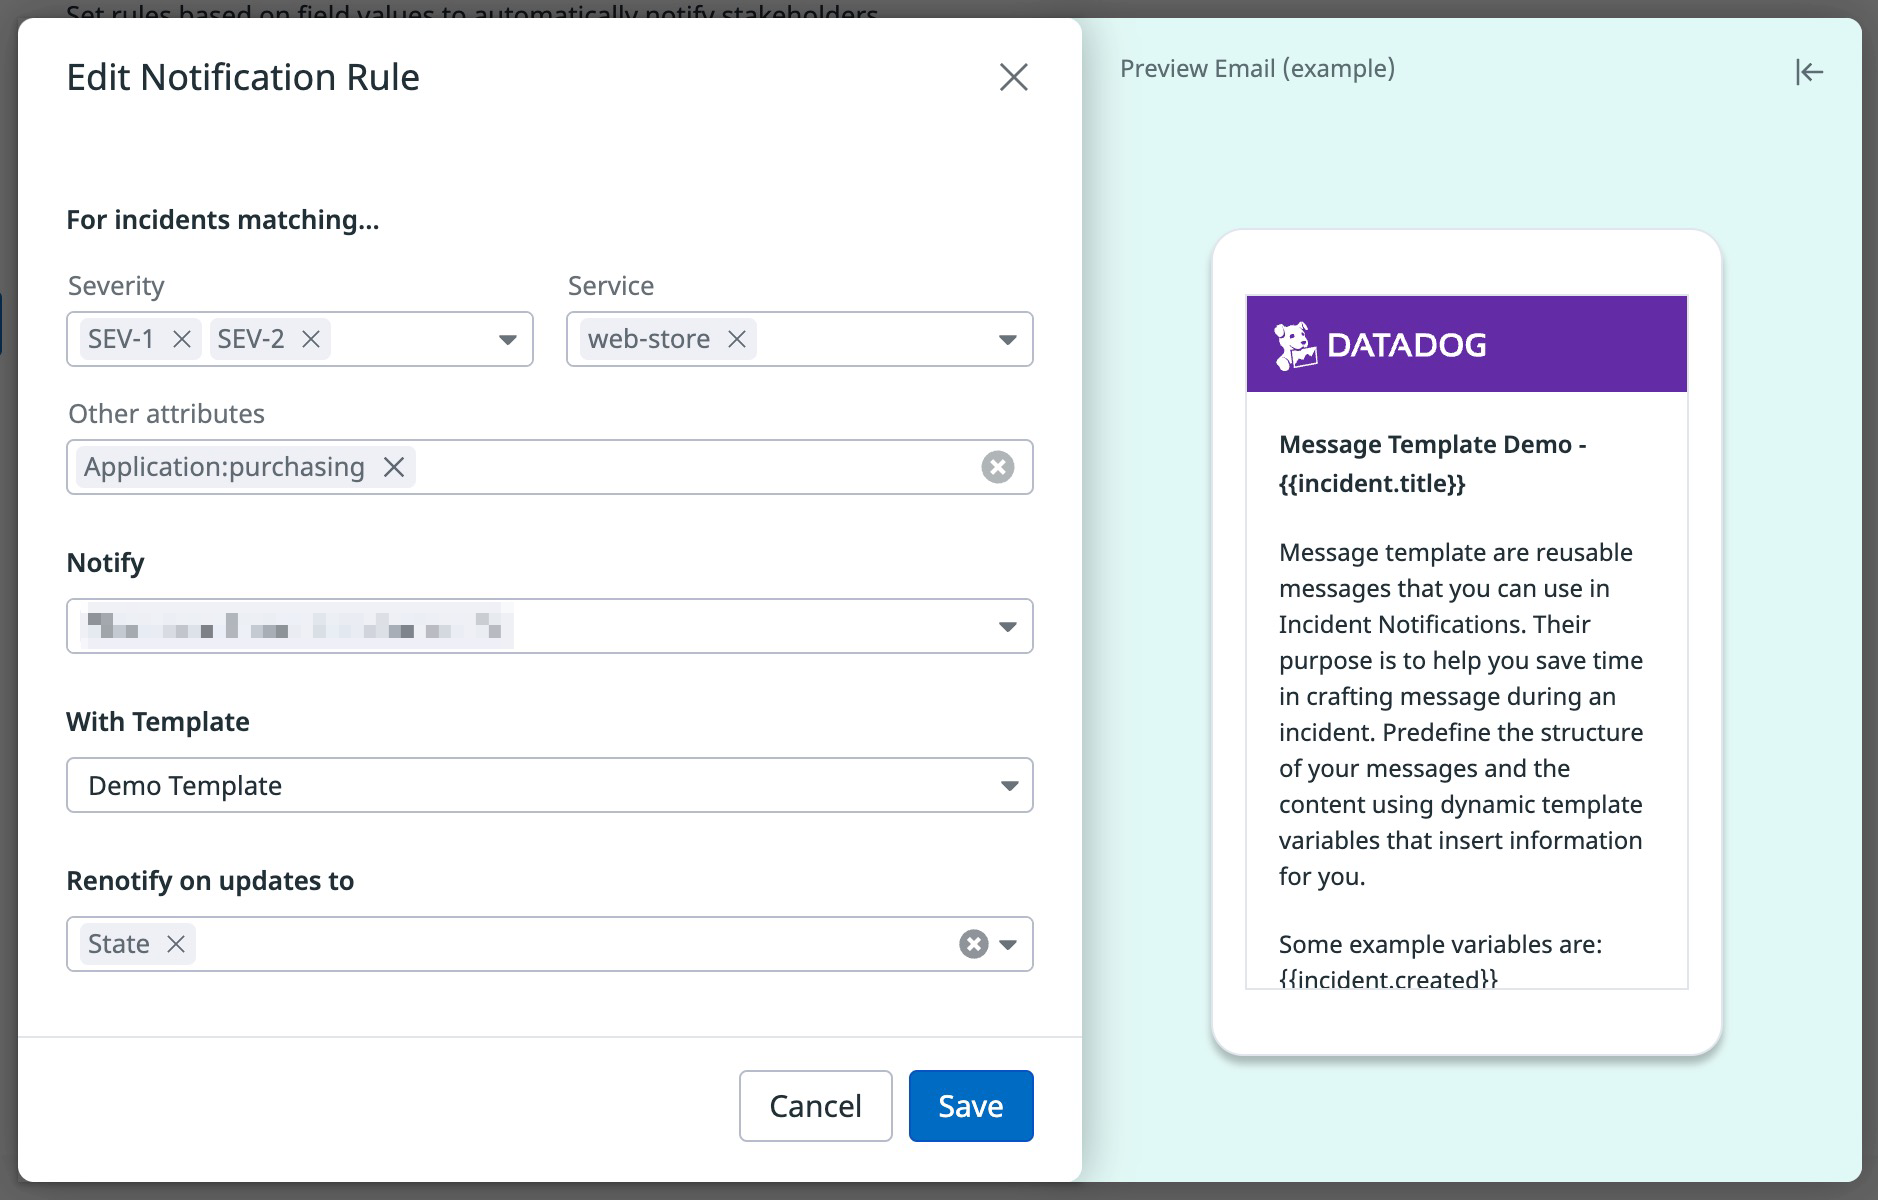
Example: Set a notification rule to automatically notify team stakeholders whenever a SEV-1 or SEV-2 for service:web-store AND application:purchasing incident is declared and when that incident moves through different states of progression.
To configure a new notification rule:
- Click New Rule.
- Under For incidents matching…, select the incident property field
key:valuepairs you want notifications to be sent for. By default, these filters are empty, and a notification rule triggers for any incident. - Notify: Select your notification recipients. Notifications can be sent to any of Datadog’s existing notification integrations. If you want to notify a recipient’s mobile device, select the option for their name that includes (Mobile Push Notification). The recipient must have enabled notifications in the Datadog mobile app for this option to appear.
- With Template: Select the desired message template you want the notification rule to use.
- Renotify on updates to: Select the incident properties that trigger notifications. A new notification is sent whenever one or more of the selected properties change. Note: properties already in your filters (see step 2) are automatically included in these rules.
- Click Save
You can perform the following operations to manage your notification rules.
- Search - Filter your list of notification rules by their recipients.
- Toggle - Enable or disable any individual notification rule by switching the toggle in that rule’s row in the list.
- Copy - Hover over any individual notification rule and click the Copy icon button next to the rule’s toggle.
- Delete - Hover over any individual notification rule and click the Delete icon button next to the rule’s toggle.
Remediation
Postmortem templates
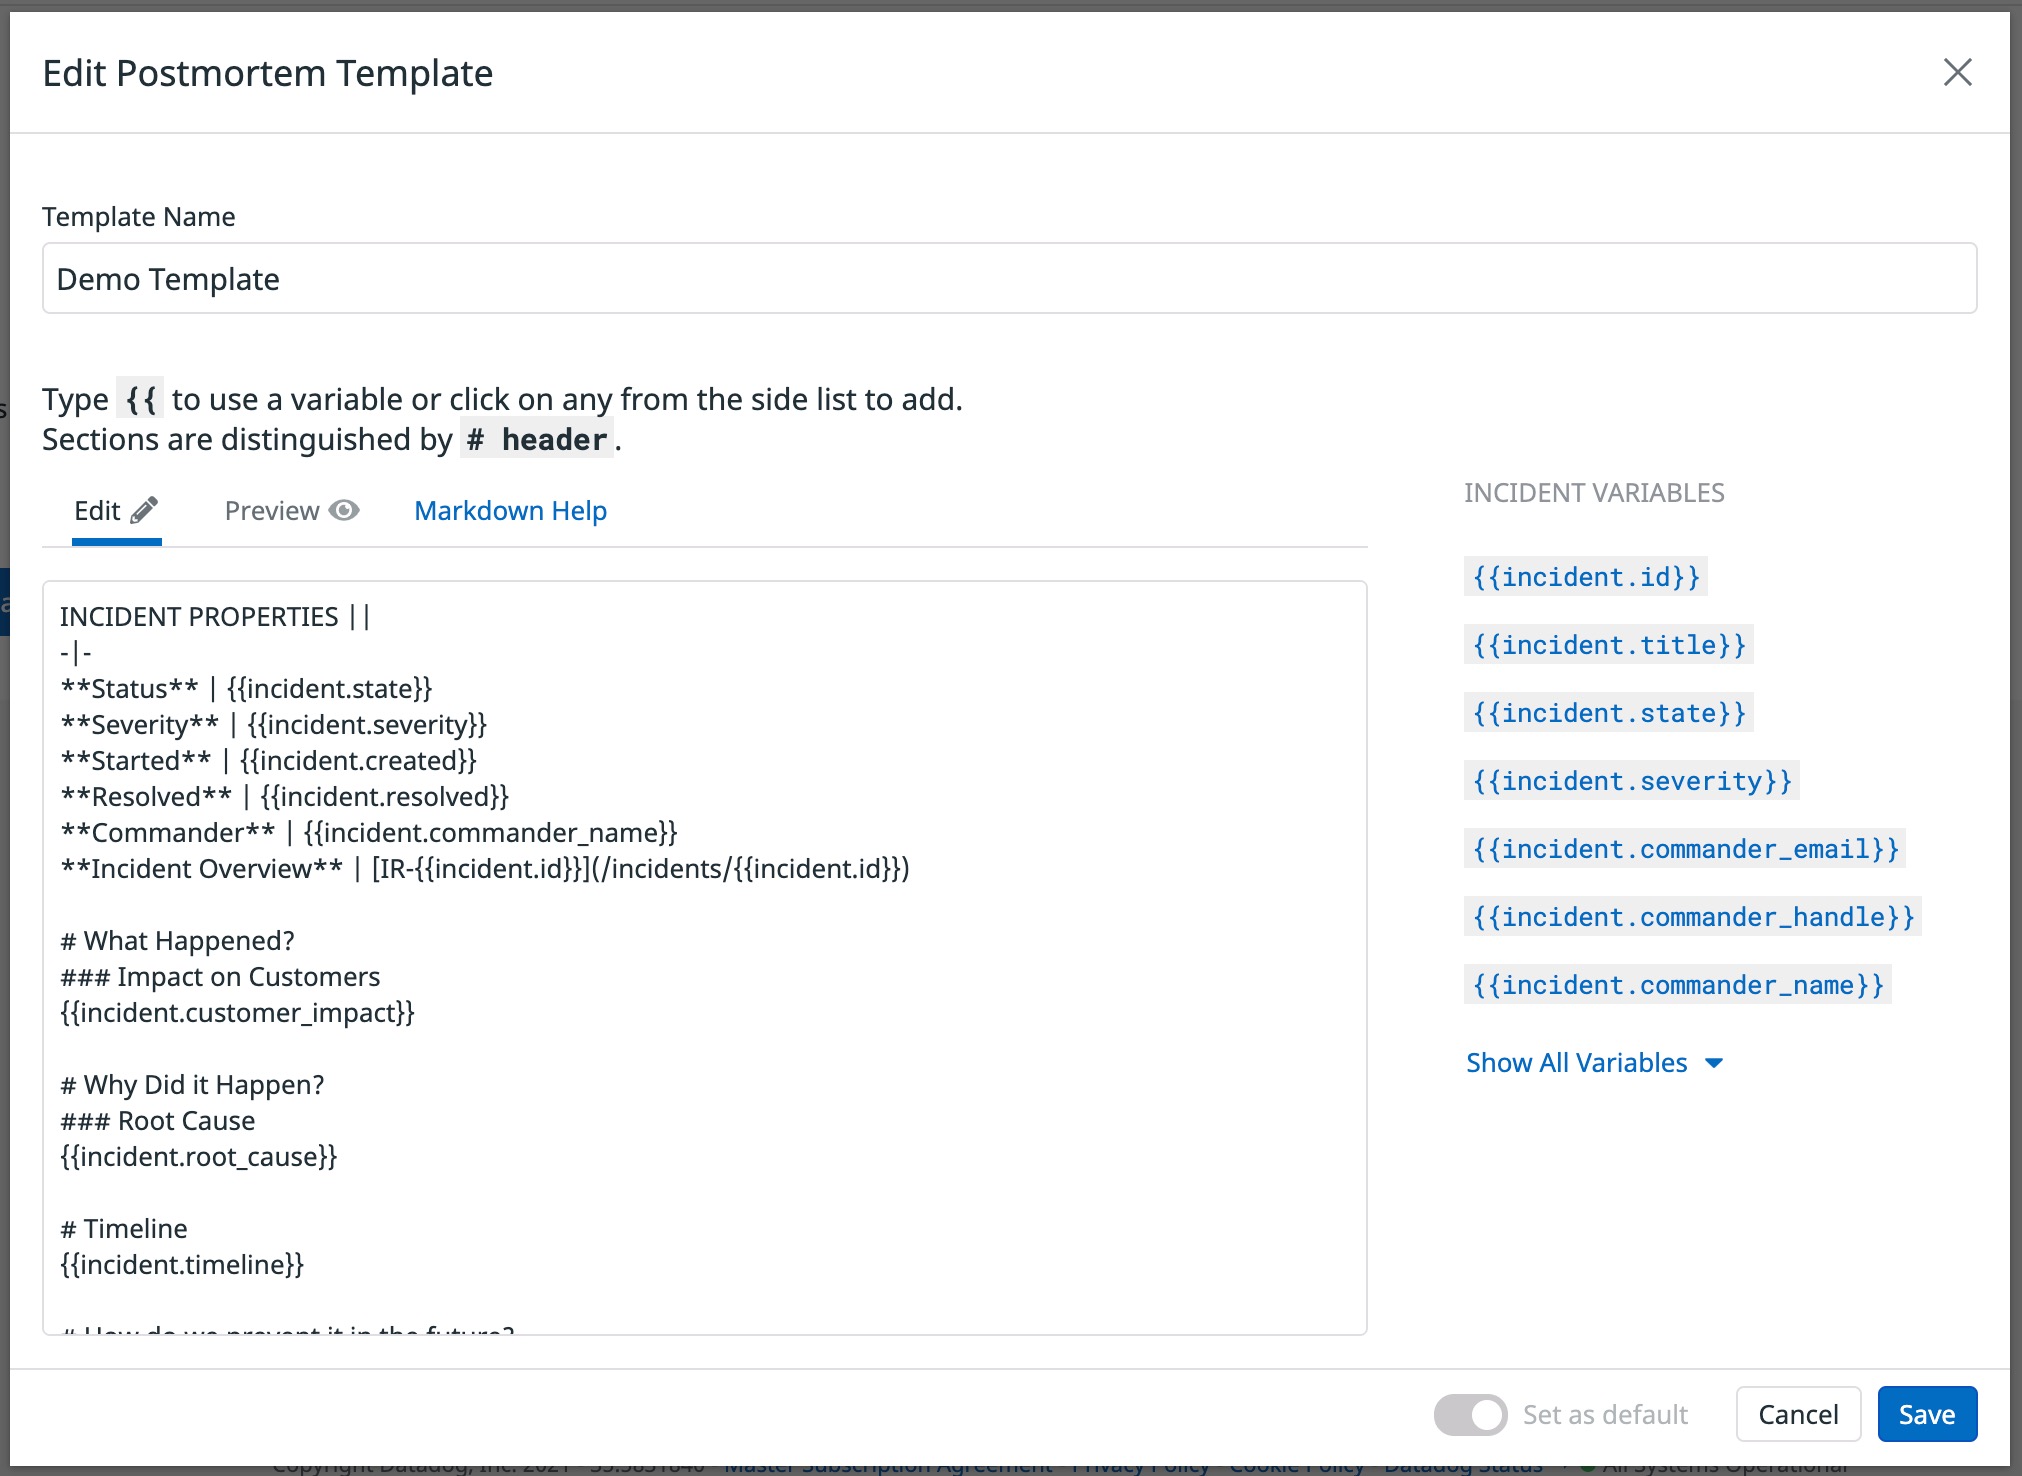
Postmortem templates are dynamic, reusable templates used to create a Datadog Notebook that is automatically populated with incident information after an incident has been resolved. Postmortem templates leverage template variables, such as {{incident.severity}}, to dynamically inject the corresponding value from the incident that the postmortem is being created for. Postmortem templates have Markdown support so that the resulting notebook includes text formatting, tables, indented lists, and hyperlinks.
To create a postmortem template:
- Click the + New Postmortem Template button
- Give the template a name
- Write the template’s content (available template variables are listed to the right of the textbox)
- (Optional) Set the template as the default
- Click Save
