- 重要な情報
- はじめに
- Datadog
- Datadog サイト
- DevSecOps
- AWS Lambda のサーバーレス
- エージェント
- インテグレーション
- コンテナ
- ダッシュボード
- アラート設定
- ログ管理
- トレーシング
- プロファイラー
- タグ
- API
- Service Catalog
- Session Replay
- Continuous Testing
- Synthetic モニタリング
- Incident Management
- Database Monitoring
- Cloud Security Management
- Cloud SIEM
- Application Security Management
- Workflow Automation
- CI Visibility
- Test Visibility
- Intelligent Test Runner
- Code Analysis
- Learning Center
- Support
- 用語集
- Standard Attributes
- ガイド
- インテグレーション
- エージェント
- OpenTelemetry
- 開発者
- 認可
- DogStatsD
- カスタムチェック
- インテグレーション
- Create an Agent-based Integration
- Create an API Integration
- Create a Log Pipeline
- Integration Assets Reference
- Build a Marketplace Offering
- Create a Tile
- Create an Integration Dashboard
- Create a Recommended Monitor
- Create a Cloud SIEM Detection Rule
- OAuth for Integrations
- Install Agent Integration Developer Tool
- サービスのチェック
- IDE インテグレーション
- コミュニティ
- ガイド
- API
- モバイルアプリケーション
- CoScreen
- Cloudcraft
- アプリ内
- Service Management
- インフラストラクチャー
- アプリケーションパフォーマンス
- APM
- Continuous Profiler
- データベース モニタリング
- Data Streams Monitoring
- Data Jobs Monitoring
- Digital Experience
- Software Delivery
- CI Visibility (CI/CDの可視化)
- CD Visibility
- Test Visibility
- Intelligent Test Runner
- Code Analysis
- Quality Gates
- DORA Metrics
- セキュリティ
- セキュリティの概要
- Cloud SIEM
- クラウド セキュリティ マネジメント
- Application Security Management
- AI Observability
- ログ管理
- Observability Pipelines(観測データの制御)
- ログ管理
- 管理
Run Workflow Widget
このページは日本語には対応しておりません。随時翻訳に取り組んでいます。翻訳に関してご質問やご意見ございましたら、お気軽にご連絡ください。
Overview
The Run Workflow widget allows you to automate critical tasks from dashboards. Trigger your workflows from a dashboard at the point you become aware of an issue affecting the health of your system. This keeps your systems up and running by improving the time to resolution and reducing the possibility of errors.
Configuration
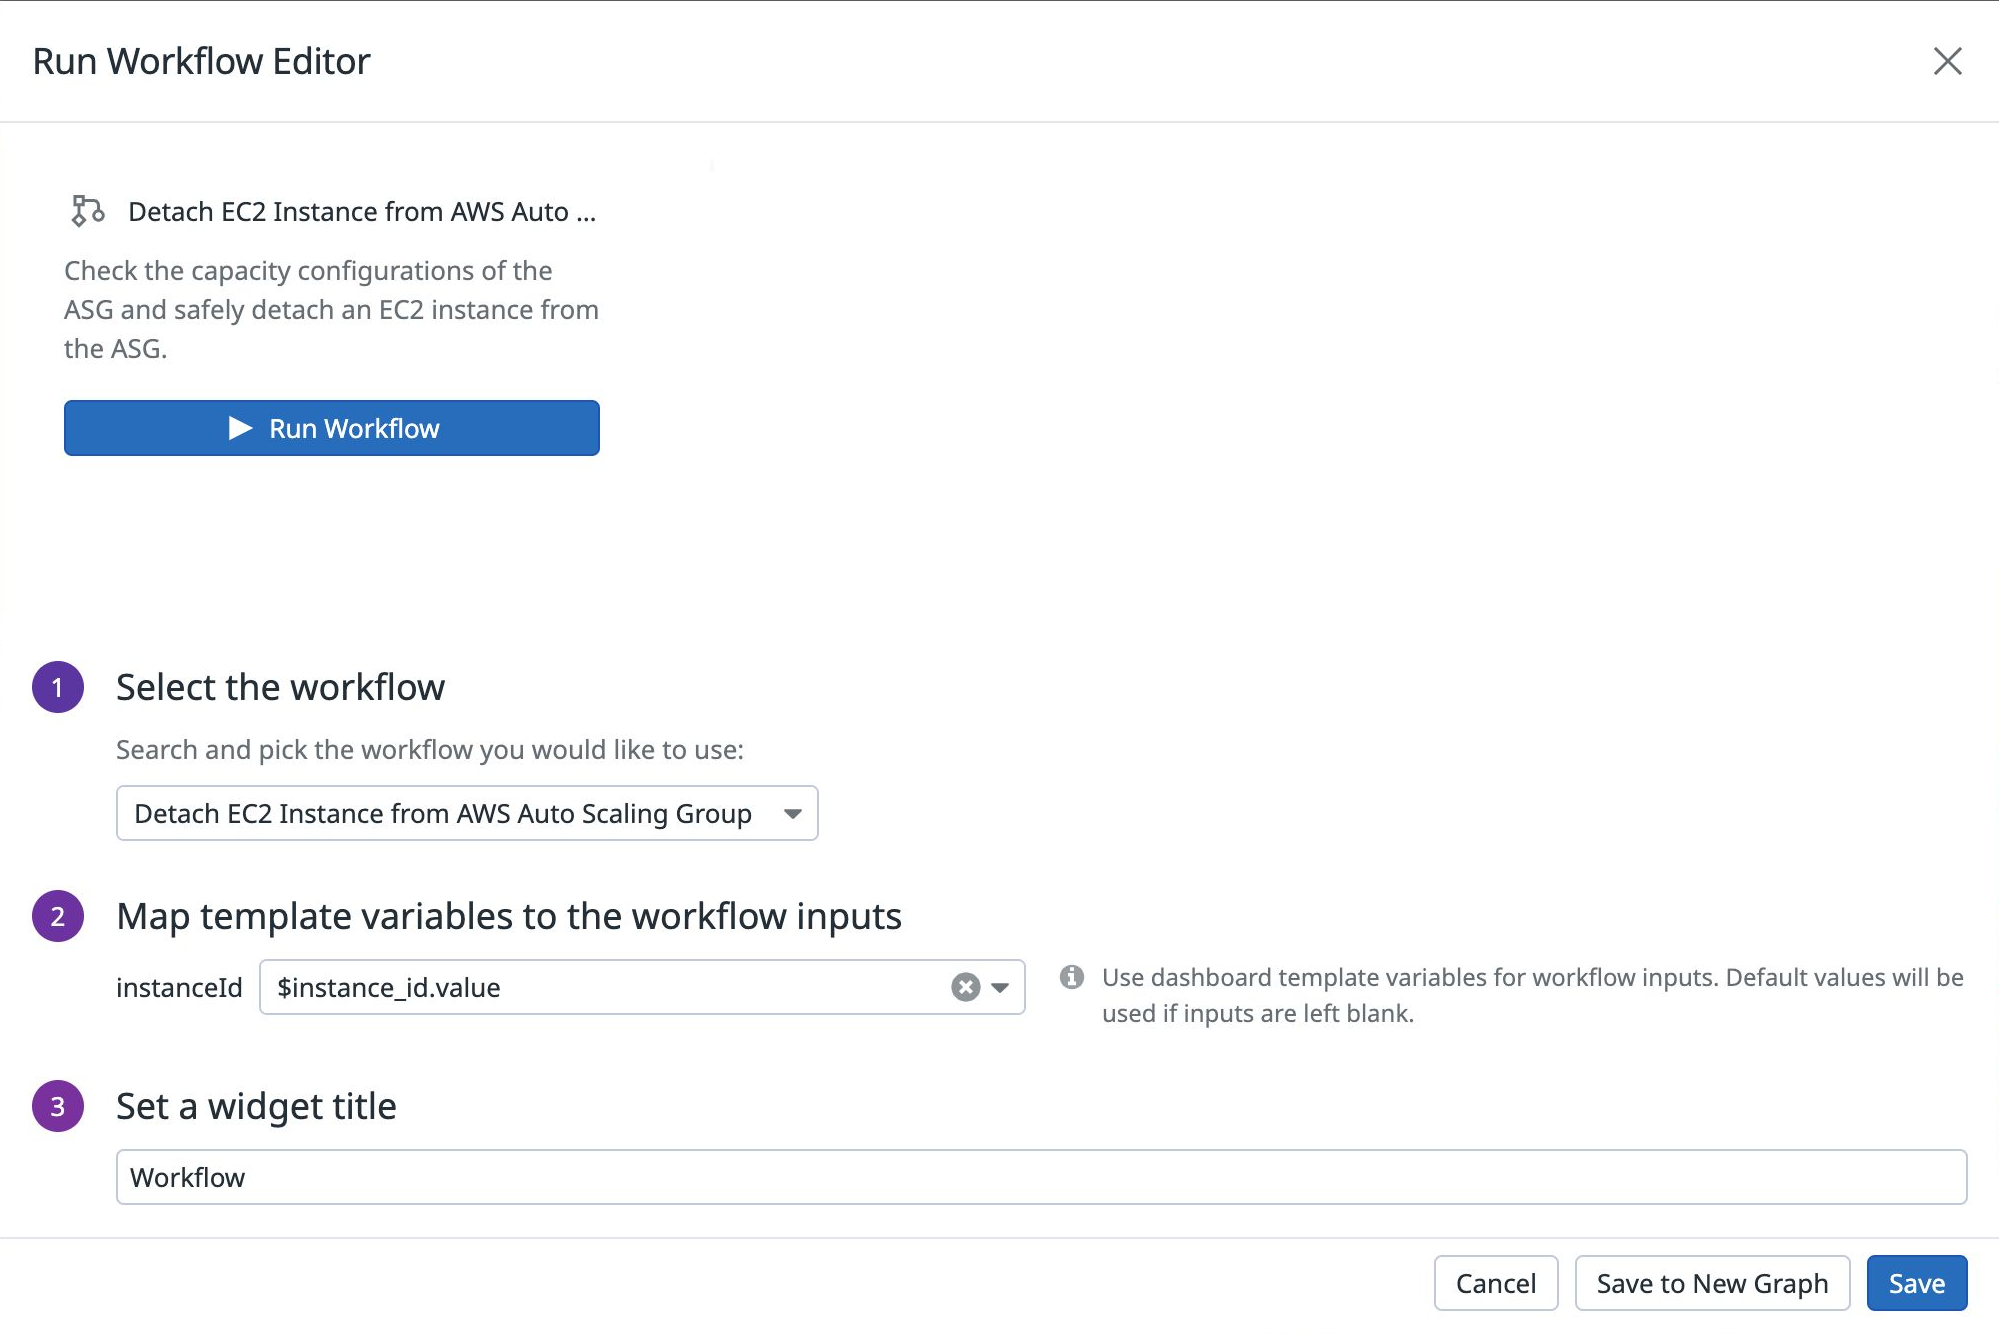
- Under Select the workflow, find your workflow in the dropdown menu.
- Map dashboard template variables to workflow input parameters. This allows the values of your dashboard template variables to be mapped directly to the input parameters when you run the workflow.
- Enter a title for the widget and click Save.
To run the workflow:
- Click Run Workflow on your dashboard widget.
- Under Execution parameters, any template variables you mapped to workflow inputs are automatically populated. Enter the values for any unmapped execution parameters, or edit the existing values if needed.
- Click Run to run the workflow.
API
This widget can be used with the Dashboards API. See the following table for the widget JSON schema definition:
フィールド
種類
説明
custom_links
[object]
List of custom links.
is_hidden
boolean
The flag for toggling context menu link visibility.
label
string
The label for the custom link URL. Keep the label short and descriptive. Use metrics and tags as variables.
link
string
The URL of the custom link. URL must include http or https. A relative URL must start with /.
override_label
string
The label ID that refers to a context menu link. Can be logs, hosts, traces, profiles, processes, containers, or rum.
inputs
[object]
Array of workflow inputs to map to dashboard template variables.
name [required]
string
Name of the workflow input.
value [required]
string
Dashboard template variable. Can be suffixed with '.value' or '.key'.
time
<oneOf>
Time setting for the widget.
Option 1
object
Wrapper for live span
live_span
enum
The available timeframes depend on the widget you are using.
Allowed enum values: 1m,5m,10m,15m,30m,1h,4h,1d,2d,1w,1mo,3mo,6mo,week_to_date,month_to_date,1y,alert
Option 2
object
Used for arbitrary live span times, such as 17 minutes or 6 hours.
type [required]
enum
Type "live" denotes a live span in the new format.
Allowed enum values: live
unit [required]
enum
Unit of the time span.
Allowed enum values: minute,hour,day,week,month,year
value [required]
int64
Value of the time span.
Option 3
object
Used for fixed span times, such as 'March 1 to March 7'.
from [required]
int64
Start time in seconds since epoch.
to [required]
int64
End time in seconds since epoch.
type [required]
enum
Type "fixed" denotes a fixed span.
Allowed enum values: fixed
title
string
Title of your widget.
title_align
enum
How to align the text on the widget.
Allowed enum values: center,left,right
title_size
string
Size of the title.
type [required]
enum
Type of the run workflow widget.
Allowed enum values: run_workflow
default: run_workflow
workflow_id [required]
string
Workflow id.
{
  "custom_links": [
    {
      "is_hidden": false,
      "label": "Search logs for {{host}}",
      "link": "https://app.datadoghq.com/logs?query={{host}}",
      "override_label": "logs"
    }
  ],
  "inputs": [
    {
      "name": "Environment",
      "value": "$env.value"
    }
  ],
  "time": {
    "live_span": "5m"
  },
  "title": "string",
  "title_align": "string",
  "title_size": "string",
  "type": "run_workflow",
  "workflow_id": "<workflow_id>"
}
Further reading
お役に立つドキュメント、リンクや記事:

